- Introduction
- Installation
- Getting started
- User Views
- Saving the current table configuration into a User View
- Editing a User View's name, icon, color or visibility
- Editing a User View's table configuration
- Deleting a User View
- Sorting a view
- User View configurations
- Disable User Views (New)
- Configuring the User View model
- Configuring the Managed User View class
- Disabling the icon picker
- Excluding solid or outline icons
- Configuring the color picker colors (New)
- Disabling the color picker
- Making a User View favorite
- Disabling making a User View favorite
- Making a User View public
- Disabling making a User View public
- Enabling making a User View a global favorite
- Disabling management of global favorite views (New)
- Configuring new global user view's sort position (New)
- Showing/hiding helper text
- Approving public and global favorite User Views
- Persisting the active User View to Session
- Preset Views
- Filament Filter Tabs
- Creating a Preset View
- Customizing the Preset View label
- Adding a Preset View to the Favorites Bar
- Adding an icon
- Display the Preset View with a color
- Adding a badge
- Changing the badge color
- Adding a tooltip
- Showing or hiding
- Applying filters
- Applying filters with Filter Builder
- Applying default grouping
- Toggling and reordering columns
- Setting a default table sort
- Setting a default table multi-sort (New)
- Loading a default Preset View
- Preserving user selected filters, toggled columns, sort column, and sort direction
- Preset Views configurations
- Favorites Bar
- Quick Save
- View Manager
- Using the view manager
- View Manager configurations
- Changing the position in the Favorites Bar
- Displaying in the table toolbar
- Changing the position in the table toolbar
- Displaying as a button with a label
- Changing the button and icon size
- Displaying the button outlined
- Displaying as a SlideOver
- Disabling the View Manager
- Changing the icon
- Icon position
- Hiding the active view badge indicator
- Hiding the search field
- Displaying a Save View link
- Displaying a Reset link
- Disabling Click to Apply
- Hiding the Apply button
- Hiding the Active View Indicator
- Displaying the Active View indicator a badge
- Hiding the view type icons
- Displaying view types as badges
- Displaying both public and global view type indicators
- Hiding the user icon
- Changing the default view icon
- Reorderable Columns
- Managed Default Views (New)
- Multi-Sort (New)
- Quick Filters (New)
- Advanced Filter Builder
- Using Advanced Filter Builder
- Enabling Column Filters
- Column Filter types
- Automatic column mapping
- Customizing filters
- Using filters alongside Advanced Filter Builder
- Including columns
- Excluding columns
- Setting the default filters
- Disabling Or Groups
- Layout options
- Customizing the Expand View Link Position
- Always opening the filter as a slideOver
- Adding icons to the Filter Picker
- Enabling search in the Filter Picker
- Configuring the number of Filter Picker columns
- Configuring the Filter Picker width
- Configuring the maximum height of the Filter Picker
- Hiding the filter indicator group labels
- Customizing the sequence of filter indicator group colors
- Customizing the buttons and labels
- Multi-Tenancy
- User Views Resource
- Easily toggling a views public, or global setting
- User Views Resource configurations
- Authorization
- Additional Configurations
- Filament Table Builder
- Support
- Changelog
- Contributing
- Credits
- License

#Introduction
Advanced Tables is a premium plugin for Filament that supercharges your tables with powerful features like user customizable views, enhanced filter tabs, convenient view management, quick filters, filter builder, and more.
#Video
Check out a short video of some of the powerful features included in Advanced Tables

#Demo
See all the functionality that Advanced Tables has to offer in an interactive demo. It also includes a Configuration Playground so you can see many of the configuration options you can use to adapt the plugin to your needs.
#About
At its core, Advanced Tables allows you to combine filters, grouping, toggled columns, and more into custom views that are just one click away. Users no longer have to rebuild their views each time they need to focus on a certain subset of their data. Advanced Tables gives your users fast access to the information they need.
With Advanced Tables, views can be set up in advance by the developer or they can be created on-the-fly by your end-users using Quick Save. And with Advanced Table’s View Manager, your users will be able to conveniently create, apply, edit, share, and sort their views right from the resource or table.
Best of all, Advanced Tables works with all of your Filament tables including Resource Tables, Relation Managers, Table Widgets, and standalone Table Builder.
#Features
- Allow your users to save their filters, toggled columns, grouping, and more in customizable User Views
- Developers can create Preset Views in code and deploy them for their clients
- Preset Views can also include filters, grouping, toggled columns, and column order
- The Quick Save button means saving custom views is just one click away
- Enhance your tables with Advanced Column Reordering
- (NEW) Managed Default Views
- Create powerful queries with Advanced Filter Builder
- Easily access views in the Favorites Bar
- Sort, favorite, and edit views on the table using the View Manager
- SlideOver, modal, and dropdown options
- Choose from six different themes
- (NEW) Table loading skeleton overlay
- (NEW) Sort by multiple table columns with Multi Sort
- (NEW) Quickly access your filters with Quick Filters
- (Coming Soon) Support for Filament's new Modal Table Select
- Supports Multi-tenancy
- Includes a User Views Resource so your admins can manage all user views
- Users can make their User Views publicly available to all users
- Easily create and export reports from your customized views with Excel Export
- Admins can create global favorite views that will appear for all users
- Powerful policy integration gives you complete control
- Includes an approval system for User Views
- More than 60 configuration options to completely customize Advanced Tables to your needs
- Supports Panel Resource Tables, Relation Managers, Table Widgets, and Standalone Table Builder
- Full support for dark mode
- Support for translated filter indicators
#Screenshots
Favorites Bar

View Manager
Quick Save

User Views Resource with Approval System

View Manager in Table Toolbar

Dark mode

#Themes
Github theme (New)
Filament theme (New)

Links theme

Links Simple theme

Tabs theme

Tabs Simple theme

#Installation
Thank you for purchasing Advanced Tables!
Below you'll find extensive documentation on installing and using this plugin. Of course, if you have any questions, find a bug, need support, or have a feature request, please don't hesitate to reach out to me at advancedtables@gmail.com.
#Requirements
Advanced Tables requires PHP 8.2+, MySQL 5.7.8+ or Postgres, Filament 5.0.0+, and Laravel 11.28+.
#New Installation
#Activating your license on AnyStack
Advanced Tables uses AnyStack to handle payment, licensing, and distribution.
During the purchasing process, AnyStack will provide you with a license key. You will also be asked by AnyStack to activate your license by providing a domain. This is usually the domain of where your final project will live. You’ll use this same domain to install locally and in production. Once you have provide a domain, your license key will be activated and you can proceed with installing with composer below.
Tip: If you missed this step, or if you need to add additional domains for other projects, you can access the activation page by going to Transactions in your AnyStack account and then clicking
View detailson the Advanced Tables product.
Tip: You will need both your
license keyand yourdomainto authenticate when you install the package with composer.
#Installing with Composer
To install Advanced Tables you'll need to add the package to your composer.json file:
{ "repositories": [ { "type": "composer", "url": "https://filament-filter-sets.composer.sh" } ],}Advanced Tables was formerly named Filament Filter Sets, but for compatibility with previous versions, the repository has maintained its original name.
Once the repository has been added to your composer.json file, you can install Advanced Tables like any other composer package using the composer require command:
composer require archilex/filament-filter-sets:"^5.0"Next, you will be prompted to provide your username and password.
Loading composer repositories with package informationAuthentication required (filament-filter-sets.composer.sh):Username: [licensee-email]Password: [license-key]Your username will be your email address and the password will is your license key, followed by a colon (:), followed by the domain you are activating. For example, let's say we have the following email and license activation:
- Contact email: my_email@gmail.com
- License key: 8c21df8f-6273-4932-b4ba-8bcc723ef500
- Activation fingerprint: my_domain.com
You will need to enter the above information as follows when prompted for your credentials:
Loading composer repositories with package informationAuthentication required (filament-filter-sets.composer.sh):Username: my_email@gmail.comPassword: 8c21df8f-6273-4932-b4ba-8bcc723ef500:my_domain.comThe license key and fingerprint should be separated by a colon (:).
Tip: If you get a
402 error, most likely you forgot to add the colon and fingerprint.
#Setting up Advanced Tables in Filament Panels (including Relation Managers, Table Widgets, and Panel Pages)
If using Filament's standalone Table Builder, please refer to the Filament Table Builder setup instructions
-
Publish and run the migrations
Important: If you are using a User class other than Laravel's default
User::classor a user's table other than Laravel's defaultusersyou should update these configurations before migrating.php artisan vendor:publish --tag="advanced-tables-migrations"php artisan migrate -
Publish the language files
Optionally, you may publish the language files:
php artisan vendor:publish --tag="advanced-tables-translations" -
Add Advanced Tables to your Filament Panel
Add Advanced Tables to a panel by instantiating the plugin class and passing it to the
plugin()method of the configuration:use Archilex\AdvancedTables\Plugin\AdvancedTablesPlugin;public function panel(Panel $panel): Panel{return $panel->plugins([AdvancedTablesPlugin::make()])} -
Add the
HasViewstrait to yourUser::classuse Archilex\AdvancedTables\Concerns\HasViews;class User{use HasViews;} -
Integrate Advanced Table's Tailwind and css files
IMPORTANT: Filament v4 requires you create a custom theme to support a plugin's additional Tailwind classes. Be sure to follow those instructions before continuing with this step.
After you have created your custom theme, add Advanced Tables' views to your new theme's
theme.cssfile usually located inresources/css/filament/admin/theme.css:@import '../../../../vendor/filament/filament/resources/css/theme.css';@import '../../../../vendor/archilex/filament-filter-sets/resources/css/plugin.css'; // Add@source '../../../../app/Filament';@source '../../../../resources/views/filament';@source '../../../../vendor/archilex/filament-filter-sets'; // Add -
Compile
Next, compile your theme:
npm run buildFinally, run the Filament upgrade command:
php artisan filament:upgrade -
Setting up tenancy
If you are installing Advanced Tables into a multi-tenancy application, please refer to the separate instructions to set up multi-tenancy.
After you've successfully installed Advanced Tables, you may review the Getting Started guide to learn how to add Advanced Tables to your resources, relation managers, pages, and/or table widgets.
#Setting up Advanced Tables in Filament Table Builder
If using Filament Panels, please refer to the Filament Panels setup instructions.
Important: Beyond the normal requirements, using Advanced Tables with Filament Table Builder requires you have some type of user authentication system such as Laravel Breeze since each view belongs to the currently authenticated user.
-
Publish the config files
While optional, it is recommended you publish the config file to be able to fully customize Advanced Table. However, If you are using a User class other than Laravel's default
User::classor a user's table other than Laravel's defaultusersyou should publish the config file and update these configurations before migrating.php artisan vendor:publish --tag="advanced-tables-config" -
Publish the language files
Optionally, publish the language files:
php artisan vendor:publish --tag="advanced-tables-translations" -
Publish and run the migrations
php artisan vendor:publish --tag="advanced-tables-migrations"php artisan migrate -
Add the
HasViewstrait to yourUser::classuse Archilex\AdvancedTables\Concerns\HasViews;class User{use HasViews;} -
Integrate Advanced Tables's custom css file
Add the following line to the top of your
app.cssfile:@import '../../vendor/archilex/filament-filter-sets/resources/css/plugin.css'; // Add@source '../../vendor/archilex/filament-filter-sets'; // Add -
Compile
Next, compile your theme:
npm run buildFinally, run the Filament upgrade command:
php artisan filament:upgrade -
Setting up tenancy
If you are installing Advanced Tables into a multi-tenancy application, please refer to the separate instructions to set up multi-tenancy.
After you've successfully installed Advanced Tables, you may review the Getting Started guide to learn how to add Advanced Tables to your tables.
#Deploying
When deploying, it is not advised to store your `auth.json`` file inside your project's version control repository. To store your credentials on your deployment server you may create a Composer auth.json file in your project directory using the following command:
composer config http-basic.filament-filter-sets.composer.sh your_account_email your_license_key_including_your_fingerprint_domainImportant: Don't forget to append a colon (:) and your fingerprint domain to your password.
You can see your credentials in your Anystack account: Anystack > Transactions > View details next to Filament Filter Sets.
Tip: Make sure the
auth.jsonfile is in.gitignoreto avoid leaking credentials into your git history.
If you are using Laravel Forge, you don't need to create the auth.json file manually. Instead, you can set the credentials on the Composer Package Authentication screen of your server.
#Fixing deployment errors
-
The most common mistake when deploying, is not adding the colon (:) followed by the domain you registered.
license_key:domain. Please review the instructions above. -
If you have set up everything correctly and are getting the error:
../advanced-tables-for-filament-3.7.29.zip' URL required authentication (HTTP 401). You must be using the interactive console to authenticateerror, you may need to ssh into your server and clear your composer global cache withcomposer clear-cache
#Upgrading to v5
Before upgrading to Advanced Tables v5, first be sure you are familiar with Filament's upgrade guide and know what changes will be needed along the way.
-
Update the dependency
Before running Filament's upgrade script, you'll want to update your
composer.jsonfile:"archilex/filament-filter-sets": "^5.0",Then proceed with running Filament's upgrade script.
Note: If you are upgrading from Filament v4 then you may stop here. However, if you are updating from Filament v3 directly to v5, then you should continue with the steps below. You should also be familiar with Filament's v4 upgrade guide.
-
Integrate Filter Set's Tailwind and css files
Follow Filament's instructions to upgrade your custom theme and add Advanced Tables' css to your theme:
@import '../../../../vendor/filament/filament/resources/css/theme.css';@import '../../../../vendor/archilex/filament-filter-sets/resources/css/plugin.css'; // Add@source '../../../../app/Filament';@source '../../../../resources/views/filament';@source '../../../../vendor/archilex/filament-filter-sets'; // Add -
Publish and run the migrations
Filament v4 has significant changes to the table columns structure to support reorderable columns and your current user views need to be upgraded to support the new structure. Publish and run the migration to update your user views to support this new structure.
IMPORTANT: Backup your user views database table called
filament_filter_setBEFORE proceeding.php artisan vendor:publish --tag="advanced-tables-migrations"php artisan migrate -
Compile
Next, compile your theme:
npm run buildand run the Filament upgrade command:
php artisan filament:upgrade
#Important Changes
Listed below are changes that have occurred in v4 that may require attention by the developer.
#Advanced Indicators
Advanced Indicators has been renamed to Quick Filters. If you are using this feature from v3, you will need to update your plugin config from advancedIndicatorsEnabled() to quickFiltersEnabled().
#Default View
In v3, the default view was an html button that was added to the front of the favorites bar. In v4 this has been replaced with a default Preset View. This allows the default view to appear in the View Manager and, if enabled, allows the user to select a different default view.
If you have a Preset View with the key default and also want to display the internal default view, then you will need to rename your default key to something different as your preset view will override the internal default view.
If, per previous recommendations for Managed Default Views, you had disabled the default view and created a Preset View with the key default, this is no longer needed. You can re-enable default views, and remove the default Preset View you created. You can customize the default view using the existing internal methods
#Getting started
#Adding Advanced Tables to your table
To use Advanced Tables you will need to add the AdvancedTables trait to the appropriate class depending on whether you intend to use it on a Resource Table, Simple Resource Table, Table Widget, or Panel Page.
Important: For standalone Table Builder users, please refer to the documentation for using Advanced Tables with Table Builder.
#Resource tables
To add Advanced Tables to a normal Resource table, add the AdvancedTables trait to the List page of your Resource:
use Archilex\AdvancedTables\AdvancedTables; class ListProducts extends ListRecords{ use AdvancedTables;#Simple (modal) resource tables
To add Advanced Tables to a Simple (modal) resource table, add the AdvancedTables trait to the Manage page:
use Archilex\AdvancedTables\AdvancedTables; class ManagesCustomers extends ListRecords{ use AdvancedTables;#Table Widgets
To add Advanced Tables to a Table Widget, add the AdvancedTables trait to the Table widget:
use Archilex\AdvancedTables\AdvancedTables; class LatestOrders extends BaseWidget{ use AdvancedTables;#Panel Pages
To add Advanced Tables to a Panel Page, you need to add the AdvancedTables trait to your component. However, as Advanced Tables overrides multiple methods in Filament's InteractsWithTables trait, adding the AdvancedTables trait to the table will cause a conflict.
For convenience, Advanced Tables includes a PanelPage class which you can use to quickly get up and running:
use Archilex\AdvancedTables\AdvancedTables;use Archilex\AdvancedTables\Livewire\PanelPage; class CustomPage extends PanelPage{ use AdvancedTables; ...Of course, there are multiple ways to prevent the trait conflict. The important part is to ensure that the AdvancedTables trait is used on a class that extends another class which contains Filament's InteractsWithTables trait.
#Adding the view component to your blade file
You also need to add the Favorites Bar component to your panel page's blade file:
<div class="space-y-6"> <x-advanced-tables::favorites-bar /> {{ $this->table }}</div>The Favorites Bar expects a space of 24px to properly display it's links. This can easily be achieved with Tailwind's space-y-6 class as shown above.
#Core Concept: User Views vs Preset Views
Advanced Tables supports both User Views and Preset Views. Understanding the difference is important to choosing if one or both is appropriate for your application.
User Views are created by your end-users using your application's UI. An end-user chooses the appropriate filters, toggled columns, column order, column sort, table grouping, etc. to build the view they need. Then they use Advanced Tables to save that view so they have easy access to it in the future. Since each user has different needs, this allows for infinite customization within your application. (And less work for developers!)
Preset Views are views that you the developer write in code and are then available to all your users, (or the users you authorize). Preset Views exposes a query() api which allows you to modify the underlying eloquent query. This means you can "filter" a table's data without needing to have that filter on your table.
However, while being able to modify the underlying eloquent query is powerful, and in some cases might be the only way to filter a table, Advanced Tables provides a filters() api which allows you to apply values to your existing table filters. This, in turn, offers a better UX for your end-users as they will then see filter indicators in the table and will better understand how a Preset View is modifying the data.
Whether used independently or together, User Views and Preset Views give your end-users quick access to the data they need.
#User Views
User Views are views created by your end-users using your application's UI. An end-user chooses the appropriate filters, toggled columns, column order, column sort, table grouping, etc. to build the view they need. Then they use Advanced Tables to save that view so they have easy access to it in the future. Since each user has different needs, this allows for infinite customization within your application. (And less work for developers!)
#Saving the current table configuration into a User View
To save a User View:
- On your table, apply any combination of filters, toggled columns, sort order, grouping, etc.
- After customizing your table, click the
+in the top right corner of the table. - Choose a name, icon, and color for the view.
- Choose if you want the view to be added to your favorite views, made public for other users, or be a global favorite.
- Save the view
When creating a user view the following configurations will be saved:
- current filters,
- table search query,
- column search queries (if enabled)
- column sort order
- toggled columns
- column order
- grouping
#Editing a User View's name, icon, color or visibility
The View Manager allows a user to edit a User View's name, icon, color, and/or visibility.
- Open the View Manager.
- Next to the view you wish to edit, click the action button, and choose
Edit view. - Update the name, icon, color, and/or visibility
- Click
Save changes
To change the configuration of filters, columns, grouping, etc. see Editing a User View's table configuration
#Editing a User View's table configuration
To update a User View's table configuration of filters, columns, grouping, etc. you can use the Replace view action:
- Set the table up with the desired configuration.
- Open the View Manager.
- Next to the view you want to update, click the action button, and choose
Replace view.
Replacing a view will overwrite the existing view with the current table's configuration.
If you would like to just update the name, icon, color, and/or visibility of a view, see Editing a User View's name, icon, color or visibility
#Deleting a User View
User views can be deleted in the View Manager using the view's action button.
#Sorting a view
User views can be sorted in the View Manager. Refer to the section Sorting views of the View Manager for additional details.
#User View configurations
Advanced Tables offers multiple ways to customize User Views. Unless specified otherwise, these options can be configured directly on the AdvancedTablesPlugin object inside your PanelProvider:
public function panel(Panel $panel): Panel{ return $panel ->plugins([ AdvancedTablesPlugin::make() ->userViewsEnabled(false) ])#Disable User Views (New)
User Views are enabled by default. However, if you are not going to use User Views, you should disable them to prevent unnecessary database queries:
AdvancedTablesPlugin::make() ->userViewsEnabled(false)#Configuring the User View model
The UserView model is responsable for storing all the configuration settings for each User View. If you need to extend this class, you may pass your custom class to userView():
AdvancedTablesPlugin::make() ->userView(MyCustomUserView::class)#Configuring the Managed User View class
The ManagedUserView model is responsable for managing the visibility and sort order between a User and a UserView. If you need to extend this class, you may pass your custom class to managedUserView():
AdvancedTablesPlugin::make() ->managedUserView(myCustomManagedUserView::class)#Disabling the icon picker
You may disable the icon picker in the Save View/Edit View slideOver by passing false to the quickSaveIconSelect() method:
AdvancedTablesPlugin::make() ->quickSaveIconSelect(false)You may also use policies to configure who can use the icon picker.
#Excluding solid or outline icons
By default the icon picker loads all of heroicons solid and outline icons. You may exclude either solid or outline icons by passing false to either the quickSaveIncludeOutlineIcons() or quickSaveIncludeSolidIcons() methods:
AdvancedTablesPlugin::make() ->quickSaveIncludeSolidIcons(false)Important: Since icons are cached, after updating you will need to clear your cache to see the change with
php artisan cache:clear.
#Configuring the color picker colors (New)
By default, the color picker will include Filament's default colors, primary, success, info, warning, danger, gray. To configure the available colors, pass an array of colors to ->quickSaveColors():
AdvancedTablesPlugin::make() ->quickSaveColors([ 'primary', 'warning', 'gray', ])You may also include any extra colors you have previously registered in Filament:
AdvancedTablesPlugin::make() ->quickSaveColors([ 'primary', 'success', 'indigo', 'pink', 'zinc', ])#Disabling the color picker
You may disable the color picker in the Save View/Edit View slideOver by passing false to the ->quickSaveColorPicker() method:
AdvancedTablesPlugin::make() ->quickSaveColorPicker(false)You may also use policies to configure who can use the color picker.
#Making a User View favorite
By default, when creating/editing a view, users can favorite their views by toggling on Add to favorites. Favorite views are added to the Favorites Bar and appear above the table. Refer to the Favorites Bar section for additional details.
#Disabling making a User View favorite
You may disable the ability to make a User View favorite by passing false to the ->quickSaveMakeFavorite() method:
AdvancedTablesPlugin::make() ->quickSaveMakeFavorite(false)You may also use policies to configure who can make views favorite.
#Making a User View public
By default, when creating/editing views, users can share their views with other users by toggling on make public. Public views will appear in other user's View Manager where they can then be added to their favorites if they wish.
Advanced Tables also has an approval system so admins can approve public views before they are visible to other users.
#Disabling making a User View public
You may disable the ability to make a User View public using the ->quickSaveMakePublic() method:
AdvancedTablesPlugin::make() ->quickSaveMakePublic(false)You may also use policies to configure who can make views public.
#Enabling making a User View a global favorite
Making a User View a global favorite automatically adds it to every user's Favorites Bar. As this is an action usually reserved for admin users, this functionality is turned off by default. You may enable the ability to make a User View a global public using the ->quickSaveMakeGlobalFavorite() method:
AdvancedTablesPlugin::make() ->quickSaveMakeGlobalFavorite()After enabling, you may use policies to further configure who can make views global favorites.
Advanced Tables also has an approval system so admins can approve global favorite views before they are visible to other users.
#Disabling management of global favorite views (New)
As previously mentioned, when an admin or user creates a global favorite view, that view is added to all user's Favorites Bar. By default, these global views can then be managed (ie. sort and favorite/un-favorite) independently by each user. If you need to disable management of global User View you may do so by passing false to the ->globalUserViewsManageable() method:
AdvancedTablesPlugin::make() ->globalUserViewsManageable(false)By disabling globalUserViewsManageable, global favorites will be not be able to be sorted nor removed from a user's Favorites Bar.
#Configuring new global user view's sort position (New)
When global favorite management is disabled, all global favorites are added before any User Views that a user has favorited. However, when global view management is enabled, a user is then free to reorder them, placing global views before, after, or in between their own user-favorited views. Now, when a new global view is created by an admin, a decision needs to be made as to whether this new global view should be placed before or after the user's previously ordered favorite views. By default new global views are positioned before a user's favorited views, however this can be configured using the newGlobalUserViewSortPosition() method:
AdvancedTablesPlugin::make() ->newGlobalUserViewSortPosition('after')#Showing/hiding helper text
When creating/editing User Views you may show/hide helper text to help guide your end-users during the process. By default, helper text is only displayed for the Favorite, Public, and Global Favorite toggles.
AdvancedTablesPlugin::make() ->quickSaveNameHelperText(false) ->quickSaveFiltersHelperText(false) ->quickSavePublicHelperText(false) ->quickSaveFavoriteHelperText(false) ->quickSaveGlobalFavoriteHelperText(false)You may configure the wording of each helper text by modifying the language file.
#Approving public and global favorite User Views
Advanced Tables includes a simple approval mechanism to allow admins to approve/reject public and global favorites before they are made available to other users.
Advanced Tables uses Filament's enum to define the Status constants:
enum Status: string implements HasLabel, HasColor{ case Approved = 'approved'; case Pending = 'pending'; case Rejected = 'rejected';To use the approval system, first, set the User View's initialStatus() to either Status::Approved, Status::Pending, or Status::Rejected. By default, each User View has an initial status of Status::Pending:
AdvancedTablesPlugin::make() ->initialStatus(Archilex\AdvancedTables\Enums\Status::Rejected)Then, set the minimumStatusForDisplay() to either Status::Approved, Status::Pending, or Status::Rejected. By default, the minimal status is Status::Pending:
AdvancedTablesPlugin::make() ->minimumStatusForDisplay(Archilex\AdvancedTables\Enums\Status::Approved)When a User View's status is the equal or greater than the minimumStatusForDisplay(), it will be displayed to other users.
Advanced Tables default setting of Pending for both Status and minimumStatusForDisplay means that all public and global User Views will automatically be displayed to other users, effectively bypassing the approval system. Changes only need to be made if you would like to enable the approval system.
To update the status of a User View, admin should use the User Views Resource.
Of course, Laravel's Observers can be implemented on the UserView model to further expand the approval system with database or email notifications.
#Persisting the active User View to Session
Persisting the active User View to the session allows a user to navigate away from the table and then return to the table with the same view selected. You may enable this by using the ->persistActiveViewInSession() method:
AdvancedTablesPlugin::make() ->persistActiveViewInSession()#Preset Views
In addition to User Views, developers can also programmatically create Preset Views in code that can be deployed to all users. Preset Views exposes a query() api which allows you to modify the underlying eloquent query. This means you can "filter" a table's data without needing to have that filter on your table.
However, while being able to modify the underlying eloquent query is powerful, and in some cases might be the only way to filter a table, Advanced Tables provides a defaultFilters() api which allows you to apply values to your table filters. This, in turn, offers a better UX for your end-users as they will then see filter indicators in the table and will better understand how a Preset View is modifying the data.
For more information on the difference between User Views and Preset Views please refer to Core Concept: User Views vs Preset Views
#Filament Filter Tabs
Filament v3 introduced Filter Tabs which also allows developers to programmatically filter their data in tabs. While similar, Advanced Tables' Preset Views offers multiple additional features:
- Allow users to hide, favorite, and/or reorder Preset Views (New)
- Combine with User Views for one consistent UI
- Relation manager support
- Table builder support
- Multiple themes
- Include filters (New)
- Include toggled columns
- Include sorting column and direction
- Include reordered columns (New)
- Persist the active Preset View to the session
- Color options
- Visibility options
#Creating a Preset View
To create a Preset View, add the getPresetView() method to your List*, Manage*, or table widget class.
use Archilex\AdvancedTables\Components\PresetView;use Archilex\AdvancedTables\AdvancedTables; class ListOrders extends ListRecords{ use AdvancedTables; public function getPresetViews(): array { return [ 'processing' => PresetView::make() ->modifyQueryUsing(fn ($query) => $query->where('status', 'processing')), 'delivered' => PresetView::make() ->modifyQueryUsing(fn ($query) => $query->where('status', 'delivered')), ]; }}The Preset View modifyQueryUsing() method modifies your original eloquent query by applying the scopes and conditions you configure.
#Customizing the Preset View label
By default the array keys will be used as the labels for each Preset View. This may be configured by passing a label into the make() method:
'processing' => PresetView::make('Processing orders') ->modifyQueryUsing(fn ($query) => $query->where('status', 'processing')) ->favorite(),If you prefer, you may also use the label() method:
'processing' => PresetView::make() ->label('Processing orders') ->modifyQueryUsing(fn ($query) => $query->where('status', 'processing')) ->favorite(),#Adding a Preset View to the Favorites Bar
By default, Preset Views are added to the View Manager in the Preset View section. To add a Preset View to the Favorites Bar use the favorite() method:
'processing' => PresetView::make() ->modifyQueryUsing(fn ($query) => $query->where('status', 'processing')) ->favorite(),Due to the fundamental difference between User Views and Preset Views, favorited Preset Views always appear before a User Views in the Favorites Bar.
#Adding an icon
Similar to User Views, Preset Views may have icons:
'processing' => PresetView::make() ->modifyQueryUsing(fn ($query) => $query->where('status', 'processing')) ->icon('heroicon-o-refresh'),By default the icon will be displayed before the name. This can be configured in the Favorites Bar settings.
#Display the Preset View with a color
Similar to User Views, Preset Views may be displayed in a color.
'processing' => PresetView::make() ->modifyQueryUsing(fn ($query) => $query->where('status', 'processing')) ->color('warning'),You may choose any of Filament's default colors, primary, success, info, warning, danger, gray.
You may also include any extra colors you have previously registered in Filament:
#Adding a badge
Preset Views can display a badge after the label by passing a string into the badge() method:
'processing' => PresetView::make() ->badge(Order::query()->where('status', 'processing')->count())#Changing the badge color
The color of a badge may be changed using the badgeColor() method:
'processing' => PresetView::make() ->badge(Order::query()->where('status', 'processing')->count()) ->badgeColor('warning')Tip: If you want to display multiple badges, you should generate one query separately and then use Laravel collections to filter and count them.
#Adding a tooltip
Preset Views can display a tooltip when hovered over in the Favorites Bar by passing a string into the tooltip() method.:
'lowStock' => PresetView::make() ->modifyQueryUsing(Product::query()->where('price', '>', 1000)->where('qty', '<', 5)) ->tooltip('High price products with low stock')#Showing or hiding
You may conditionally show or hide Preset Views for certain users using either the visible() or hidden() methods, passing a closure:
'processing' => PresetView::make() ->visible(fn (): bool => auth()->isAdmin())You can also use a Laravel policy to manage visibility:
'processing' => PresetView::make() ->visible(fn (Order $record): bool => auth()->user()->can('viewProcessing', $record)),And then in OrderPolicy:
public function viewProcessing(User $user){ return $user->isAdmin();}Tip: If your policy is not working, be sure to register it in
AuthServiceProvideras sometimes Laravel does not successfully auto-register policies.
#Applying filters
You can apply values to your table filters from your Preset Views with the defaultFilters() method:
'new_this_quarter' => PresetView::make() ->defaultFilters([ 'status' => [ 'value' => 'new', ], 'created_at' => [ 'range' => 'this_quarter', ], ])Using the defaultFilters() api gives your users a better understanding of how a Preset View is filtering the data by turning on Filament's filter indicators.
Tip: The easiest way to know how to properly form your filter array is to apply the desired filter to your table and then
dd($this->tableFilters)at the top of thegetPresetViews()method.
#Applying filters with Filter Builder
If you are using Advanced Filter Builder, you should use the following syntax to define your default filters:
'follow_up' => PresetView::make() ->defaultFilters([ 'advanced_filter_builder' => [ [ // filter group 1 'status' => [ 'value' => 'new' ], 'created_at' => [ 'range' => 'this_month', ], ], [ // filter group 2 (ie: "or") 'status' => [ 'value' => 'cancelled' ], 'created_at' => [ 'range' => 'last_month', ], ], ], ])If the example above, this will create the following query scope: new orders made this month OR cancelled orders made last month.
Tip: The easiest way to know how to properly form your filter array is to apply the desired filter to your table and then
dd($this->tableFilters)at the top of thegetPresetViews()method.
If you are using the builder's Column Filters, then you will need to add the applicable values. For example:
'this_quarter' => PresetView::make() ->defaultFilters([ 'advanced_filter_builder' => [ [ // filter group 1 'created_at' => [ 'column' => 'created_at', 'operator' => 'in_the_last', 'value' => 1, 'unit' => 'quarters', ], ], ], ])Tip: Many of the column filters have multiple
keyssuch asdate_start,date_end, etc. You only need to add the values that you are setting for the filter.
#Applying default grouping
You can apply one of your table groupings to your Preset View with the defaultGrouping() method:
'new_this_quarter' => PresetView::make() ->defaultGrouping('created_at', 'desc')#Toggling and reordering columns
Preset Views can toggle and reorder columns as well using the defaultColumns() method:
'processing' => PresetView::make() ->defaultColumns(['id', 'status', 'customer.name', 'created_at'])Columns will be saved in the following ways:
- If Reorderable Columns are enabled, Advanced Tables will sort the columns in the order they are included in the
defaultColumns()array. - If a column is not included in the array and is
toggleable(), it will be hidden. - If a column is not included in the array and is not
toggleable(), it will be added to the end of the table.
#Setting a default table sort
If a column is sortable, you may choose it as the default sort column for your table using the defaultSort() method:
'processing' => PresetView::make() ->defaultSort('total_price')By default, sorting is ascending, but you may choose descending as well ->defaultSort('total_price', 'desc').
Tip: While it is possible to add
orderBy()to your query to sort your table, usingdefaultSort()is recommended as it will correctly show the sorting indicator on the table column.
#Setting a default table multi-sort (New)
If Multi-Sort is enabled, you may multi-sort your preset views through the same defaultSort() method. Just pass an array of columns and their sort direction to defaultSort():
'processing' => PresetView::make() ->defaultSort([ 'is_visible' => 'desc', 'price' => 'asc' ])#Loading a default Preset View
You may choose one of your Preset Views as the default view when loading the page by using the default() method:
'processing' => PresetView::make() ->default()default() can take a callback which can allow you to dynamically choose which Preset View is the default based on the conditions you choose. The first Preset View that returns true will be the view that is loaded by default.
#Preserving user selected filters, toggled columns, sort column, and sort direction
By default, when an end-users clicks a Preset View, the filters, toggled columns, sort column, and sort direction that a user has already applied to a table will be removed in favor of the Preset View's configuration. This is usually the desired behavior as Preset Views are meant to be customized views into data. However in some instances, you may wish to preserve the user's selected filters, columns, etc. To do this you may use preserveAll().
'processing' => PresetView::make() ->preserveAll()If you need more fine-grained control you may use the individual methods:
'processing' => PresetView::make() ->preserveFilters() ->preserveToggledColumns() ->preserveSort()Note: By preserving a user's selection you are in turn removing the option for a Preset View to always take a user to that view's predefined configuration as that view is now affected by the user.
#Preset Views configurations
Advanced Tables offers multiple ways to customize Preset Views. Unless specified otherwise, these options can be configured directly on the AdvancedTablesPlugin object inside your PanelProvider:
public function panel(Panel $panel): Panel{ return $panel ->plugins([ AdvancedTablesPlugin::make() ->createUsingPresetView(false) ])#Configuring the Managed Preset View class
The ManagedPresetView class is responsable for storing the visibility and sorting configurations between a User and a PresetView If you need to extend this class, you may pass your custom class to managedPresetView():
AdvancedTablesPlugin::make() ->managedPresetView(myCustomManagedPresetView::class)#Disabling Preset View management
By default, Preset Views will be sorted in the order they are added to the getPresetViews() array. Similarly, any Preset View that has the favorite() method will be displayed by default in the end-user's Favorites Bar, and any Preset View without favorite() will be displayed in the View Manager.
By default, users can sort Preset Views as well as add/remove them from the Favorites Bar. If you need to disable Preset View management you may do so by passing false to the ->globalUserViewsManageable() method:
AdvancedTablesPlugin::make() ->presetViewsManageable(false)By disabling presetViewsManageable, Preset Views will be not be able to be sorted nor added/removed from a user's Favorites Bar.
#Configuring new Preset Views sort position
When Preset View management is enabled, a user is free to reorder, add or remove them from their Favorites Bar. Now, when a new Preset View is added in code and then deployed to the user, a decision needs to be made as to whether this new Preset View should be placed before or after the user's previously ordered Preset Views. By default new Preset Views are positioned before a user's current Preset View ordering, however this can be configured using the newPresetViewSortPosition() method:
AdvancedTablesPlugin::make() ->newPresetViewSortPosition('after')#Persisting the active Preset View to Session
Persisting the active Preset View to the session allows a user to navigate away from the table and then return to the table with the same view selected. You may enable this by using the ->persistActiveViewInSession() method in your Panel Provider:
AdvancedTablesPlugin::make() ->persistActiveViewInSession()#Distinguishing between Preset Views and Users Views
Enabling both Preset Views and User Views has the potential of causing confusion with end-users if they create a User View on top of a Preset View. This is because a Preset View can "filter" the table using the query() method which doesn't correspond to any filter on the table. This means that when a user builds a User View using a Preset View as its base, there's no way for the user to "turn off" the filter scope.
While Advanced Tables has multiple options you can use to mitigate these potential issues, the easiest way around this issue is to not use the query() method and instead use the defaultFilters() method. This way, even when a user creates a User View based on a Preset View, they are in full control of data.
However, if you still need, or prefer, to use the query() method to filter your data, you can use these options to help avoid confusion. These configurations should be applied to the AdvancedTablesPlugin in your Panel Provider.
#Disable User View creation
You can disable the creation of User Views all together when a Preset View is selected. If disabled, when a user clicks the Quick Save Button, a Filament notification will be displayed explaining that this action is not possible. The text of the notification can be configured in the language file.
AdvancedTablesPlugin::make() ->createUsingPresetView(false)#Display a divider line
You can optionally display a divider line between Preset Views and User Views to help visually distinguish between the two.
AdvancedTablesPlugin::make() ->favoritesBarDivider()#Display a lock icon
You can optionally display an icon next to a Preset View to help visually distinguish between the two.
AdvancedTablesPlugin::make() ->presetViewLockIcon()By default heroicon-o-lock-closed will be used, however you may pass any heroicon icon to the method:
AdvancedTablesPlugin::make() ->presetViewLockIcon('heroicon-o-star')#Display a query indicator in the Save View slideOver or modal
Another option to help a user know how a Preset View is modifying the query is to use the ->indicator() method on the Preset View:
'honor_roll_students' => PresetView::make() ->modifyQueryUsing(fn ($query) => $query->perfectAttendance() ->perfectGrades() ->withoutBehaviorReports() ) ->indicator('students with perfect attendance, grades, and behavior')By adding a string of text to the indicator() method, a new badge with the selected text will be displayed in the View Summary when creating a new view.
#Display helper text in the Save View slideOver or modal
Finally, you can display helper text in the slideOver or modal that explains that the user has chosen a Preset View as the base for their User View and that the filtering applied in the Preset View set cannot be removed. This text can be configured in the language file.
AdvancedTablesPlugin::make() ->quickSaveActivePresetViewHelperText()#Favorites Bar
The Favorites Bar is home to all of a user's favorite views as well as Quick Save and View Manager. The Favorites Bar can be customized in a variety of ways to match the needs of your application.
#Favorites Bar configuration
Unless specified otherwise, these customizations can be configured directly on the AdvancedTablesPlugin object inside your PanelProvider.
#Themes
Advanced Tables includes six different themes for the Favorites Bar:
- Links
- Simple links
- Branded tabs
- Tabs
- Github (New, default)
- Filament
You can change the theme with the 'favoritesBarTheme()` method:
use Archilex\AdvancedTables\Enums\FavoritesBarTheme; AdvancedTablesPlugin::make() ->favoritesBarTheme(FavoritesBarTheme::Filament)You may also use the corresponding string instead:
AdvancedTablesPlugin::make() ->favoritesBarTheme('filament')Note: Since
links-simpleonly has color to visually distinguish between active and in-active states, it is recommended you disable the ability to select a color for their User Views since it becomes difficult to know which link is active.
#Size
You may change the size of the Favorites Bar links to allow more links to be shown with the favoritesBarSize() method:
use Filament\Support\Enums\ActionSize; AdvancedTablesPlugin::make() ->favoritesBarSize(ActionSize::Small)Available sizes are: ActionSize::Small and ActionSize::Medium.
#Icon position
You may change the position of a view's icon in the Favorites Bar using the favoritesBarIconPosition() method:
use Filament\Support\Enums\IconPosition; AdvancedTablesPlugin::make() ->favoritesBarIconPosition(IconPosition::Before)#Disabling the Default View
By default, the Favorites Bar includes a Default View. Clicking this will completely reset the table back to its default settings. You may disable the Default View using the favoritesBarDefaultView() method:
AdvancedTablesPlugin::make() ->favoritesBarDefaultView(false)You may also disable the Default View per resource by overriding the hasDefaultView() method in the class where you have added the AdvancedTables trait:
public function hasDefaultView(): bool{ return false;}#Modifying the Default View
Behind the scenes, the default view is an internal Preset View that is injected at the front of the views. This means it is easy to modify the default view per resource by creating a Preset View with the key default:
public function getPresetViews(): array{ return [ 'default' => PresetView::make() ->modifyQueryUsing(fn (Builder $query) => $query->active()) ->icon(Heroicon::Check) ->default() ->favorite() ];}#Default View name
You may change the name of the Default View in the language file.
#Default View icon
You may change the icon used for the Default View using the favoritesBarDefaultIcon() method:
AdvancedTablesPlugin::make() ->favoritesBarDefaultIcon('heroicon-o-home')To remove the Default View icon, don't pass anything to the method: favoritesBarDefaultIcon()
#Divider
If using both Preset Views and User Views, it may be helpful to have a divider line to help users visually distinguish between the two. You may use the favoritesBarDivider() method to enable this:
AdvancedTablesPlugin::make() ->favoritesBarDivider()For more ways to distinguish between Preset Views and Users Views, please read the section Distinguishing between Preset Views and Users Views
#Loading Indicator
You may show a loading indicator when switching between views by using the favoritesBarLoadingIndicator() method:
AdvancedTablesPlugin::make() ->favoritesBarLoadingIndicator()#Disabling the Favorites Bar
You can disable the Favorites Bar globally (helpful if you only want to use reorderable columns) by passing false to the favoritesBarEnabled() method:
AdvancedTablesPlugin::make() ->favoritesBarEnabled(false)You may also configure this per table by overriding the favoritesBarIsEnabled() method on your List page:
class ListOrders extends ListRecords{ use AdvancedTables; public static function favoritesBarIsEnabled(): bool { return false; } ...You may also disable Quick Save or the View Manager if needed.
#Quick Save
Advanced Tables offers a quick way for end-users to save User Views with the Quick Save button. Quick Save can be customized in a variety of ways to match the needs of your application.
#Quick Save configurations
Advanced Tables offers multiple ways to customize Quick Save. Unless specified otherwise, these options can be configured directly on the AdvancedTablesPlugin object inside your PanelProvider.
#Disabling Quick Save
You may disable Quick Save globally by passing false to the quickSaveEnabled() method:
AdvancedTablesPlugin::make() ->quickSaveEnabled(false)You may also configure this per table by overriding the quickSaveIsEnabled() method on your List page:
class ListOrders extends ListRecords{ use AdvancedTables; public static function quickSaveIsEnabled(): bool { return false; } ...If you wish to just hide the Quick Save button for certain users, you can also use policies.
You may also disable the Favorites Bar or the View Manager if needed.
#Changing the icon
You may change the icon of the Quick Save button using the icon argument of the quickSaveInFavoritesBar() method:
AdvancedTablesPlugin::make() ->quickSaveInFavoritesBar(icon: 'heroicon-o-bookmark')Note: The Quick Save icon only applies when the button is in the Favorites Bar.
#Changing the position in the Favorites Bar
By default, Quick Save is at the end of the Favorites Bar. You may position it at the start of the Favorites Bar using the quickSaveInFavoritesBar() method:
AdvancedTablesPlugin::make() ->quickSaveInFavoritesBar(position: 'start')#Displaying in the table toolbar
By default, Quick Save is displayed in the Favorites Bar. You may display it in the toolbar by passing false to the quickSaveInFavoritesBar() method and adding the quickSaveInTable() method:
AdvancedTablesPlugin::make() ->quickSaveInFavoritesBar(false) ->quickSaveInTable()#Displaying as a modal
By default, Quick Save will open it's form in a slideOver. You may display the form in a modal by passing false to the quickSaveSlideOver() method:
AdvancedTablesPlugin::make() ->quickSaveSlideOver(false)#View Manager
Advanced Tables' View Manager is an easy and convenient way for your end-users to manage all of the views available for the table. Users can quickly search, apply, sort, edit, delete, add to favorites, and more, all from the View Manager. The View Manager can be customized in a variety of ways to match the needs of your application.
#Using the view manager
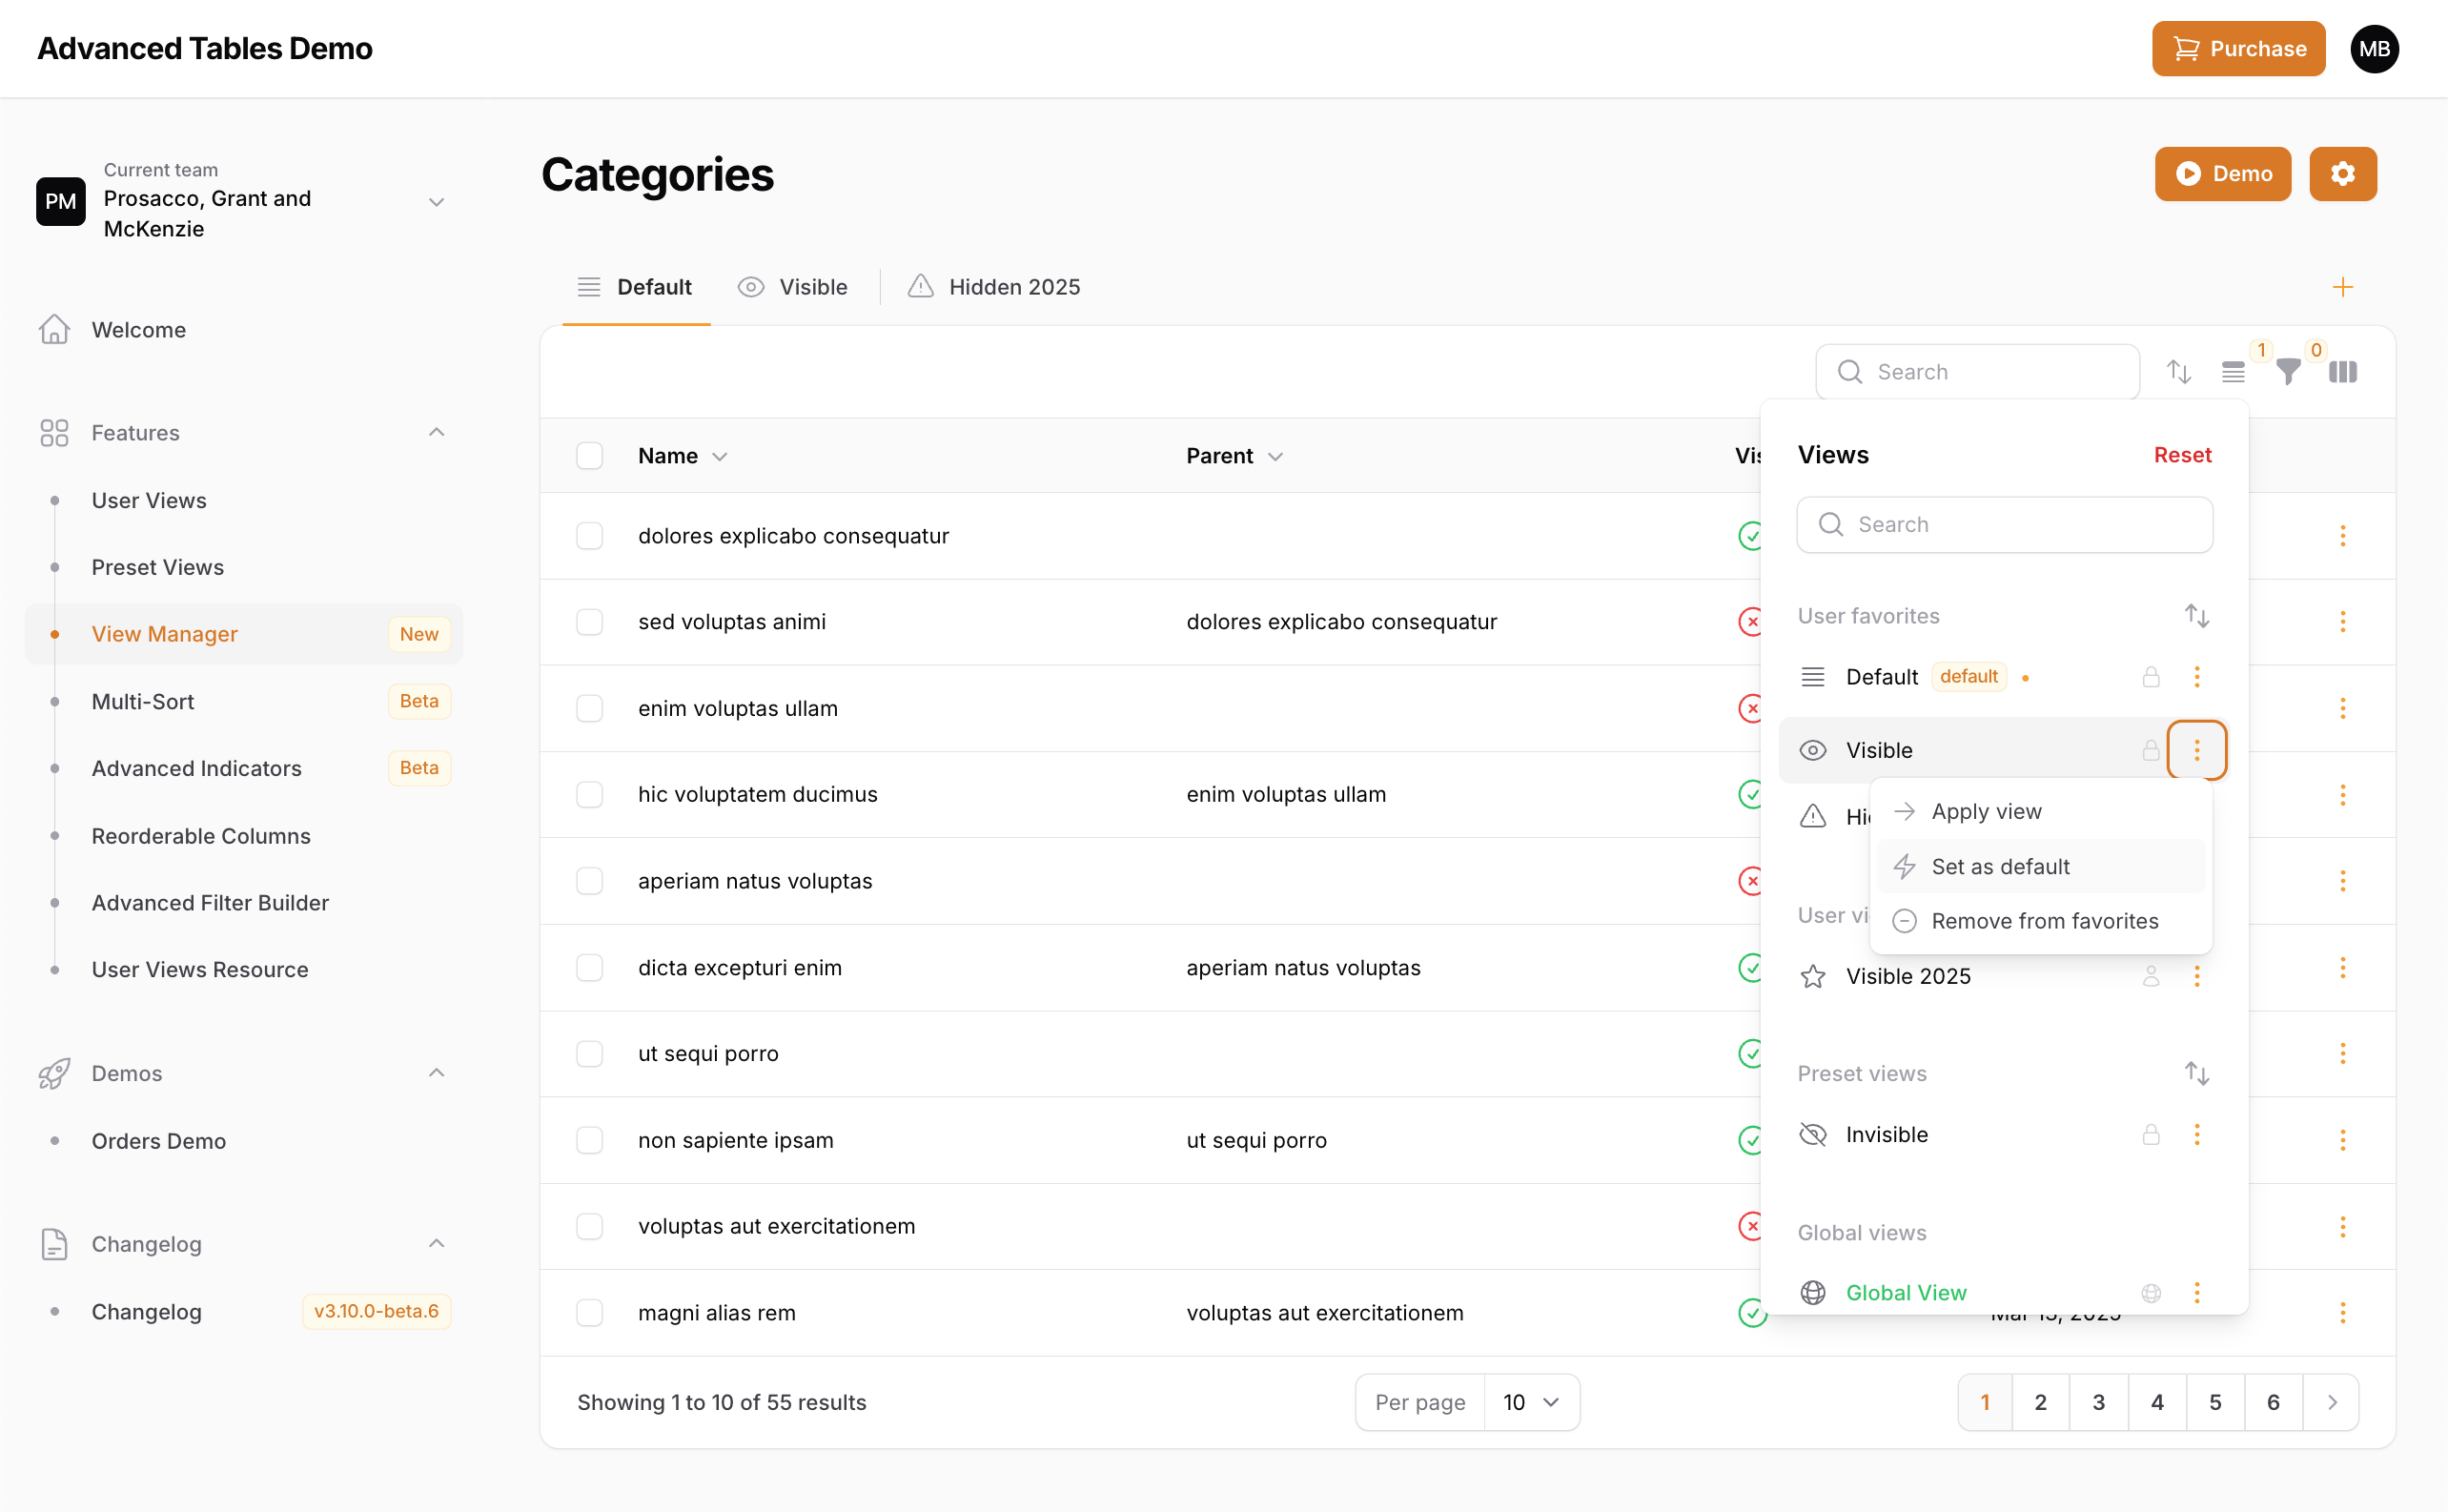
The View Manager allows end-users to access, apply, edit, sort, and manage all the available table views, including Preset Views, public views, and global favorites. Depending on which views are enabled, the view manager can display up to five different sections:
- User favorites (includes: favorited Preset Views, favorited User Views, and global favorite views)
- User views (non-favorited User Views)
- Preset views (non-favorited Preset Views)
- Public views (other user's public views)
- Global views (global favorites that have been removed from the user's favorites)
#Action button
Next to each view is an action button that gives the user several options depending on the type of view:
- Apply view
- Set as default/Remove as default (NEW!)
- Add to favorites/Remove from favorites
- Edit view (only displayed for the User Views created by the user)
- Delete view (only displayed for the User Views created by the user)
#Sorting views
User favorites, User views, and Preset views can be sorted by clicking the up/down arrows and then dragging/dropping the view to the desired location. Each view will be confined to it's section.
Important: If the User Favorites section contains both Preset Views and User Views, Preset Views will always come first, followed by User Views. These two types of views can only be sorted within their respective groupings. In other words, Preset Views can only be sorted among other Preset Views, and User Views can only be sorted among other User Views.
#View Manager configurations
Advanced Tables offers multiple ways to customize the View Manager. Unless specified otherwise, these options can be configured directly on the AdvancedTablesPlugin object inside your PanelProvider.
#Changing the position in the Favorites Bar
By default, View Manager is displayed at the end of the Favorites Bar. You may position it at the start of the Favorites Bar using the viewManagerInFavoritesBar() method:
AdvancedTablesPlugin::make() ->viewManagerInFavoritesBar(position: 'start')#Displaying in the table toolbar
By default, View Manager is displayed in the Favorites Bar. You may display it in the toolbar by passing false to the viewManagerInFavoritesBar() method and adding the viewManagerInTable() method:
AdvancedTablesPlugin::make() ->viewManagerInFavoritesBar(false) ->viewManagerInTable()#Changing the position in the table toolbar
By default, View Manager is displayed after the search field. You may display at any of the tooldbar positions available via Filament's toolbar renderhooks by passing the renderhook to the position property in the viewManagerInTable() method:
AdvancedTablesPlugin::make() ->viewManagerInTable(position: 'tables::toolbar.toggle-column-trigger.before')#Displaying as a button with a label
By default, View Manager is displayed as a icon button. You may display it as a button with a label by using the viewManagerButton() method:
AdvancedTablesPlugin::make() ->viewManagerButton(label: 'Views')#Changing the button and icon size
You may change the size of the View Manager's button and icon using the viewManagerButtonSize() method:
AdvancedTablesPlugin::make() ->viewManagerButtonSize('lg')#Displaying the button outlined
If you are displaying the View Manager as button you may display it outlined by using the viewManagerButtonOutlined() method:
AdvancedTablesPlugin::make() ->viewManagerButtonOutlined()#Displaying as a SlideOver
By default, View Manager is displayed as a dropdown. You may display it as a slideOver by adding the viewManagerSlideOver() method:
AdvancedTablesPlugin::make() ->viewManagerSlideOver()#Dropdown vs slideOver internally
Internally, when displaying View Manager as a slideOver, Advanced Tables only has to query and select from the database the user's favorite views as they are the only views show in the table. Since Filament only processes the content in slideOvers when they are triggered by an action button, the remaining views aren't queried until the View Manager is triggered. This helps reduce unnecessary memory usage by selecting a smaller dataset from the database.
However, this also means that when opening a slideOver there is a slight delay as Filament has to then query the database.
On the flip side, when displaying the View Manager as a dropdown, Advanced Tables has to query and select all the available views from the database. This is because dropdowns already load all the data and are simply hidden and shown in Alpine.
This in turn means that there is additional memory usage as all of the table's views are queried from the database and loaded into memory. However, it also means that opening the dropdown is instant as opposed to having a delay with the slideOver.
In most situations, the additional memory usage of the dropdown is worth the tradeoff to have the View Manager instantly available, but knowing how this works internally will help you decide which is best for your application.
#Disabling the View Manager
You may disable the View Manager globally by passing false to the viewManagerEnabled() method:
AdvancedTablesPlugin::make() ->viewManagerEnabled(false)You may also configure this per table by overriding the viewManagerIsEnabled() method on your List page:
class ListOrders extends ListRecords{ use AdvancedTables; public static function viewManagerIsEnabled(): bool { return false; } ...You may also disable the Favorites Bar or Quick Save if needed.
#Changing the icon
You may change the icon used for the View Manager using the viewManagerIcon() method:
AdvancedTablesPlugin::make() ->viewManagerIcon('heroicon-o-bars-3')#Icon position
You may change the position of the icon in the View Manager using the viewManagerIconPosition() method:
use Filament\Support\Enums\IconPosition; AdvancedTablesPlugin::make() ->viewManagerIconPosition(IconPosition::After)#Hiding the active view badge indicator
When displaying the View Manager as a dropdown, by default a badge indicator will be shown when there is an active View. You may disable the badge by passing false to the viewManagerBadge() method:
AdvancedTablesPlugin::make() ->viewManagerBadge(false)Note: The active view badge indicator is only available when the View Manager is used as a dropdown.
#Hiding the search field
By default the View Manager includes a search field to quickly search for views. You may disable the search field by passing false to the viewManagerSearch() method:
AdvancedTablesPlugin::make() ->viewManagerSearch(false)#Displaying a Save View link
You may include a Save View link inside the View Manager with the viewManagerSaveView() method:
AdvancedTablesPlugin::make() ->viewManagerSaveView()This also allows you to hide the Quick Save button from the Favorites Bar to maximize the space available in the Favorites Bar:
AdvancedTablesPlugin::make() ->quickSaveInFavoritesBar(false) ->viewManagerInFavoritesBar(false) ->viewManagerInTable() ->viewManagerSaveView()Note: This option is only available when the View Manager is displayed as a dropdown. When displaying the View Manager as a slideOver,
viewManagerSaveView()has no effect.
#Displaying a Reset link
You may include a Reset link inside the View Manager that functions the same as clicking the Default View button with the viewManagerResetView() method:
AdvancedTablesPlugin::make() ->viewManagerResetView()This also allows you to hide Default View button from the Favorites Bar to maximize the space available in the Favorites Bar.
#Disabling Click to Apply
By default a user may click on any of the Views in the View Manager to apply that view's configuration to the table. You may disable this by passing false to the viewManagerClickToApply() method:
AdvancedTablesPlugin::make() ->viewManagerClickToApply(false)#Hiding the Apply button
By default a View's action button includes an Apply View button to apply that view's configuration to the table. You may hide this by passing false to the viewManagerApplyButton() method:
AdvancedTablesPlugin::make() ->viewManagerApplyButton(false)#Hiding the Active View Indicator
By default the View Manager will display an indicator next to the currently active view. You may hide this by passing false to the viewManagerActiveViewIndicator() method:
AdvancedTablesPlugin::make() ->viewManagerActiveViewIndicator(false)#Displaying the Active View indicator a badge
By default the View Manager will display the active view indicator as a small green dot next to the current active view. You may change this to be a badge with the viewManagerActiveViewBadge() method:
AdvancedTablesPlugin::make() ->viewManagerActiveViewBadge()The name of the badge can be modified in the language file.
#Hiding the view type icons
Since different types of views have different available options, by default the View Manager will display view type icons next to each view. The icons that can be displayed are:
- Preset Views - lock icon
- Views a user created - user icon
- Public views - eye icon
- Global views - globe icon
If you wish to hide these icons you can pass false to the viewManagerViewTypeIcons() method:
AdvancedTablesPlugin::make() ->viewManagerViewTypeIcons(false)#Displaying view types as badges
If you prefer to display view types as badges instead of icons you can use the viewManagerViewTypeBadges() method:
AdvancedTablesPlugin::make() ->viewManagerViewTypeBadges()#Displaying both public and global view type indicators
By default, when a view is both public and a global favorite, the View Manager will only show the global favorite indicator, be it the icon or the badge. This helps reduce visual clutter as global favorites are already public. However, if you wish to display both you may do so with the viewManagerPublicIndicatorWhenGlobal() method:
AdvancedTablesPlugin::make() ->viewManagerPublicIndicatorWhenGlobal()#Hiding the user icon
By default the View Manager will display the chosen icon for User Views and Preset Views in the View Manager. You may hide this icon in the View Manager with the viewIcon() method:
AdvancedTablesPlugin::make() ->viewIcon(false)#Changing the default view icon
If there is no icon associated with the User View or Preset View, a default icon will be shown in the View Manager. You may change which icon is displayed with the defaultViewIcon() method:
AdvancedTablesPlugin::make() ->defaultViewIcon('heroicon-o-queue-list')#Reorderable Columns
To support the broader community, the reorderable columns feature is now a part of Filament v4 core through Filament's new Column Manager! You can enable reorderable columns by adding ->reorderableColumns() to your table:
return $table ->reorderableColumns()However, coming soon, Advanced Tables will be introducing Advanced Column Manager which will bring additional functionality to Filament's such as allowing users to create their own column groupings and allowing columns to be moved between column groups. This will give users ultimate flexibility and save developers time from having to hardcode column groups.
#Managed Default Views (New)
Advanced Tables now allows your users to manage which view they would like to be their default view for each table. When a view is a default it will be automatically loaded when the resource/table is first opened after logging in.
#Enable Managed Default Views
Managed Default Views are disabled by default. To enable, add `managedDefaultViewsEnabled()` to your panel provider: ```phpAdvancedTablesPlugin::make() ->managedDefaultViewsEnabled()```#Using Managed Default Views
To use Managed Default Views:
- Open the View Manager.
- Next to the view you would like to make default, click the action group button then choose, "Set default".
- You may also remove a view as a default view. If there is a matching developer-defined default Preset View, it will become the new default.
#Multi-Sort (New)
Advanced Tables now allows your users to sort their tables by multiple columns. Using the new Multi-Sort dropdown, users can add additional columns to sort by, easily change sort direction, and even reorder the columns. And Multi-Sort is completely integrated with Preset Views and User Views.
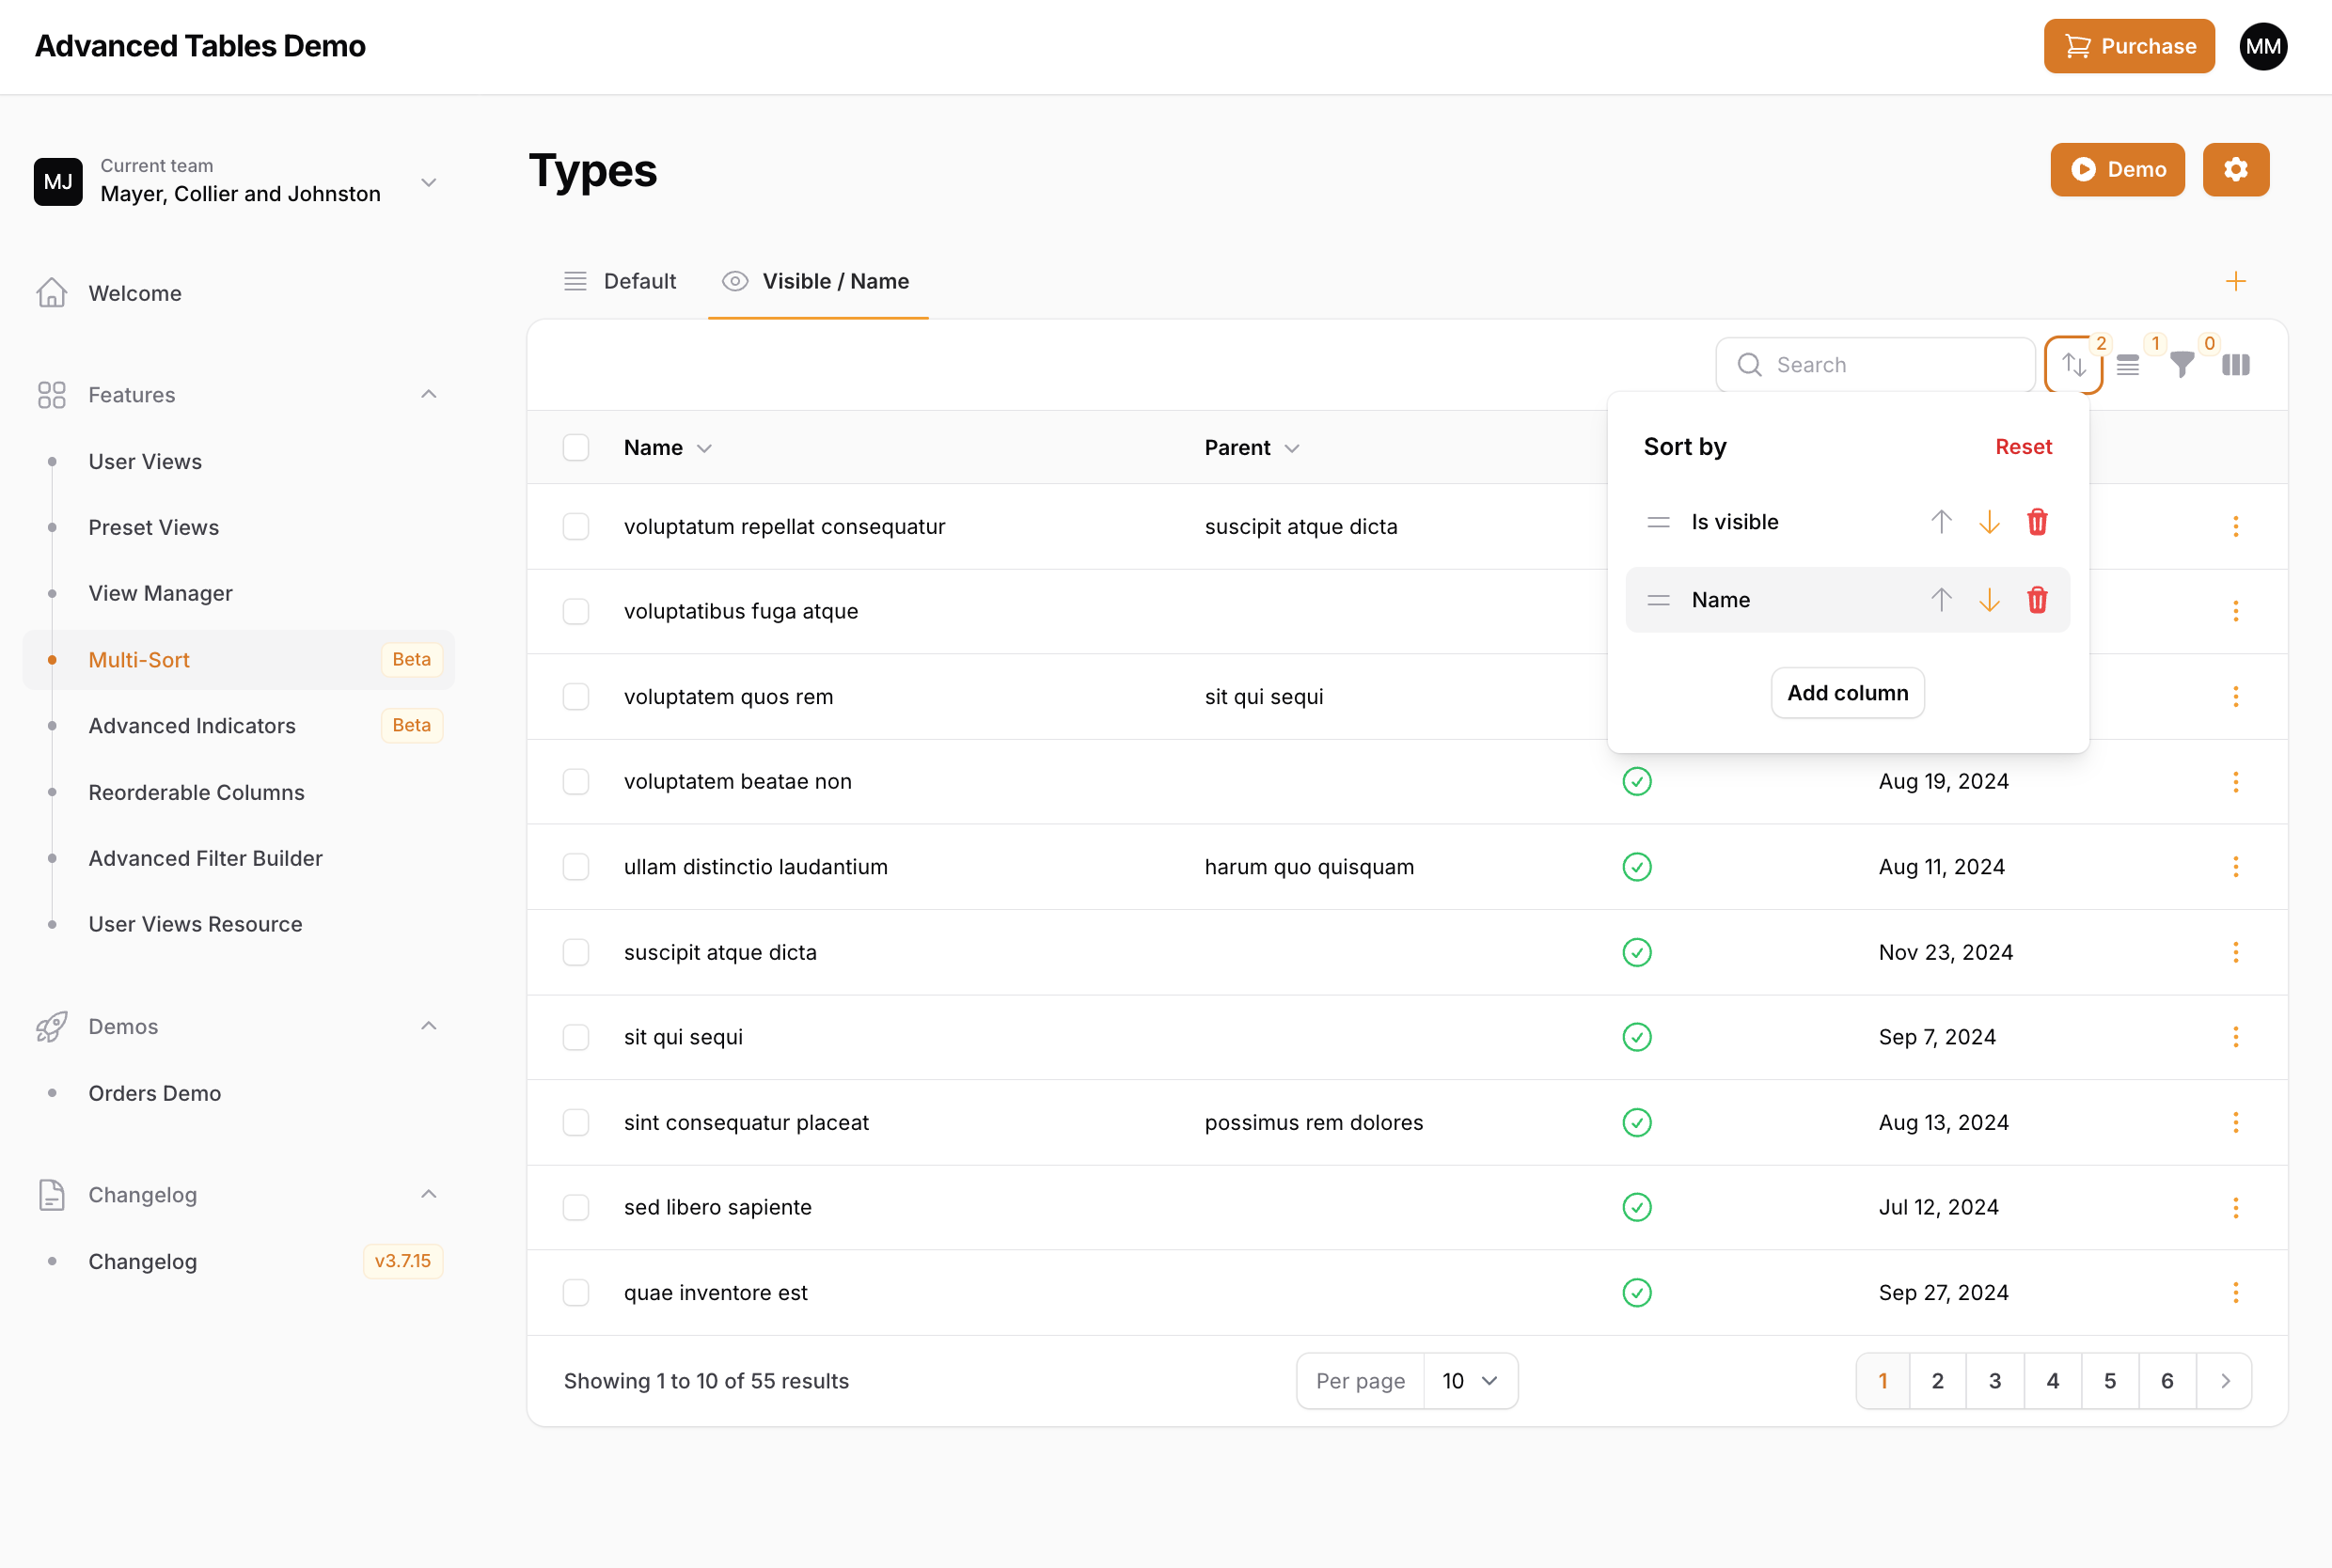
#Using Multi-Sort
- Click the new multi-sort button in the table toolbar to open the multi-sort dropdown.
- Click the
Add columnbutton to add a column to sort by. Only->sortable()table columns will be shown. - Use the
upanddownarrow buttons to change the sort direction. - You may add additional columns and then drag and drop the them in the order you prefer.
Note: The multi-sort button will only be displayed when there is at least one sortable column.
#Using with Preset Views
You can apply multi-sorting in your Preset Views through the defaultSort() method:
'processing' => PresetView::make() ->defaultSort([ 'is_visible' => 'desc', 'price' => 'asc' ])#Multi-Sort configurations
Advanced Tables offers multiple ways to customize Multi-Sort. Unless specified otherwise, these options can be configured directly on the AdvancedTablesPlugin object inside your PanelProvider.
#Disabling Multi-Sort
Advanced Tables enables multi-sorting by default. You may disable this globally by passing false to the multiSortEnabled() method:
AdvancedTablesPlugin::make() ->multiSortEnabled(false)You may also configure this per table by overriding the multiSortIsEnabled() method on your List page:
class ListOrders extends ListRecords{ use AdvancedTables; public static function multiSortIsEnabled(): bool { return false; } ...#Changing the icon
You may change the icon used for the Multi-Sort dropdown using the multiSortIcon() method:
AdvancedTablesPlugin::make() ->multiSortIcon('heroicon-s-chevron-up-down')#Hiding the badge
By default, when one or more columns is being sorted, the Multi-Sort dropdown button will display a badge indicating the number of columns that are being sorted. You may hide the badge by passing false to the multiSortBadge() method:
AdvancedTablesPlugin::make() ->multiSortBadge(false)#Customizing the buttons and labels
You may customize Multi-Sort buttons, labels in the language file.
#Quick Filters (New)
Important: Quick Filters is one of the biggest additions to Advanced Tables since it's initial launch and I'm very excited to be able to bring this functionality to Filament. However, since additional configuration is needed, there are still outstanding features to be implemented, known limitations exist, and there may be custom Filament implementations that haven't been accounted for, this feature is disabled by default. Please read all the instructions fully to know what is currently supported, what is under development, and what may not be supported. If you do find an issue, please reach out to me on discord our through email.
Quick Filters gives your users quick access to their filters through Filament's indicator system. When enabled, each indicator can be clicked on to access that filter's settings. In addition, filters can be favorited and "pinned" so they always appear, even when not active.
#Enabling Quick Filters
-
Enable Quick Filters
Quick Filters is disabled by default. To enable, add
quickFiltersEnabled()to your panel provider:AdvancedFilter::make()->quickFiltersEnabled() -
Compile assets
After enabling be sure to run
npm run buildandphp artisan filament:upgrade. -
Update Custom Filter Classes
Quick Filters automatically overrides any default Filament filters you have included in your resource or page. However, any custom filter classes that you have created that extends a Filament filter will need to be updated to use Advanced Table's versions. This can be easily accomplished by just updating your imported class with the plugins equivalent:
- use Filament\Tables\Filters\Filter+ use Archilex\AdvancedTables\Filament\Filter- use Filament\Tables\Filters\SelectFilter+ use Archilex\AdvancedTables\Filament\SelectFilter- use Filament\Tables\Filters\TernaryFilter+ use Archilex\AdvancedTables\Filament\TernaryFilter- use Filament\Tables\Filters\TrashedFilter+ use Archilex\AdvancedTables\Filament\TrashedFilterRemember, you only need to override custom filter classes you have created. Filters used within Filament's resources and pages will be overridden automatically.
-
Add the AdvancedTables trait
If you haven't already, add the AdvancedTables trait to your table.
#Using Quick Filters
Once enabled, Quick Filters should work right out the box with minimal configuration. Just click on any indicator to see the form field(s) associated with that filter. Any adjustments to that filter will be immediately reflected in the table and synced to filament's filter form.
#Custom Filters with Multiple Form Fields
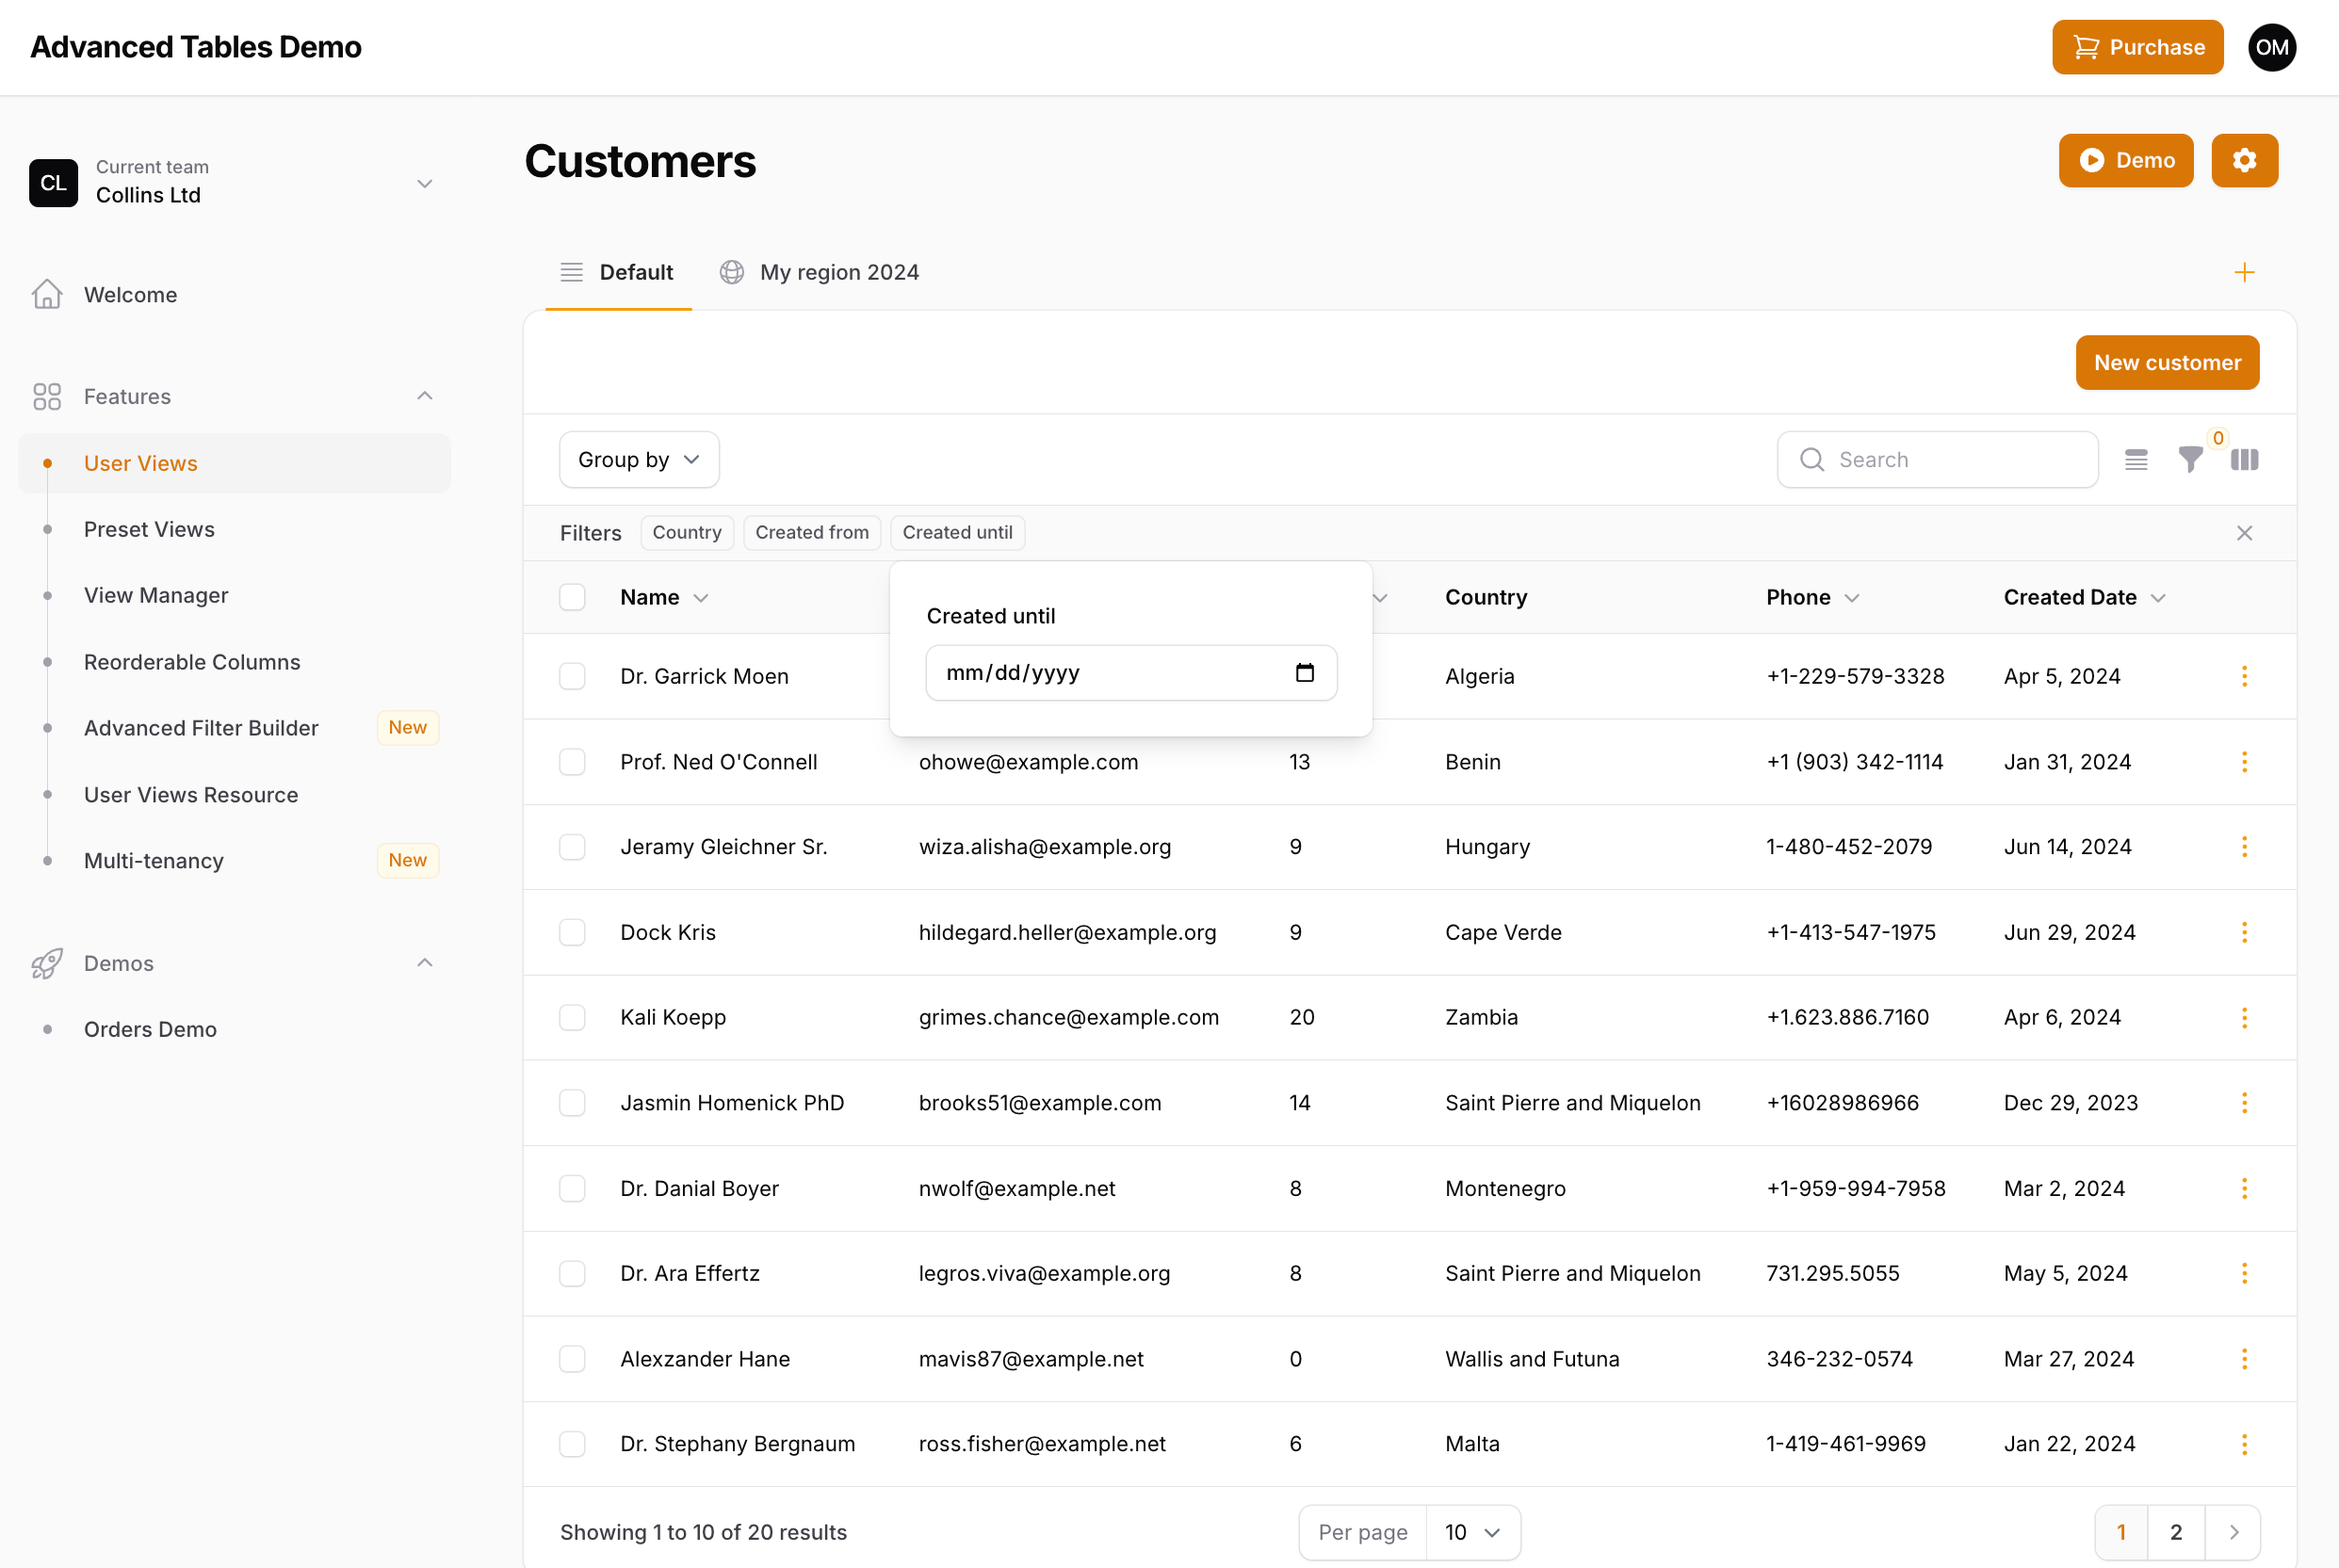
When implementing custom filters with multiple form fields in Filament, there are two main ways to display the indicator(s). You could display a single indicator that adapts according to the fields that are set, or you could have individual indicators for each field. As an example, take the following date filter examples which have two date fields, but display the indicator differently.
Example 1 - Display as a single indicator:

Filter::make('created_at') ->form([ DatePicker::make('created_from'), DatePicker::make('created_until'), ]) ->query(function (Builder $query, array $data): Builder { ... }) ->indicateUsing(function (array $data): ?Indicator { if (($data['created_from'] ?? null) && (! ($data['created_until'] ?? null))) { return Indicator::make('Created from ' . Carbon::parse($data['created_from'])->toFormattedDateString()); } if ((! ($data['created_from'] ?? null)) && ($data['created_until'] ?? null)) { return Indicator::make('Created until ' . Carbon::parse($data['created_until'])->toFormattedDateString()); } if (($data['created_from'] ?? null) && ($data['created_until'] ?? null)) { return Indicator::make('Created between ' . Carbon::parse($data['created_from'])->toFormattedDateString() . ' and ' . Carbon::parse($data['created_until'])->toFormattedDateString()); } return null; })Example 2 - Display as multiple indicators:
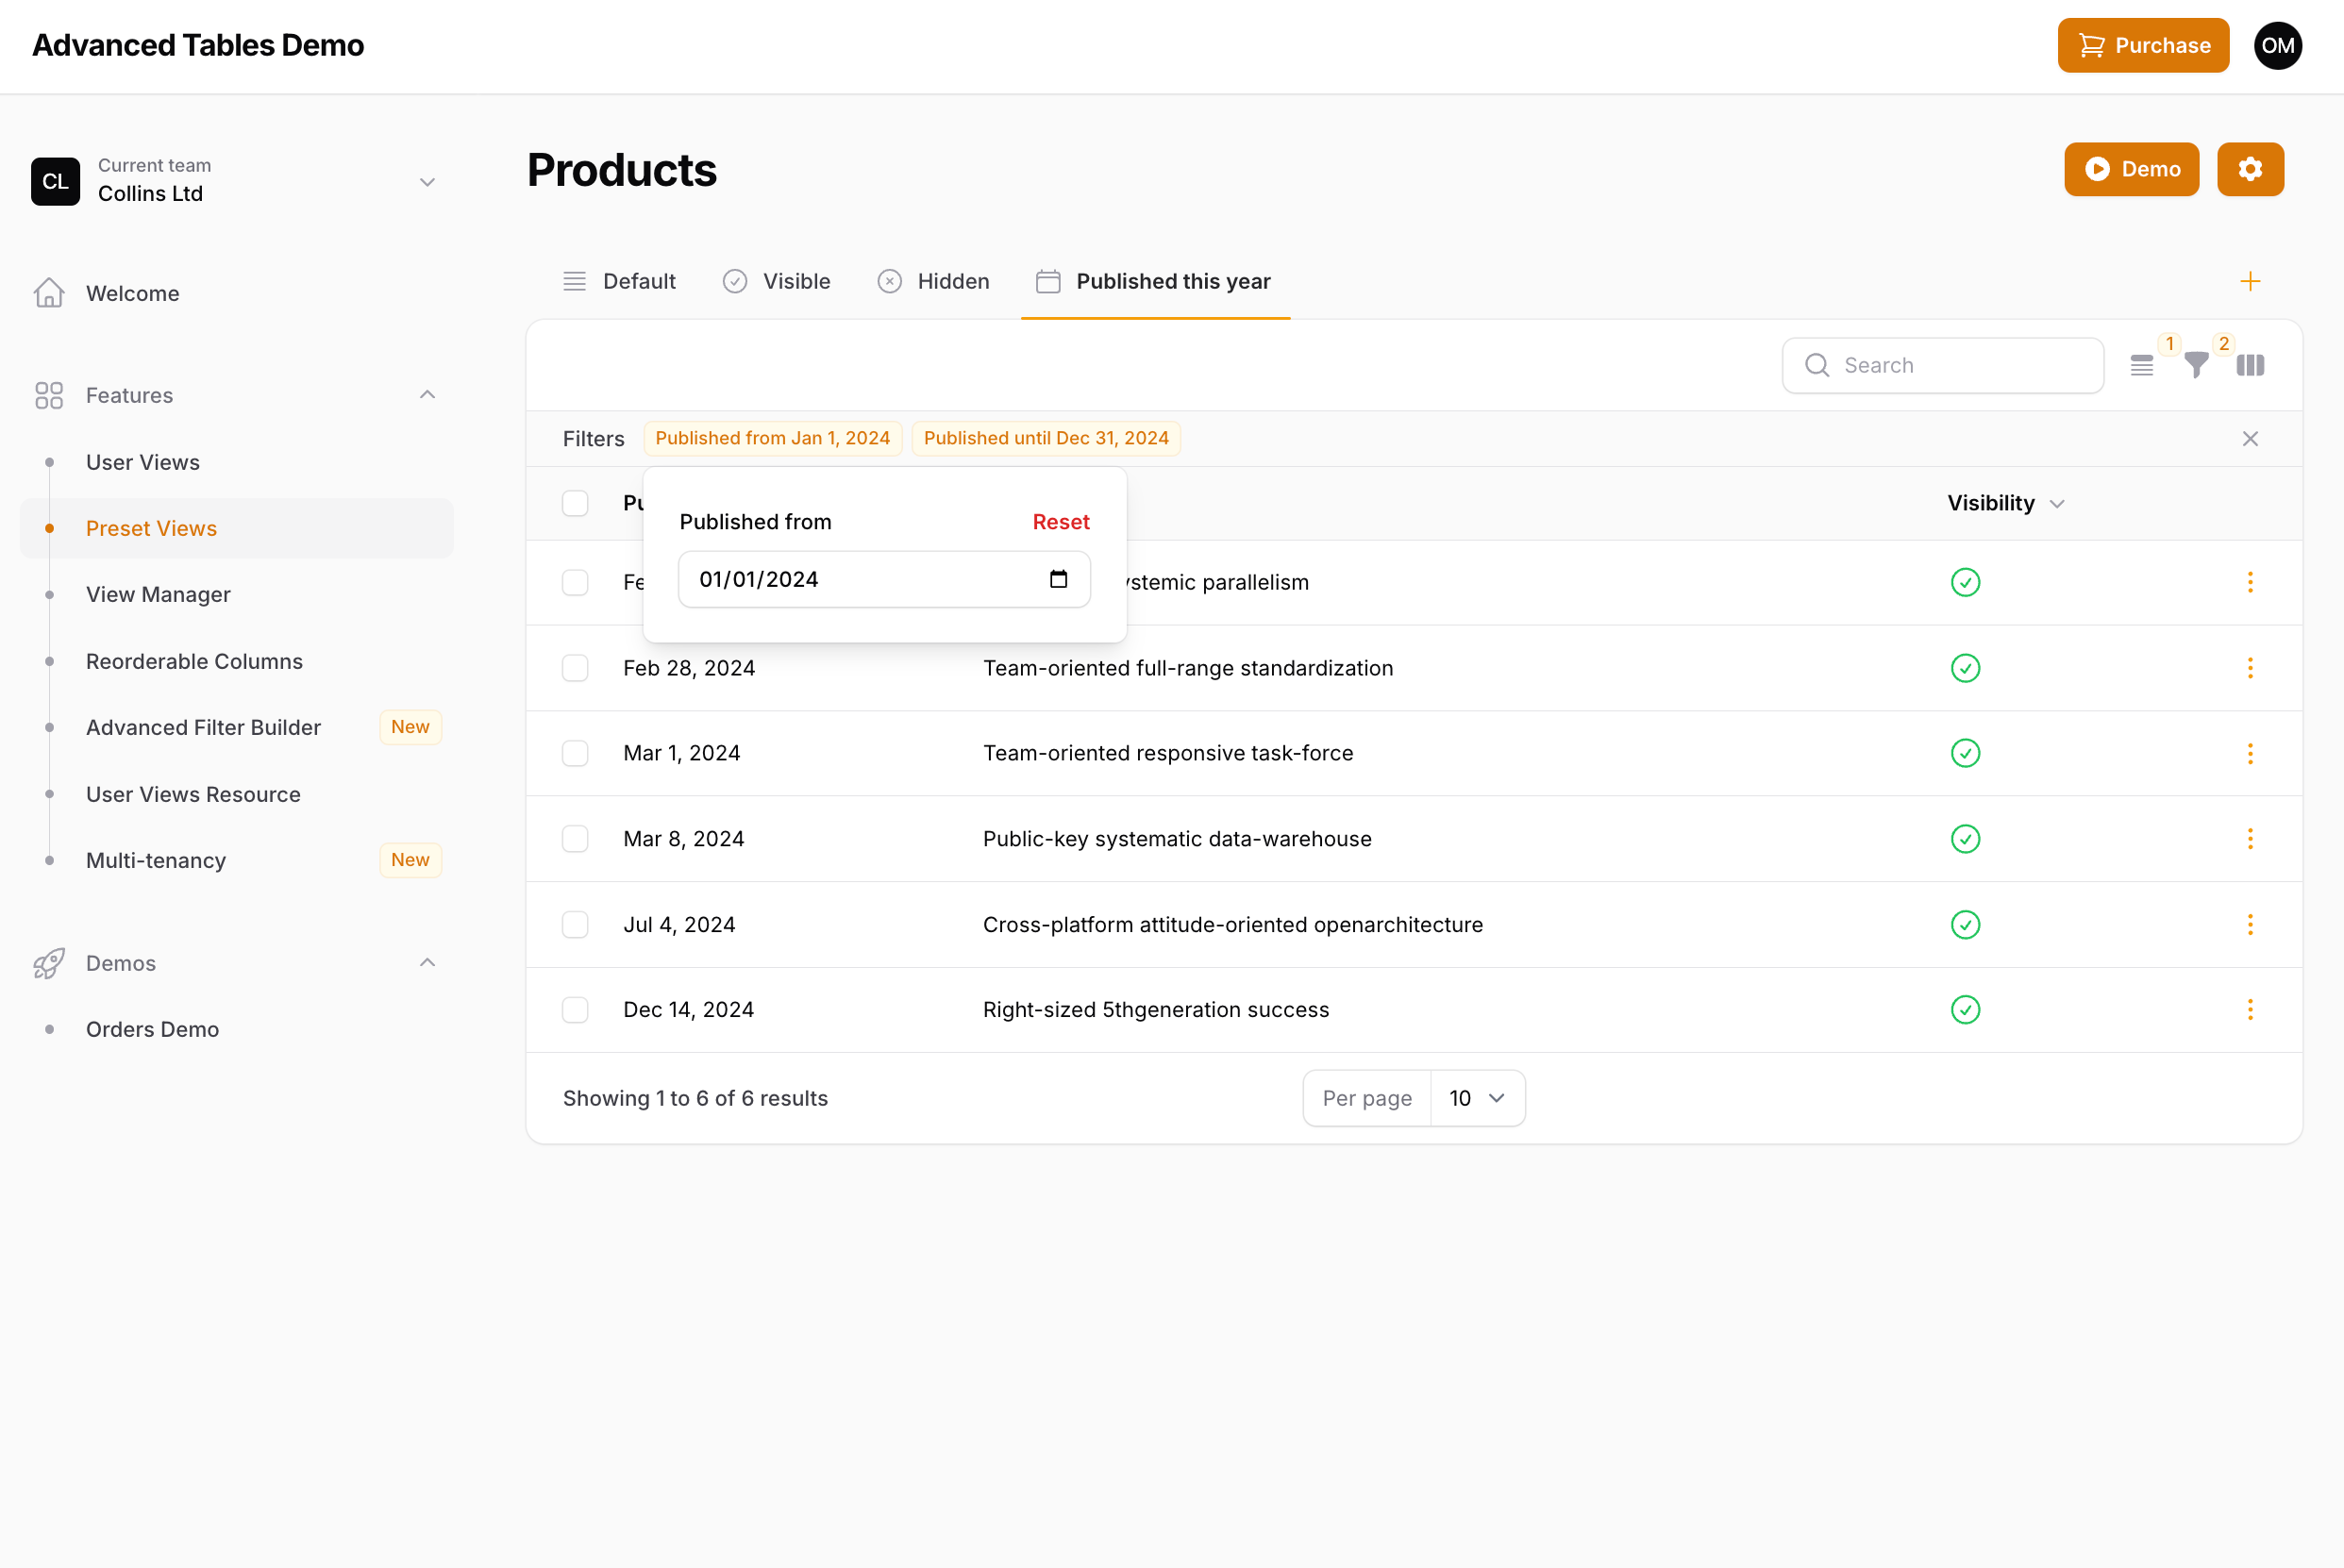
Filter::make('published_at') ->form([ DatePicker::make('published_from'), DatePicker::make('published_until'), ]) ->query(function (Builder $query, array $data): Builder { ... }) ->indicateUsing(function (array $data): array { $indicators = []; if ($data['published_from'] ?? null) { $indicators[] = Indicator::make('Published from ' . Carbon::parse($data['published_from'])->toFormattedDateString()) ->removeField('published_from'); } if ($data['published_until'] ?? null) { $indicators[] = Indicator::make('Published until ' . Carbon::parse($data['published_until'])->toFormattedDateString()) ->removeField('published_until'); } return $indicators; }),Quick Filters supports both of these use cases. In the first example, only one indicator will be shown, but the form will include both fields. In the second, only the indicator's respective field will be displayed.
If you are using return types (and you should be) then Quick Filters will automatically detect how the indicators should be displayed. If you are not using return types, then you will need to be explicit about how Quick Filters should display your form fields using the ->multipleIndicators() method:
Example 1 - Display as a single indicator:
Filter::make('created_at') ->multipleIndicators(false)Example 2 - Display as multiple indicators:
Filter::make('created_at')` ->multipleIndicators()Note: Displaying indicators outside of these two examples (ie. a single indicator for all form fields, or a one-to-one field/indicator setup), is not currently supported. If you have a filter set up like this, please contact me.
#Favorite Filters
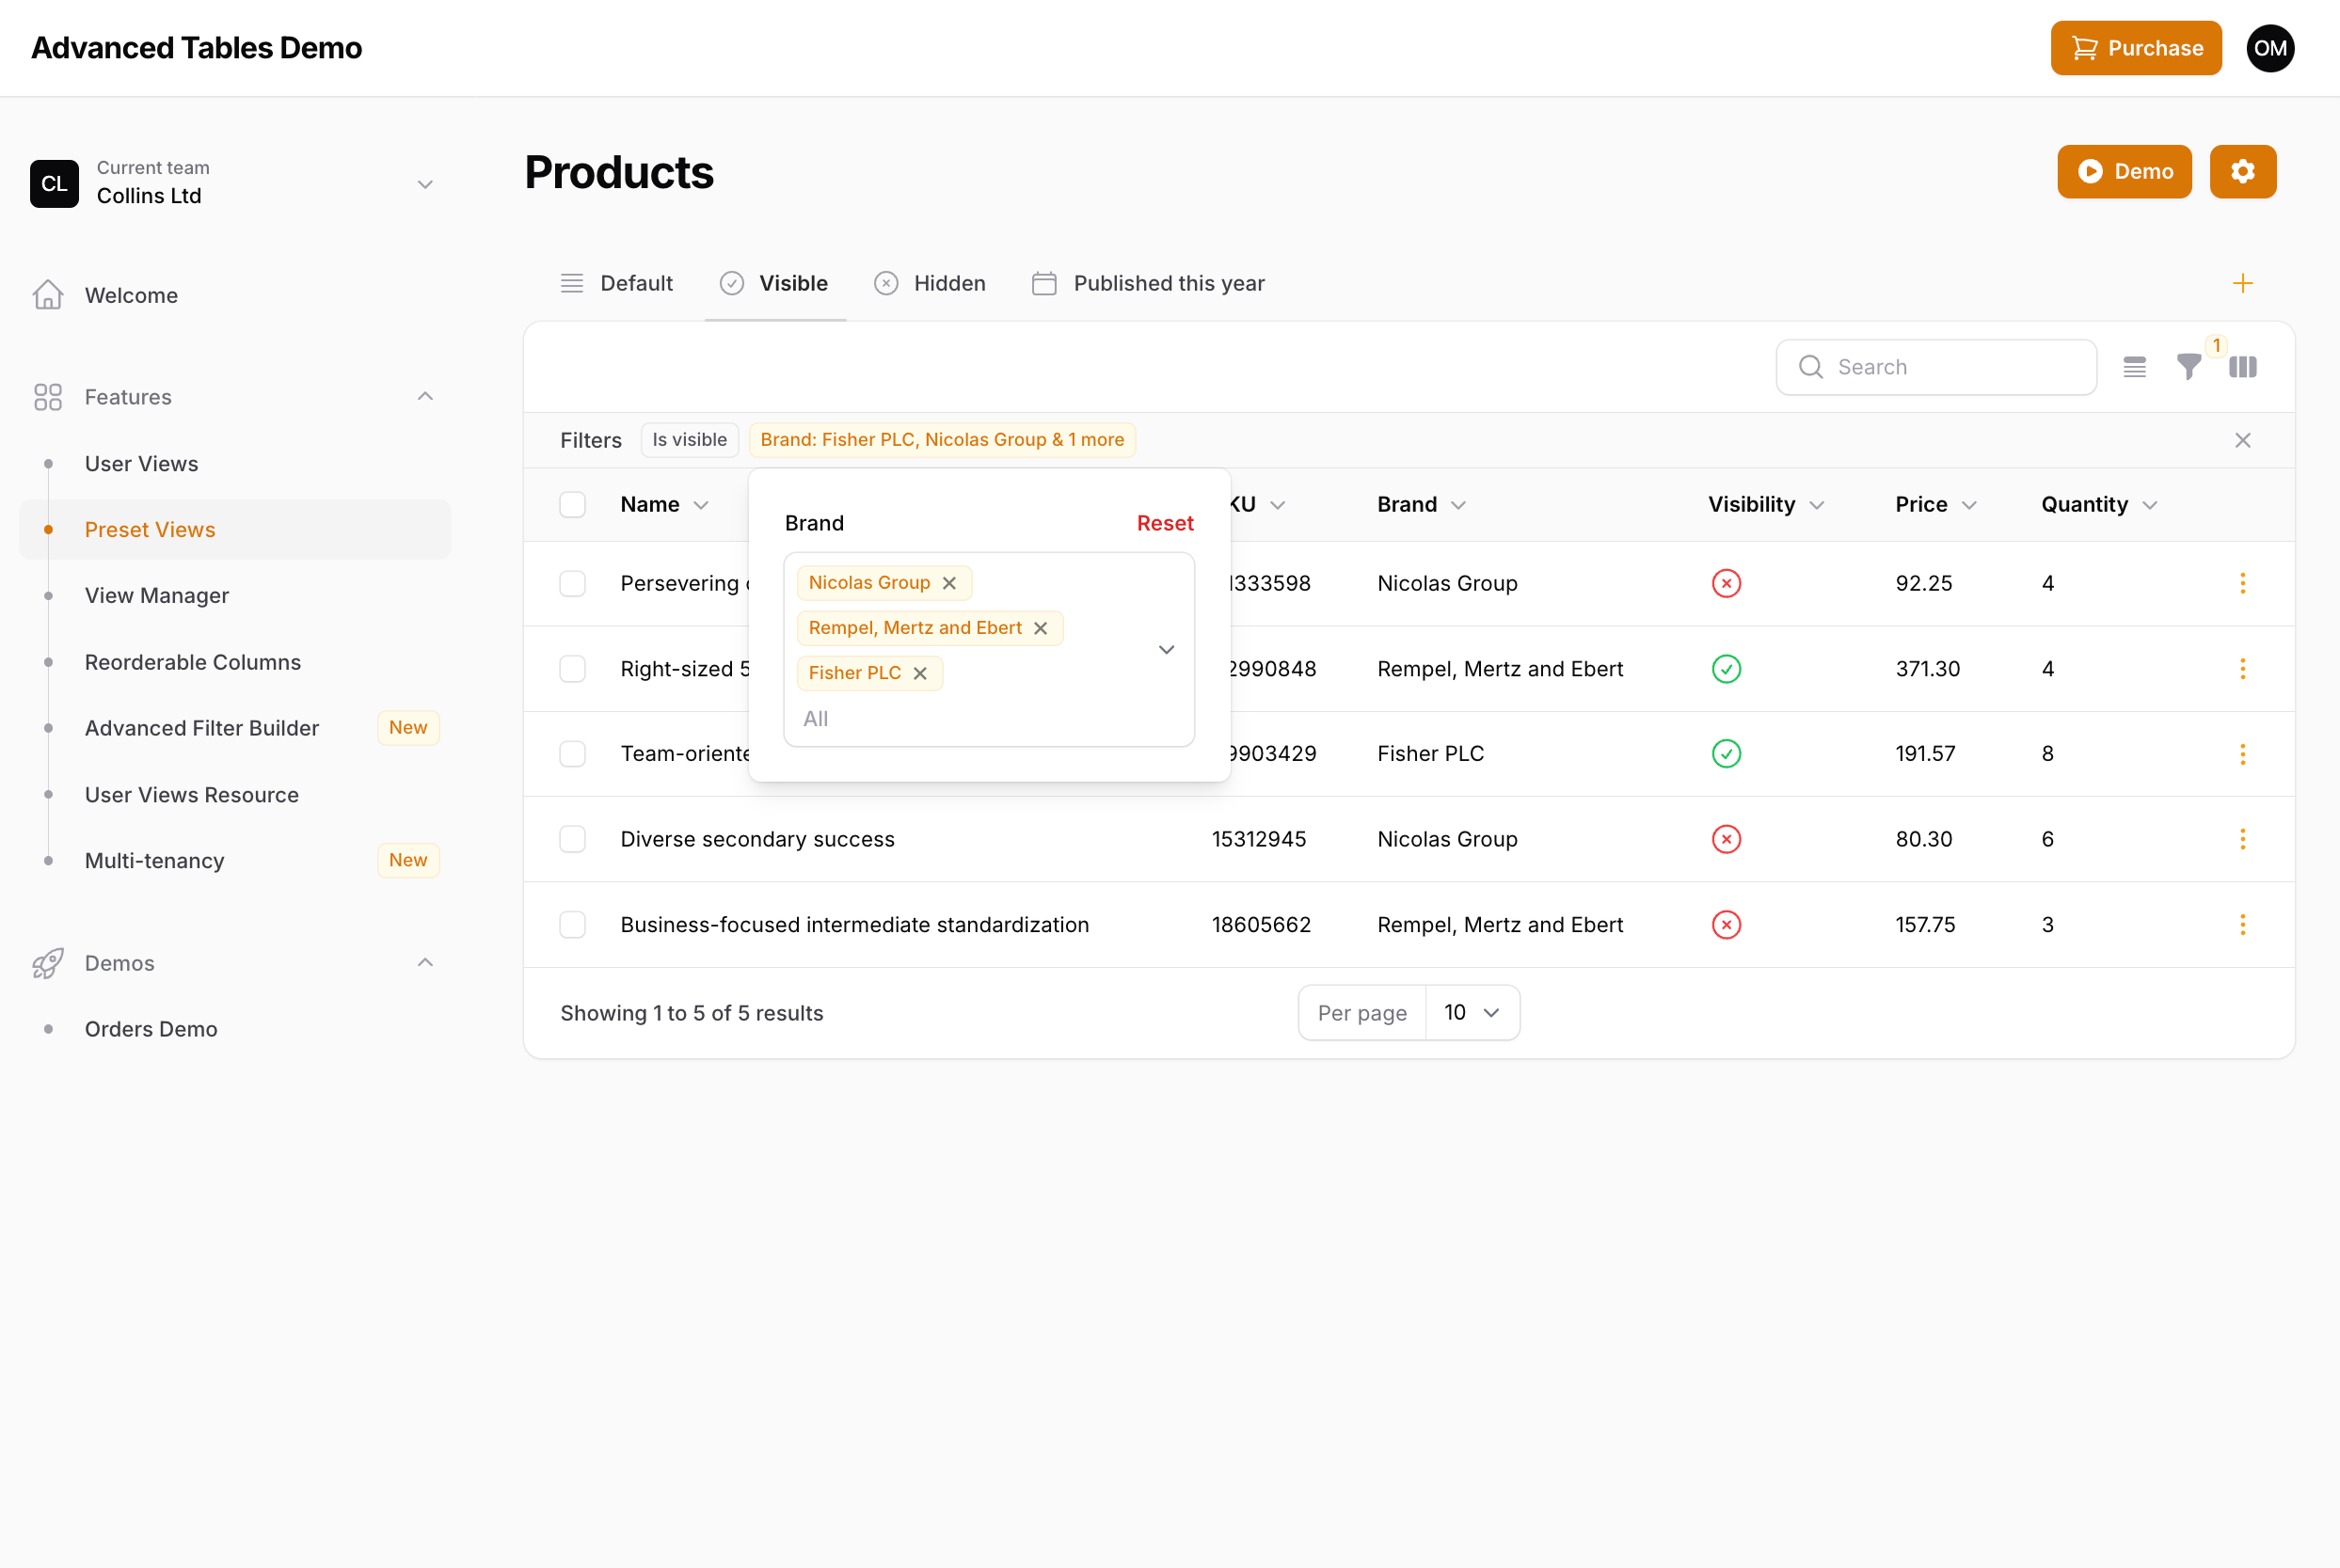
Quick Filters not only gives you quick access to applied filters, but also allows you to specify "favorite" filters which will always be displayed in the indicator bar, even when the filter is not active. You can make a filter a favorite by using the ->favorite() method:
SelectFilter::make('brand') ->favorite()Note: Support for Filament's
->columns()method on filters is coming soon.
#Limiting the Indicator labels
Quick Filters also introduces the ability to limit the number of labels that are shown on a Select Filter. Since you now have easy access to filters through the indicator, it may not be necessary to pollute the indicator bar with an excessively long indicator. To limit the indicator labels you may use the ->limitIndicatorLabels() method:
SelectFilter::make('brand') ->limitIndicatorLabels(3)By default, once the limit is reached Filament's localized version of & 3 more will be displayed. However, you may change this by publishing and updating the plugin's language files and updating the more_indicator_labels value in the advanced-tables.php language file:
'indicators' => [ 'more_indicator_labels' => '+ :count', // display as "+ 4"],#Specifying Favorite Filters in Preset Views
If you are using Preset Views you may configure which filters should be displayed as favorites using the ->defaultFavoriteFilters() method:
'recentlyCreated' => PresetView::make() ->favorite() ->defaultFavoriteFilters(['created_at']) ->defaultFilters([ 'created_at' => [ 'created_from' => now()->startOfWeek()->toDateString(), 'created_until' => now()->endOfWeek()->toDateString(), ], ])Note: When defining default favorite filters, the order of the filters will be determined by the order they are in listed in Filament's ->filters() array. Support for ordering by the order of the ->defaultFavoriteFilters() array is coming.
#Specifying Favorite Filters with User Views (Under Development)
User-specified favorite filters is currently under development and should be released soon. When released, your users will be able to favorite, rearrange, and even hide filters according to their needs and then save that configuration as a User View.
#Deferring Quick Filters
The current implementation of Quick Filters is for each indicator form to be live even if you are using Filament's filter deferring. Since each indicator is a subset of all the filters, deferring a single filter doesn't seem necessary.
However, if there is sufficient demand/need for it, I will look into bringing deferring to Quick Filters in the future. If implemented, each indicator dropdown would have it's own "Apply" button. Please contact me if this is a feature you need.
#Disabling Quick Filters
You may disable Quick Filters per table by overriding the quickFiltersAreEnabled() method on your List page:
class ListOrders extends ListRecords{ use AdvancedTables; public static function quickFiltersAreEnabled(): bool { return false; } ...#Current Limitations and Unknowns
While Quick Filters should work for the majority of implementations, there are currently a few limitations and unknowns:
- Advanced Filter Builder is not currently supported, but under development.
- Custom filters may not be fully supported, but the goal is to support any implementation with Filament's filters. If something is not working as expected please contact me.
- Third-party filter plugins have not been tested. If a filter plugin is not working, please contact me. Please note, that full support may require the plugin developer to update their filter.
- Filament's Query Builder Filter is not currently supported. I am looking into supporting it, but if support comes it will be at the very end of this development period.
#Advanced Filter Builder

Advanced Filter Builder is a custom filtering system that gives your users a simple, yet powerful way to quickly build custom queries. Each filter inside the builder can be used multiple times and grouped into or groups, allowing your users to drill down and find the data they need. Advanced Filter Builder was designed to make filtering easy for your users with a simple UI and natural filtering language.
For developers, Advanced Filter Builder couldn't be easier to implement. Advanced Filter Builder can automatically generates text, numeric, date, boolean, and select filters from your table columns! You can also seamlessly integrate your existing filters or override the auto-generated ones allowing you to fully customize the filtering experience.
Important: Adding AdvancedTables to your table is required for Advanced Filter Builder to properly work.
#Using Advanced Filter Builder
To enable the Advanced Filter Builder, add AdvancedFilterBuilder to your table's ->filter() method:
return $table ->columns([ ... ]) ->filters([ AdvancedFilter::make(), ])#Enabling Column Filters

To automatically generate Column Filters for each of your table columns, you may use the ->includeColumns() method. This will automatically map your table's compatible columns to the appropriate Column Filter and make them available in Advanced Filter Builder's picker:
AdvancedFilter::make() ->includeColumns()Tip: If you wish to only use some Column Filters, you may use either include or exclude columns.
#Column Filter types
Advanced Filter Builder includes multiple different custom Column Filters, each with it's own set of operators:
#Text Filter
The TextFilter allows you to filter text strings with operators like is, is not, starts with, does not end with, contains, etc.

When appropriate, the TextFilter can also transform the is and is not operators into a multiple select dropdown:

#Numeric Filter
The NumericFilter allows you to filter numbers with operators like equal to, greater than, less than or equal to, between, positive, etc.

#Date Filter
The DateFilter allows you to filter dates combining operators like yesterday, in the next, before, between, etc. with units like day, week, months ago, years from now, etc.

#Select Filter
Advanced Table's custom SelectFilter combines Filament's SelectFilter with operators is, is not, is empty, is not empty.

#Automatic column mapping
Advanced Filter Builder will automatically map your table columns to the appropriate filter depending on the type of column:
TextColumn::make()->date()andTextColumn::make()->dateTime()columns will be mapped to the DateFilter.TextColumn::make()->numeric()andTextColumn::make()->money()columns will be mapped to the NumericFilter.- Aggregate Relationship columns
count,avg,min,max, andsumwill be mapped to an aggregate NumericFilter. - Any remaining
TextColumnwill be mapped to the TextFilter. SelectColumnwill be mapped to Advanced Filter's custom SelectFilter.CheckboxColumn,ToggleColumn,ImageColumn,IconColumnwill be mapped to Filament'sTernary Filter.
#Customizing filters
Advanced Filter Builder uses the methods on your columns to automatically determine the appropriate filter to use. However, sometimes your table column may not match the type of filter you need. For example, if you are using a TextColumn to display an numeric amount, but aren't using the ->numeric() method, Advanced Filter Builder wouldn't know it's best to use a NumericFilter. In these cases, it's easy to customize the filter manually using the ->filters() method.
#Customizing a Column Filter
You may manually define a Column Filter for a particular column by passing the desired filter type to the ->filters() method. The name of the filter should be the column you wish to override.
Tip: Any filter you add to the
->filters()array will be shown in the filters dropdown by default. To override this behavior you can use the->defaultFilters()method to configure which filters, if any, are shown by default.
Note: When you are customizing a Column Filter the
nameof the filter must match the name of the column in your Filament table. If not, it will not appear in the Filter Picker.
AdvancedFilter::make() ->filters([ NumericFilter::make('shipping_price') // Use the NumericFilter on the shipping_price column ])To enable the Select field inside of the TextFilter, you may use a TextFilter and then pass in an array of options:
AdvancedFilter::make() ->filters([ TextFilter::make('country') ->options(fn () => Country::all()->pluck('name', 'id')), ])You may also pass in a relationship to automatically load the available options:
AdvancedFilter::make() ->filters([ TextFilter::make('customer.name') ->relationship(name: 'customer', titleAttribute:'name') ->multiple() ->preload(), ])Finally, if your table column only needs a dropdown of options to select from (ie, it doesn't need additional operators like starts with, contains, etc.), you may manually map your column to Advanced Filter Builder's custom SelectFilter:
use Archilex\AdvancedTables\Filters\SelectFilter; AdvancedFilter::make() ->filters([ SelectFilter::make('status') ->options([ 'processing' => 'Processing', 'new' => 'New', 'shipped' => 'Shipped', 'delivered' => 'Delivered', 'cancelled' => 'Cancelled', ]) ->multiple(), ])Important: Be sure to import
Archilex\AdvancedTables\Filters\SelectFilterto see theis,is not,is empty, andis not emptyoperators.
#Customizing a column filter's operators
You may customize a column filter's operators using either the ->includeOperators() or ->excludeOperators() methods:
AdvancedFilter::make() ->filters([ TextFilter::make('name') ->includeOperators([ TextOperator::CONTAINS, TextOperator::DOES_NOT_CONTAIN ]), SelectFilter::make('status') ->includeOperators([ TextOperator::IS, // The SelectFilter uses the TextOperator ]), DateFilter::make('created_at') ->excludeOperators([ DateOperator::YESTERDAY, DateOperator::TODAY, DateOperator::TOMORROW ]), NumericFilter::make('total_price') ->excludeOperators([ NumericOperator::EQUAL_TO, NumericOperator::NOT_EQUAL_TO ]), ])To customize a column filter's operators globally, you can call the static configuringUsing() method from the boot() method of a service provider:
public function boot(){ TextFilter::configureUsing(function (TextFilter $filter) { return $filter->includeOperators([ TextOperator::CONTAINS, TextOperator::DOES_NOT_CONTAIN ]); });}includeOperators() and excludeOperators() can also take a closure meaning you can further customize which operators are available:
TextFilter::configureUsing(function (TextFilter $filter) { return $filter->includeOperators(function (TextFilter $filter) { return $filter->getName() === 'currency' ? [TextOperator::CONTAINS, TextOperator::DOES_NOT_CONTAIN] : [TextOperator::IS, TextOperator::IS_NOT]; });});#Customizing a column filter's default operator
To customize a column filter's default operator you may pass the name of the operator to the ->defaultOperator() method:
AdvancedFilter::make() ->filters([ TextFilter::make('name') ->defaultOperator(TextOperator::CONTAINS), ])To customize a column filter's default operator globally, you can call the static configuringUsing() method from the boot() method of a service provider:
public function boot(){ TextFilter::configureUsing(fn (TextFilter $filter) => $filter->defaultOperator(TextOperator::CONTAINS)); DateFilter::configureUsing(fn (TextFilter $filter) => $filter->defaultOperator(DateOperator::TODAY)); SelectFilter::configureUsing(fn (TextFilter $filter) => $filter->defaultOperator(TextOperator::IS)); NumericFilter::configureUsing(fn (TextFilter $filter) => $filter->defaultOperator(NumericOperator::GREATER_THAN));}defaultOperator() can also take a closure meaning you can further customize which operator is the default:
TextFilter::configureUsing(function (TextFilter $filter) { return $filter->defaultOperator(function (TextFilter $filter) { return $filter->getName() === 'currency' ? TextOperator::CONTAINS : TextOperator::IS; });});#Adding custom filters
Advanced Filter Builder can also seamlessly integrate any of Filament's filters, including custom filters. This allows a filter to be used multiple times as well as in "or groups".
Tip: Any filter you add to the
->filters()array will be shown in the filters dropdown by default. To override this behavior you can use the->defaultFilters()method to configure which filters, if any, are shown by default.
To add a filter to Advanced Filter Builder, pass the filter into the ->filters() method:
AdvancedFilter::make() ->filters([ Filter::make('is_active') ->query(fn (Builder $query): Builder => $query->where('is_active', true)) ->toggle(), ])Note: Any filter that has the same
nameas your table column, will be override the automatically mapped column filter. If the filter name does not match any of the table columns it will be added as an additional filter.
Important: If you are updating from a prior release and your users have already saved created User Views with filters, don't worry, Advanced Filter Builder will automatically map them to the first filter group.
However, if you are using Preset Views with default filters, you will need to adjust your filters to be compatible with Advanced Filter Builder.
#Using filters alongside Advanced Filter Builder
You may still use any of Filament's filters alongside Advanced Filter Builder by adding it as you normally would to your table's ->filters() method:
return $table ->columns([ ... ]) ->filters([ Filter::make('is_active') ->query(fn (Builder $query): Builder => $query->where('is_active', true)) ->toggle(), AdvancedFilter::make(), ])The above will add a single Is active toggle filter to the filter dropdown as well as display the Advanced Filter Builder below it.
#Including columns
To only filter some of your columns, you may pass an array of column names you wish to include to the ->includeColumns() method:
AdvancedFilter::make() ->includeColumns([ 'is_active', 'currency', 'address.city', ]);Important: If you are customizing a Column Filter, that column must be included in the
->includesColumns()method.
#Excluding columns
You may instead exclude columns by passing an array of columns names to the ->excludeColumns() method:
AdvancedFilter::make() ->excludeColumns([ 'status', 'customer.name', 'created_at', ]);Important: If you are customizing a Column Filter, that column must not be excluded from the
->excludesColumns()method.
#Setting the default filters
By default, every filter included in Advanced Filter Builder's ->filters() method will be shown in the table's filter dropdown. Column Filters that haven't been overriden in the ->filters() method will be available in the filter picker. To not display any column filters you can pass an empty array to the ->defaultFilters() method:
AdvancedFilter::make() ->filters([ ... ]) ->defaultFilters([])To only display some filters by default, you may pass the name of your filter to the ->defaultFilters() method inside a double array. You may also use this method to define Column Filters you wish to be displayed by default in the filter dropdown:
AdvancedFilter::make() ->filters([ ... ]) ->defaultFilters([['status']])Important: Be sure to add your filters inside a double array.
You can also set up multiple default groups:
AdvancedFilter::make() ->filters([ ... ]) ->defaultFilters([['status'], ['status']])#Disabling Or Groups
By default, Advanced Filter Builder allows your filters to be used in "or groups". You may disable this feature by passing false to the ->orGroups() method:
AdvancedFilter::make() ->orGroups(false)#Layout options
Advanced Filter Builder responsively adapts to any of the available FilterLayouts (AboveContent, BelowContent, AboveContentCollapsible, Modal, SlideOver, Dropdown). When the builder is used with the Dropdown layout (Filament's default layout), the user will also be presented with an "Expand View" button that will allow the dropdown to expand into a slideOver.
If you using the Modal layout, it's recommended you set the ->filtersFormWidth() on the table to at least 3xl so the form elements have space to flow:
use Archilex\AdvancedTables\Filters\AdvancedFilter;use Filament\Tables\Actions\Action;use Filament\Tables\Table;use Filament\Tables\Enums\FiltersLayout; public function table(Table $table): Table{ return $table ->filters([ AdvancedFilter::make(), ]) ->filtersLayout(FiltersLayout::Modal) ->filtersFormWidth('3xl')}#Customizing the Expand View Link Position
When using Filament's default Dropdown filter layout, the user will also be presented with an "Expand View" button that will allow the dropdown to expand into a slideOver. The expand view link in this view is absolute positioned (ugly...I know). If you are using translatable fields, this may cause the link to overlap. You may change the position of the expand view link by passing an array of styles to the ->filterBuilderExpandViewStyles() method:
AdvancedTablesPlugin::make() ->filterBuilderExpandViewStyles(['right: 100px', 'top: 24px'])This method also take a closure allowing you to set different positions based on a condition such as locale:
use Illuminate\Support\Facades\App; AdvancedTablesPlugin::make() ->filterBuilderExpandViewStyles(fn () => App::isLocale('es') ? ['right: 100px', 'top: 24px'] : ['right: 80px', 'top: 24px'])#Always opening the filter as a slideOver
If you would prefer Advanced Filter Builder to always open in a slideOver or modal, you may use Filament's filtersTriggerAction() method:
use Archilex\AdvancedTables\Filters\AdvancedFilter;use Filament\Tables\Actions\Action;use Filament\Tables\Table; public function table(Table $table): Table{ return $table ->filters([ AdvancedFilter::make(), ]) ->filtersFormWidth('md') ->filtersTriggerAction( fn (Action $action) => $action ->slideOver() );}#Adding icons to the Filter Picker
You can add icons to the Filter Picker by passing an array of icons to the ->icons() method where the name of your filter is the key and the icon is the value:
AdvancedFilter::make() ->filters([ ... ]) ->icons([ 'status' => 'heroicon-o-clock', 'currency' => 'heroicon-o-currency-euro', 'customer' => 'heroicon-o-user', 'created_at' => 'heroicon-o-calendar', ])#Enabling search in the Filter Picker
If the Filter Picker has a lot of available filters you can enable a search field using the ->filterPickerSearch() method:
AdvancedFilter::make() ->filterPickerSearch()#Configuring the number of Filter Picker columns
To change the number of columns the Filter Picker may occupy, you may use the ->filterPickerColumns() method:
AdvancedFilter::make() ->filterPickerColumns(2)Passing an integer will determine how many columns are displayed at the lg breakpoint. You may also pass an array:
AdvancedFilter::make() ->filterPickerColumns(['sm' => 2])#Configuring the Filter Picker width
To customize the width of the Filter Picker, you may use the ->filterPickerWidth() method, and specify a width - xs, sm, md, lg, xl, 2xl, etc.
AdvancedFilter::make() ->filterPickerWidth('md')Tip: Since the slideOver is confined to width
md, it is recommended the Filter Picker not be set to a width larger thanmdas larger sizes will cause the slideOver to horizontally scroll.
#Configuring the maximum height of the Filter Picker
To add a maximum height to the Filter Picker, which, in turn, allows the picker to be scrolled, you may use the ->filterPickerMaxHeight() method, passing a CSS length:
AdvancedFilter::make() ->filterPickerMaxHeight('240px')#Hiding the filter indicator group labels
When adding multiple filter groups ("or" groups), an the Filter Group number (ie "Filter Group 1") will be prepended to the indicator to help differentiate between the different filter groups. You may disable this by passing false to the ->prependFilterGroupLabels() method:
AdvancedFilter::make() ->prependFilterGroupLabels(false)You may also hide the filter group label when there is only one filter group:
AdvancedFilter::make() ->prependFilterGroupLabels(prependFilterGroupLabelWhenSoleGroup: false)And of course, this can be set globally in your service provider:
AdvancedFilter::configureUsing(function (AdvancedFilter $filter) { return $filter->prependFilterGroupLabels(prependFilterGroupLabelWhenSoleGroup: false);});Tip: The name/translation of the label can be modified in the language file.
#Customizing the sequence of filter indicator group colors
When adding multiple filter groups ("or" groups), the indicators will be displayed in different colors to help differentiate between the different filter groups. By default, the indicators will be colored in the following sequence: primary, info, gray, success, danger, warning. You may choose a different sequence by passing an array of colors to the ->indicatorColors() method:
AdvancedFilter::make() ->indicatorColors(['info', 'success'])Any default color that is not defined in the array will be appended after the last defined color.
#Customizing the buttons and labels
You may customize Advanced Filter Builders buttons, labels, and filter operators in the language file.
#Multi-Tenancy
Advanced Tables has built in support for simple one-to-many tenancy, Filament's multi-tenancy as well as basic support for Spatie Multi-tenancy and Tenancy for Laravel. (Please see support section below).
Setting up tenancy with Advanced Tables will depend on your app and the tenancy implementation you are using. Please refer to the appropriate instructions for your setup:
- Simple one-to-many tenancy with Filament Panels - Instructions
- Simple one-to-many tenancy with Filament's standalone Table Builder - Instructions
- Multi-tenancy with Filament Panels using Filament's tenancy implementation - Instructions
- Multi-tenancy with Filament Panels using a third party tenancy implementation (Spatie/Stancl) - Instructions
- Multi-tenancy with Filament's standalone Table Builder and a third party tenancy implementation (Spatie/Stancl) - Instructions
#Simple one-to-many tenancy
Since in a simple one-to-many tenancy implementation, each user only belongs to one tenant (team, organization, company, etc.), it may not be necessary to set up tenancy in Advanced Tables as each User View is already scoped to a user. However, if are allowing users to share views or if your tenant will have admins that can create Global Favorite Views, you will need to enable tenancy so that each User View will be scoped to the appropriate tenant.
#Setting up simple tenancy with Filament Panels
-
To set up simple tenancy with Filament Panels you will need to pass your
Tenant::classto the->tenant()method of theAdvancedTablesPluginobject:AdvancedTablesPlugin::make()->tenant(Team::class) -
After you have configured your tenant model you may proceed to run the
AddTenancycommand:php artisan advanced-tables:add-tenancyThis command will add and run the necessary migrations to finishing setting up multi-tenancy in Advanced Tables.
#Setting up simple tenancy with Filament's standalone Table Builder
-
To set up simple tenancy with Filament's standalone Table Builder you will need to add your
Tenant::classto youradvanced-tables.phpconfig file:'tenancy' => ['tenant' => App\Models\Team::class,], -
Inside your tenant model you need to include a
getTenantId()method so Advanced Tables knows which tenant to use for its scopes:class Team extends Model{public function getTenantId(): ?string{return auth()->user()?->team_id;}} -
After you have configured your tenant model and the
getTenantId()method, you may proceed to run theAddTenancycommand:php artisan advanced-tables:add-tenancyThis command will add and run the necessary migrations to finishing setting up multi-tenancy in Advanced Tables.
#Multi-Tenancy
#Setting up multi-tenancy with Filament's implementation
-
To set up multi-tenancy with Filament Panels and Filament's multi-tenancy implementation, first set up multi-tenancy in Filament per Filament's instructions.
-
After setting up tenancy in Filament, run the
AddTenancycommand:php artisan advanced-tables:add-tenancyThis command will add and run the necessary migrations to finishing setting up multi-tenancy in Advanced Tables.
#Setting up multi-tenancy with a third party implementation
-
To set up multi-tenancy with Filament Panels and Spatie Multi-tenancy or Tenancy For Laravel you will need to pass your
Tenant::classto the->tenant()method of theAdvancedTablesPluginobject:AdvancedTablesPlugin::make()// Spatie->tenant(\Spatie\Multitenancy\Models\Tenant::class)// TenancyForLaravel->tenant(\Stancl\Tenancy\Database\Models\Tenant::class) -
After setting up tenancy, run the
AddTenancycommand:php artisan advanced-tables:add-tenancyThis command will add and run the necessary migrations to finishing setting up multi-tenancy in Advanced Tables.
#Setting up multi-tenancy in Filament's standalone Table Builder with a third party implementation
-
To set up multi-tenancy with Filament's standalone Table Builder along with Spatie Multi-tenancy or Tenancy For Laravel you will need to add your
Tenant::classto youradvanced-tables.phpconfig file:'tenancy' => ['tenant' => \Spatie\Multitenancy\Models\Tenant::class,], -
After you have configured your tenant model, you may proceed to run the
AddTenancycommand:php artisan advanced-tables:add-tenancyThis command will add and run the necessary migrations to finishing setting up multi-tenancy in Advanced Tables.
#Configuring the table column
If you had previously manually implemented multi-tenancy in Advanced Tables and need to reference a table column other than the default tenant_id, you may configure it by passing your column name to the ->tenantColumn() method:
AdvancedTablesPlugin::make() ->tenantColumn('account_id')#Ignoring multi-tenancy
If you are using multi-tenancy in your app, but would prefer User Views and Preset Views to not be scoped to each tenant (i.e. a user's views would be the same regardless of which tenant they are in), you may ignore multi-tenancy in the plugin by passing false to the ->scopeToTenancy() method:
AdvancedTablesPlugin::make() ->scopeToTenancy(false)#Support for multi-tenancy
Advanced Tables only fully supports Filament's official multi-tenancy implementation. Since third-party multi-tenancy implementations with either Spatie or Tenancy for Laravel can vary dramatically from developer to developer, it is possible that Advanced Tables will not be fully compatible. Please be sure you have multi-tenancy fully working and tested before attempting to implement multi-tenancy in Advanced Tables. Support can only be provided for issues pertaining to Advanced Tables.
#User Views Resource
The User Views Resource is a Filament table resource primarily for admins to be able to manage the User Views of all their users. It is also where admins can approve or reject User Views with the approval system.
Important: You will need to set up a policy to limit access to the User Views Resource. Without a policy, any user will be able to rename, update, or delete any User View. See the policy section for more information.
#Easily toggling a views public, or global setting
The icons in the rows are actionable and can be clicked to quickly toggle the setting.
#User Views Resource configurations
Advanced Tables offers multiple ways to customize the User Views Resource. Unless specified otherwise, these options can be configured directly on the AdvancedTablesPlugin object inside your PanelProvider.
#Disabling the User Views Resource
Advanced Tables enables the User Views Resource by default. If you are not using User Views, you may disable this by passing false to the resourceEnabled() method:
AdvancedTablesPlugin::make() ->resourceEnabled(false)If you wish to just limit access to the User Views Resource, you should create a policy.
#Customizing the labels
You may customize the model label, plural model label, and navigation label in the language file.
#Customizing the navigation icon
You may customize the navigation icon by passing a heroicon to the resourceNavigationIcon() method:
AdvancedTablesPlugin::make() ->resourceNavigationIcon('heroicon-o-star')#Customizing the navigation group
You may customize the navigation group by passing a string to the resourceNavigationGroup() method:
AdvancedTablesPlugin::make() ->resourceNavigationGroup('Settings')#Customizing the navigation sort order
You may customize the navigation sort order by passing an int to the resourceNavigationSort() method:
AdvancedTablesPlugin::make() ->resourceNavigationSort(1)#Disabling the Navigation Badge
By default, Advanced Tables shows a badge in the navigation of the number of unapproved views. You may disable this by passing false to the resourceNavigationBadge() method:
AdvancedTablesPlugin::make() ->resourceNavigationBadge(false)#Disabling loading all users in the user select filter
By default, when filtering users in the User Views Resource all users will be loaded. This is fine for smaller applications with a handful of users, but if you application has hundreds or thousands of users, you may disable loading all users by passing false to the resourceLoadAllUsers method:
AdvancedTablesPlugin::make() ->resourceLoadAllUsers(false)#Using multiple panels
When using multiple panels the User Views Resource by default will only show the User Views associated with the current panel's resources. However, since the UserViewResource::class is part of the plugin, if you create views on the User View Resource then those views will appear in every panel's User Views Resource. Sometimes, this maybe desired. For example, if you create an "Approved" view on the User View Resource, you may want that view to appear in the User Views Resource of every panel.
However, if you prefer each User Views Resource to be independent, you can follow the steps below:
Note: This will only affect future views created for the User Views Resource. It will not update views you previously created for your User Views Resource.
-
Copy
archilex/filament-filter-sets/src/Resources/UserViewResource.phpandarchilex/filament-filter-sets/src/Resources/UserViewResource/Pages/ManageUserViews.phpfiles to your panels directory:+-- Filament│ +-- SecondaryPanel│ │ +-- Resources│ │ │ +-- UserViewResource.php│ │ │ +-- UserViewResource│ │ │ │ +-- Pages│ │ │ │ │ +-- ManageUserViews.phpNote: While you can extend the plugin's UserViewResource for each panel, it is also possible to use the plugin's UserViewResource for your main panel and only extend the resource for your secondary panels.
-
Extend UserViewResource.php:
namespace App\Filament\SecondaryPanel\Resources;use App\Filament\SecondaryPanel\Resources\UserViewResource\Pages\ManageUserViews;use Archilex\AdvancedTables\Resources\UserViewResource as Resource;class UserViewResource extends Resource{public static function getPages(): array{return ['index' => ManageUserViews::route('/'),];}} -
Update ManageUserViews.php
namespace App\Filament\SecondaryPanel\Resources\UserViewResource\Pages;use App\Filament\SecondaryPanel\Resources\UserViewResource;use Archilex\AdvancedTables\AdvancedTables;use Filament\Resources\Pages\ManageRecords;class ManageUserViews extends ManageRecords{use AdvancedTables;protected static string $resource = UserViewResource::class;}
Now, when you create a view inside that panel's User Views Resource it will only appear in that panels' User Views Resource.
#Showing user views from multiple panels
As mentioned, by default the User Views Resource will only show the User Views that are associated to that panel. However, if you would like to include views from other panels you can do that by passing an array of panel ids to the ->resourcePanels() method.
AdvancedTablesPlugin::make() ->resourcePanels(['admin', 'secondaryPanel'])Note: The
openaction will only be displayed for the current panel's user views.
#Authorization
Depending on your application, you may not want to give all of your users the ability to use all the functions. Here are a few example situations:
- You want to limit access to the User Views Resource to only administrators.
- You only want the administrator to be able to create global favorite User Views.
- You want your users to be able to create their own User Views, but not make them globally or publicly available to other users.
- You want to disallow picking colors for User Views.
Advanced Tables handles authorization with Laravel policies. Beyond Filament's normal policy methods, Advanced Tables includes the following additional methods:
#Policy Methods
makePublic() is used to control who can make a User View publicly available to the other users.
makeFavorite() is used to control who can add a User View to their favorites. Usually this will be enabled for all users.
makeGlobalFavorite() is used to control who can make a User View a global favorite for all users. Usually this would only be administrators.
selectIcon() is used to control if you want to allow your users to select an icon for a User View.
selectColor() is used to control if you want to allow your users to select colors for a User View.
#Policy example
To make setting up these policies easy Advanced Tables includes a sample UserViewPolicy. To implement this policy, first create your own policy:
php artisan make:policy UserViewPolicyNext, locate the newly created UserViewPolicy and replace its contents with the contents in the example UserViewPolicy located in this plugin's Policies directory.
Finally, even though Laravel may automatically detect your policy, it is recommended you explicitly register it in App\Providers\AuthServiceProvider:
use App\Policies\UserViewPolicy;use Archilex\AdvancedTables\Models\UserView; protected $policies = [ UserView::class => UserViewPolicy::class,];#Example policy assumptions
The example policy assumes:
- You are using the default
User::classand that it's located in theApp\Models\directory as has been the default since Laravel 8. - You have an
isAdmin()method on your user model.
#Policies applied by example
The example policy will apply the following policies:
- Only admins will be able to view the User Views Resource.
- All users can create User Views.
- Only admins or the owner of the User View can view, update, or delete their User View.
- Only admins can bulk delete User Views.
- All users can make their User Views public.
- All users can favorite their User Views or other user's User Views.
- Only admins can make a User View a global favorite.
- All users can select an icon for their User Views.
- All users can select a color for their User Views.
#Additional Configurations
#Table Loading Indicators (New)
If you would like to give your users more feedback when their table is loading, you may enable a loading skeleton overlay by adding the ->tableLoadingOverlay() method:
AdvancedTablesPlugin::make() ->tableLoadingOverlay()If any of your table columns are using the ->extraCellAttributes() method, you will need to make sure you pass in true as the second parameter so that your attributes are merged with the plugin's:
TextColumn::make('name') ->extraCellAttributes([ 'class' => 'bg-gray-500' ], merge: true)Additional loading indicator types and effects will be coming in the future. Feel free to reach out to me with your suggestions.
Note: Be sure to run
npm run buildandphp artisan filament:upgradeafter enabling this feature.
#User::class
If you are using a User configuration other than Laravel's default, you should configure these before running your migrations:
#Configuring the User::class
You may customize the User::class by passing your custom class to the user() method:
AdvancedTablesPlugin::make() ->user(MyUser::class)#Configuring the users database table
You may customize the users database table by passing the name of your table to the userTable() method:
AdvancedTablesPlugin::make() ->userTable('my_users_table')#Configuring the user name columns
By default, Laravel's default users table includes a name column which Advanced Tables expects to exist. If you have modified your users table to something such as first_name and last_name you may configure this using the userTableNameColumn() method:
AdvancedTablesPlugin::make() ->userTableNameColumn('first_name')If you have only have a first_name and last_name column, but still wish to show a user's full name in the User Views Resource, you may create a virtual column to support this:
$table->string('full_name')->virtualAs('concat(first_name, \' \', last_name)');AdvancedTablesPlugin::make() ->userTableNameColumn('full_name')#Configuring the user primary key
If you are set your primary key on your User::class model to something other than Laravel's default id, you should also configure this in Advanced Tables using the userTableKeyColumn() method:
AdvancedTablesPlugin::make() ->userTableKeyColumn('uuid')#Configuring the authentication guard
By default, Advanced Tables will use whichever authentication guard is set on your Filament panel. If you are using standalone Table Builder, you may set the authentication guard in the advanced-tables config file:
'users' => [ 'auth_guard' => 'web',],#Language Files
Each text field in Advanced Tables has been added to the language file allowing you to customize the text to better fit your application needs. You can publish the language files with:
php artisan vendor:publish --tag=advanced-tables-translationsThis will copy the language files to your resources\lang\vendor\advanced-tables directory. Currently 🇺🇸 English, 🇲🇽 Spanish, and 🇫🇷 French translations are available.
#Filament Table Builder
Advanced Tables has full support for Filament's Table Builder.
Before proceeding, please refer to the setup instructions.
#Getting started
#Adding the Advanced Tables trait
To use Advanced Tables, you need to add the AdvancedTables trait to your component. However, as Advanced Tables overrides multiple methods in Filament's InteractsWithTables trait, adding the AdvancedTables trait to the table will cause a conflict.
For convenience, Advanced Tables includes a Page class which you can use to quickly get up and running:
use Archilex\AdvancedTables\AdvancedTables;use Archilex\AdvancedTables\Livewire\Page; class ListUsers extends Page{ use AdvancedTables; ...Of course, there are multiple ways to prevent the trait conflict. The important part is to ensure that the AdvancedTables trait is used on a class that extends another class which contains Filament's InteractsWithTables trait.
#Adding the view component to your blade file
You also need to add the Favorites Bar component to your blade file:
<div class="space-y-6"> <x-advanced-tables::favorites-bar /> {{ $this->table }}</div>The Favorites Bar expects a space of 24px to properly display it's links. This can easily be achieved with Tailwind's space-y-6 class as shown above.
#Managing User Views
If you are using the Filament Panels, Advanced Tables comes with a UserViewResource so admins can manage all of their user's views. If you are using Filament Tables, you can recreate this table:
-
Create a new Livewire component
php artisan make:livewire ListUserViews -
Locate the
ListUserViews.phpfile in this pluginsLivewiredirectory and copy and paste its contents into your newly createdListFilterSetscomponent. -
Add the Favorites Bar to your
list-user-viewsview component:<div class="space-y-6"><x-advanced-tables::favorites-bar />{{ $this->table }}</div> -
Finally add the route to
routes/web.php.Route::get('/user-views', App\Livewire\ListUserViews::class)->middleware(['auth', 'verified']);
#Configurations
All of the configurations listed above are also available when using Filament's standalone Table Builder. However, these will need to be configured in the config file.
#Support
Question? Bug? Feature request? Comment or suggestion? Email me at advancedtables@gmail.com or join us on #advanced-tables on Discord. I'd love to hear from you.
#Changelog
Please see CHANGELOG for more information on what has changed recently.
#Contributing
Users with active licenses may access the private repo to contribute by visiting the Licenses tab of your AnyStack account.
#Credits
#License
#Single License
The Single License grants the Licensee permission to use Advanced Tables in a single project hosted on a single domain or subdomain. Examples include a personal website or a website for a single client.
If you would like to implement Advanced Tables in a SaaS application, you will need an Unlimited or Lifetime license.
The single license grants permission for up to 5 Employees and Contractors (i.e. developers) of the Licensee to access and use Advanced Tables.
You will receive updates and bug fixes for one year from the date of purchase. Should you decide not to renew your license, you will only be able to install the package up to the last version available before the license expired. You can renew the license at a discounted price to continue receiving updates and new features.
#Unlimited License
The Unlimited License grants the Licensee permission to use Advanced Tables on unlimited domains and subdomains, including SaaS applications.
The unlimited license grants permission for up to 25 Employees and Contractors (i.e. developers) of the Licensee to access and use Advanced Tables. There is no limit on the amount of end-users your app may have.
You will receive updates and bug fixes for one year from the date of purchase. Should you decide not to renew your license, you will only be able to install the package up to the last version available before the license expired. You can renew the license at a discounted price to continue receiving updates and new features.
#Lifetime License
The Lifetime License grants the Licensee permission the same benefits as the Unlimited License.
You will receive updates for the lifetime of the product.
The unlimited license grants permission for up to 25 Employees and Contractors (i.e. developers) of the Licensee to access and use Advanced Tables. There is no limit on the amount of end-users your app may have.
#Code Distribution
None of Advanced Tables' licenses allow the public distribution of its source code. So, you may not build an application using Advanced Tables and distribute that application publicly via an open source repository, hosting platforms, or any other code distribution platform.
#Questions?
Unsure which license you need? Email me at advancedtables@gmail.com with your questions.
Kenneth Sese has been working in software development for more than 10 years. He is driven by a passion to help organizations that serve developing communities to utilize technology to fulfill their missions. He is currently a developer at Padmission building software that is helping end homelessness for families across the United States. He is also the author of Advanced Tables, Toggle Icon Column, and Stacked Image Column.