Upload Pro
CommunityA beautiful, advanced & high-performance upload experience for Filament.
filament/
namespace. Review the source and install at your own risk. Found
malware or an unresolved security issue the author won't
address?
Report it
.
 Author:
Ralph J. Smit
Author:
Ralph J. Smit
Documentation
- Features
- Screenshots
- Installation guide: Filament Upload Pro
- Usage
- Advanced File Upload
- Setting a directory
- Accepted file types & preserving filenames (security)
- Storing filenames in independent column
- Fetching file information
- Spatie MediaLibrary support
- Multiple uploads
- Minimum and maximum file count
- Minimum and maximum file size
- Reordering files
- Custom upload logic
- Uploading message
- Layout options
- Dropzone area
- Files
- Image editor
- PDF-viewer
- Upgrade guide (from V0 to V1)
- Roadmap
- Support
- Advanced File Upload
This package allows you to easily integrate a beautiful file upload component into your Filament app, inside and outside panels. It provides an alternative flexible layout to the native FileUpload, paired with great performance for uploading very large files (S3 Multipart upload or manually chunked for non-S3 disks). It includes an advanced image editor out of the box, supports drag & drop and a whole bunch of handy actions (download, preview, replace, reordering). It includes the ability to insert custom actions per file, making it easy to provide custom actions to run on individual files (existing or just uploaded), like file modifications or editing meta-data, giving you endless flexibility. Furthermore, it includes several components that you can use out-of-the-box in the rest of your Filament forms and infolists, like an ImageEditor component that you are can use in your own forms where you want to provide such functionality.
NEW: The package supports Filament V3, V4 & V5.
#Features
- Advanced upload with many layout & configuration options. 💛
- An easy-to-use
ImageEditorfield that makes it a brief to edit images & save them back on disk. ✨ - A handy
PdfEntryinfolist component that can display a PDF inline. - Include custom actions inside your upload form.
- Native Amazon S3 Multipart upload support. ✅
- Chunked uploads for all non-S3 disks. 🚀
- Benefit of chunked uploads or S3 Multipart is that it allows you to work-around e.g. the Cloudflare 100MB upload limit. ⚙️
- Ability to pause uploads. ⏸️
- Ability to advanced edit images (including cropping & watermark). 👌
- Ability to download files.
- Ability to preview files (image or PDF in a modal). 👀
- Ability to upload a new file to replace an existing one.
- Ability to reorder uploads/existing files.
- Automatic integration with Spatie MediaLibrary ⚡️️
- Built for performance & including all security best-practices. ✨
- Beautiful design & integration with Filament Forms.
- Convert your existing
FileUploadeasily toAdvancedFileUpload. - Works outside the admin panel in all forms, infolists & schemas.
- Fully & easily translatable.
- Supports Filament V5, V4 & V3. 🎉
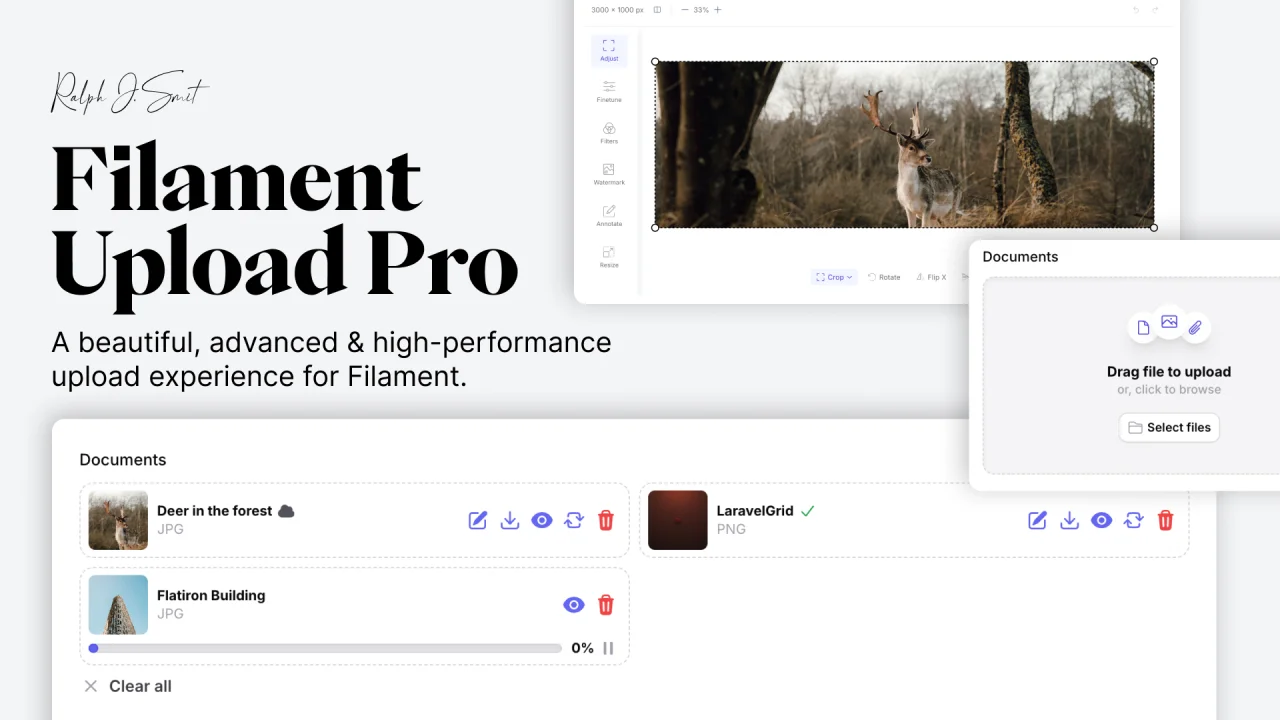
#Screenshots
#Advanced file upload form component
The advanced file-upload component can be used in your forms to upload files. The component will handle automatically the uploading of the files, including chunked uploads for non-S3 disks and S3 Multipart uploads for S3 disks:
The status of each file is shown as follows:
- a cloud-icon if they are already existing on the disk,
- a progress bar (which can be paused and resumed anytime, plus retry on error), or
- a green checkmark icon when the file was uploaded successfully, but not yet saved to the permanent location:
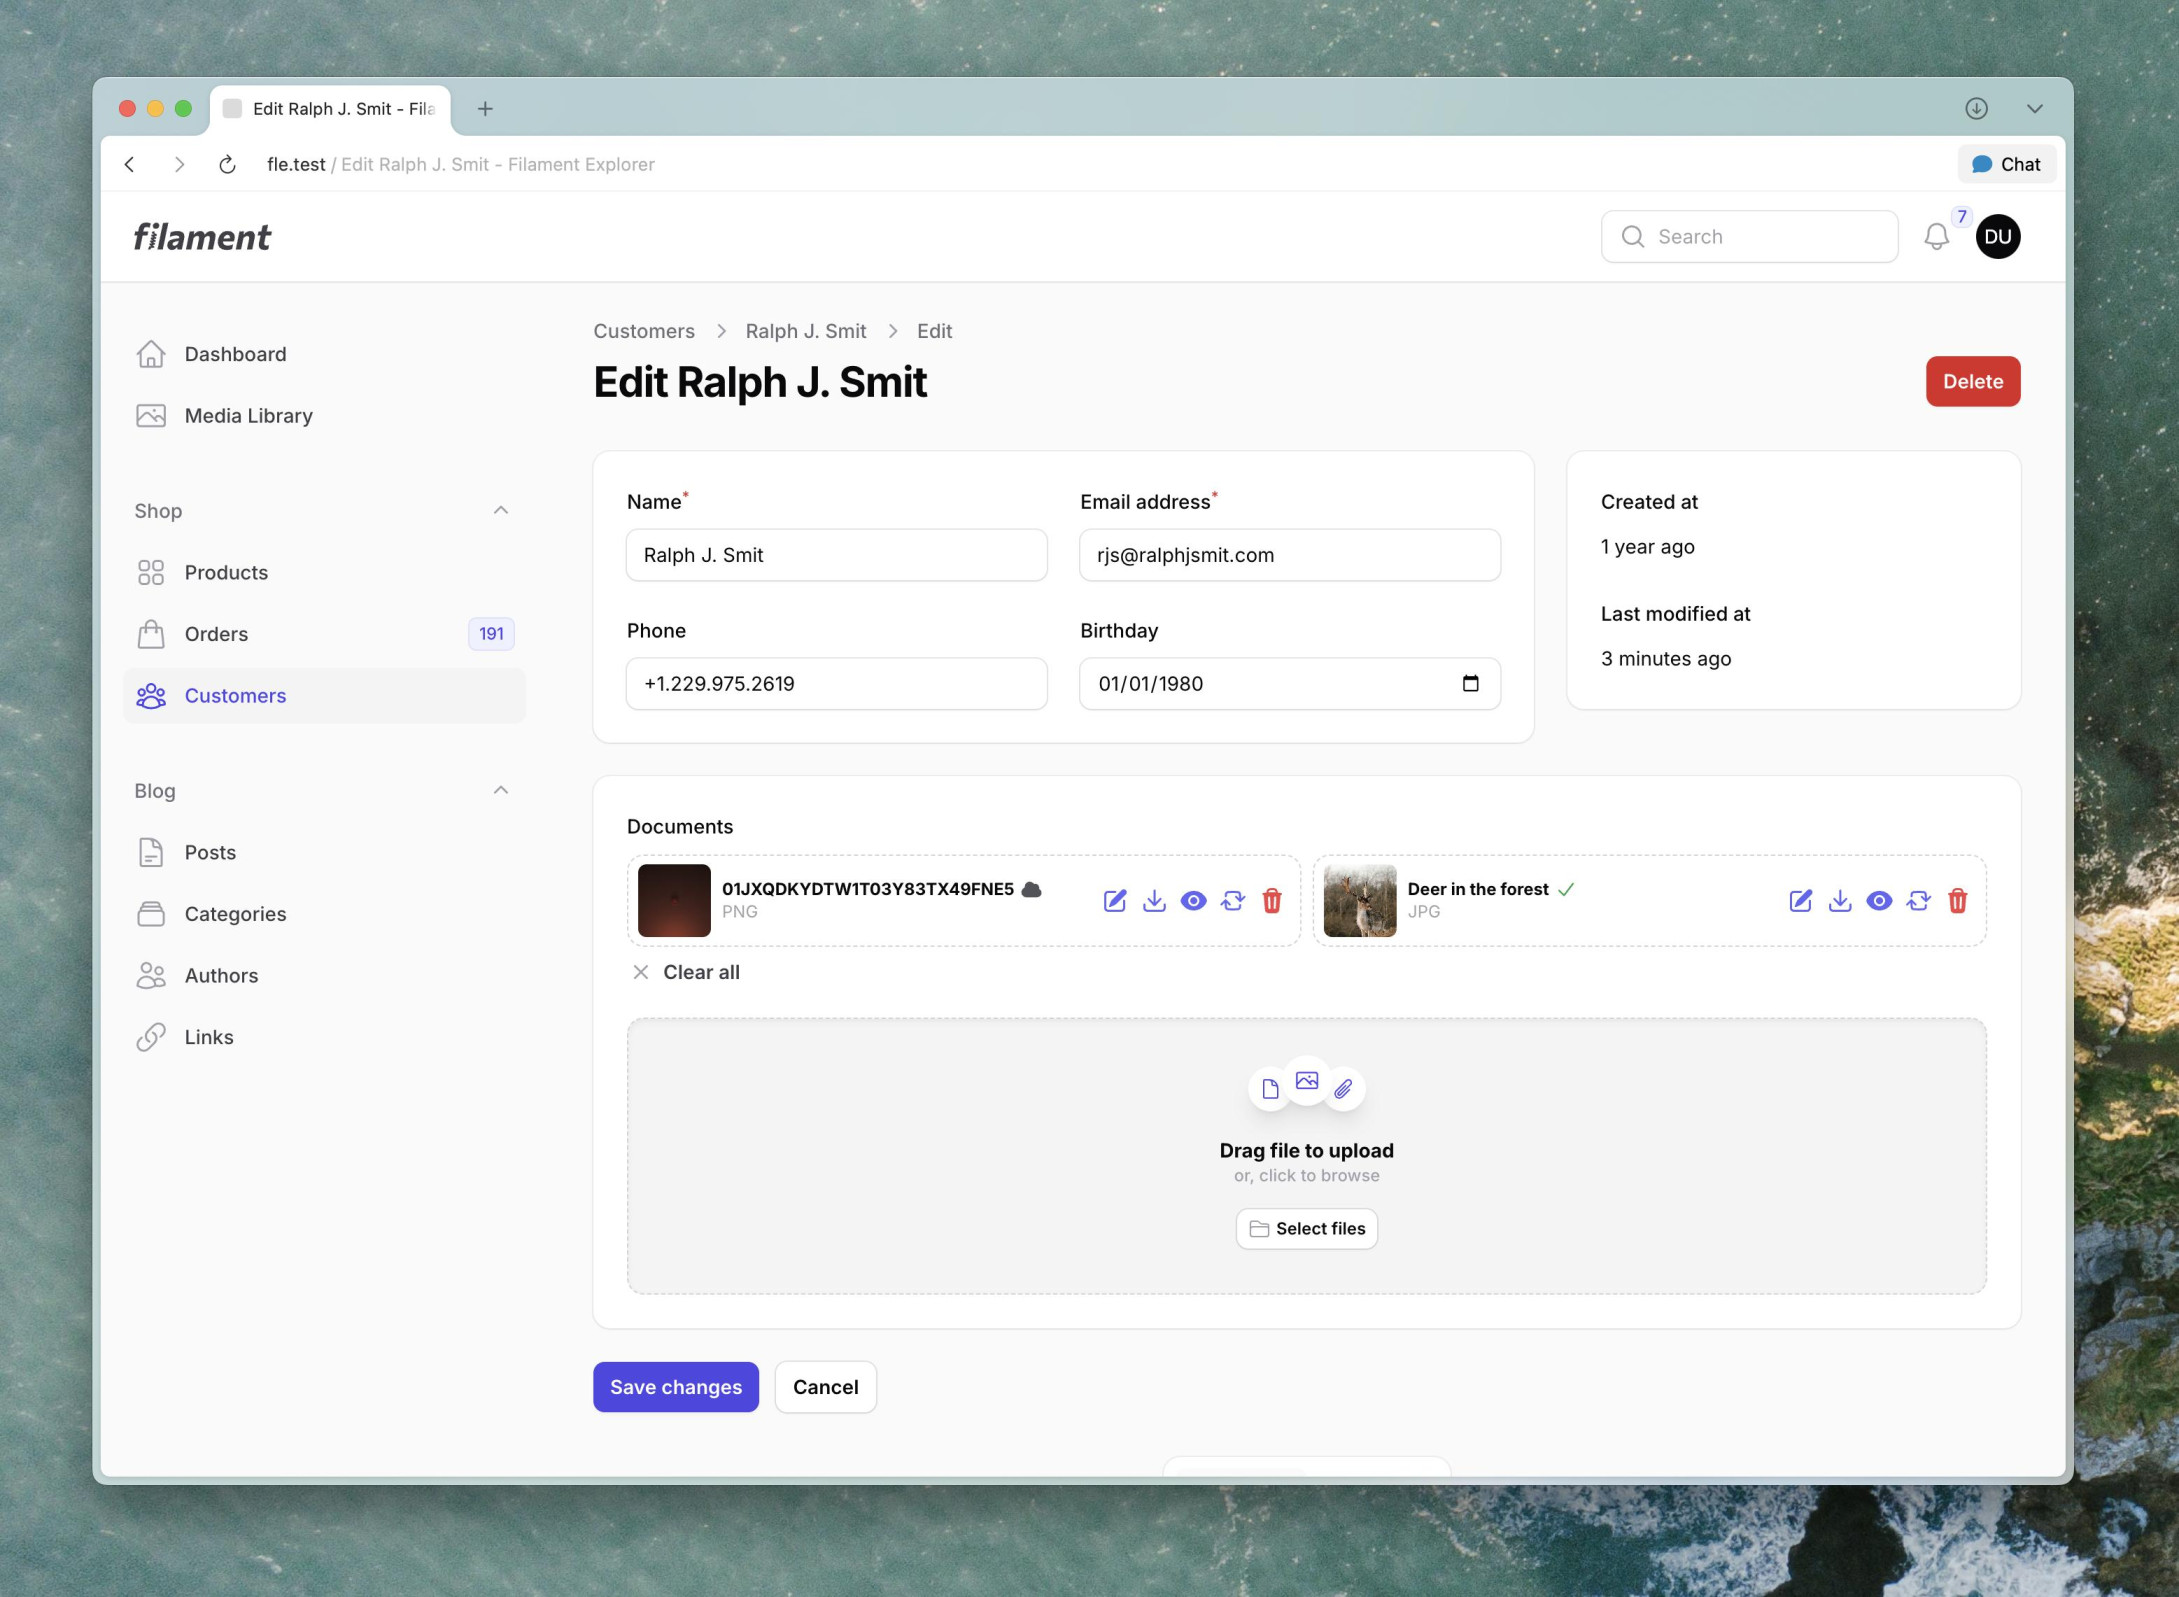
The layout of the file upload-component contains of two parts: the "dropzone" and the "files" sections. You can configure the layout (also per breakpoint) to determine how many columns each of these should span. You can also choose if you want to have the dropzone before or after the files. This allows for super flexible and custom layouts, like the following horizontally-split layout:
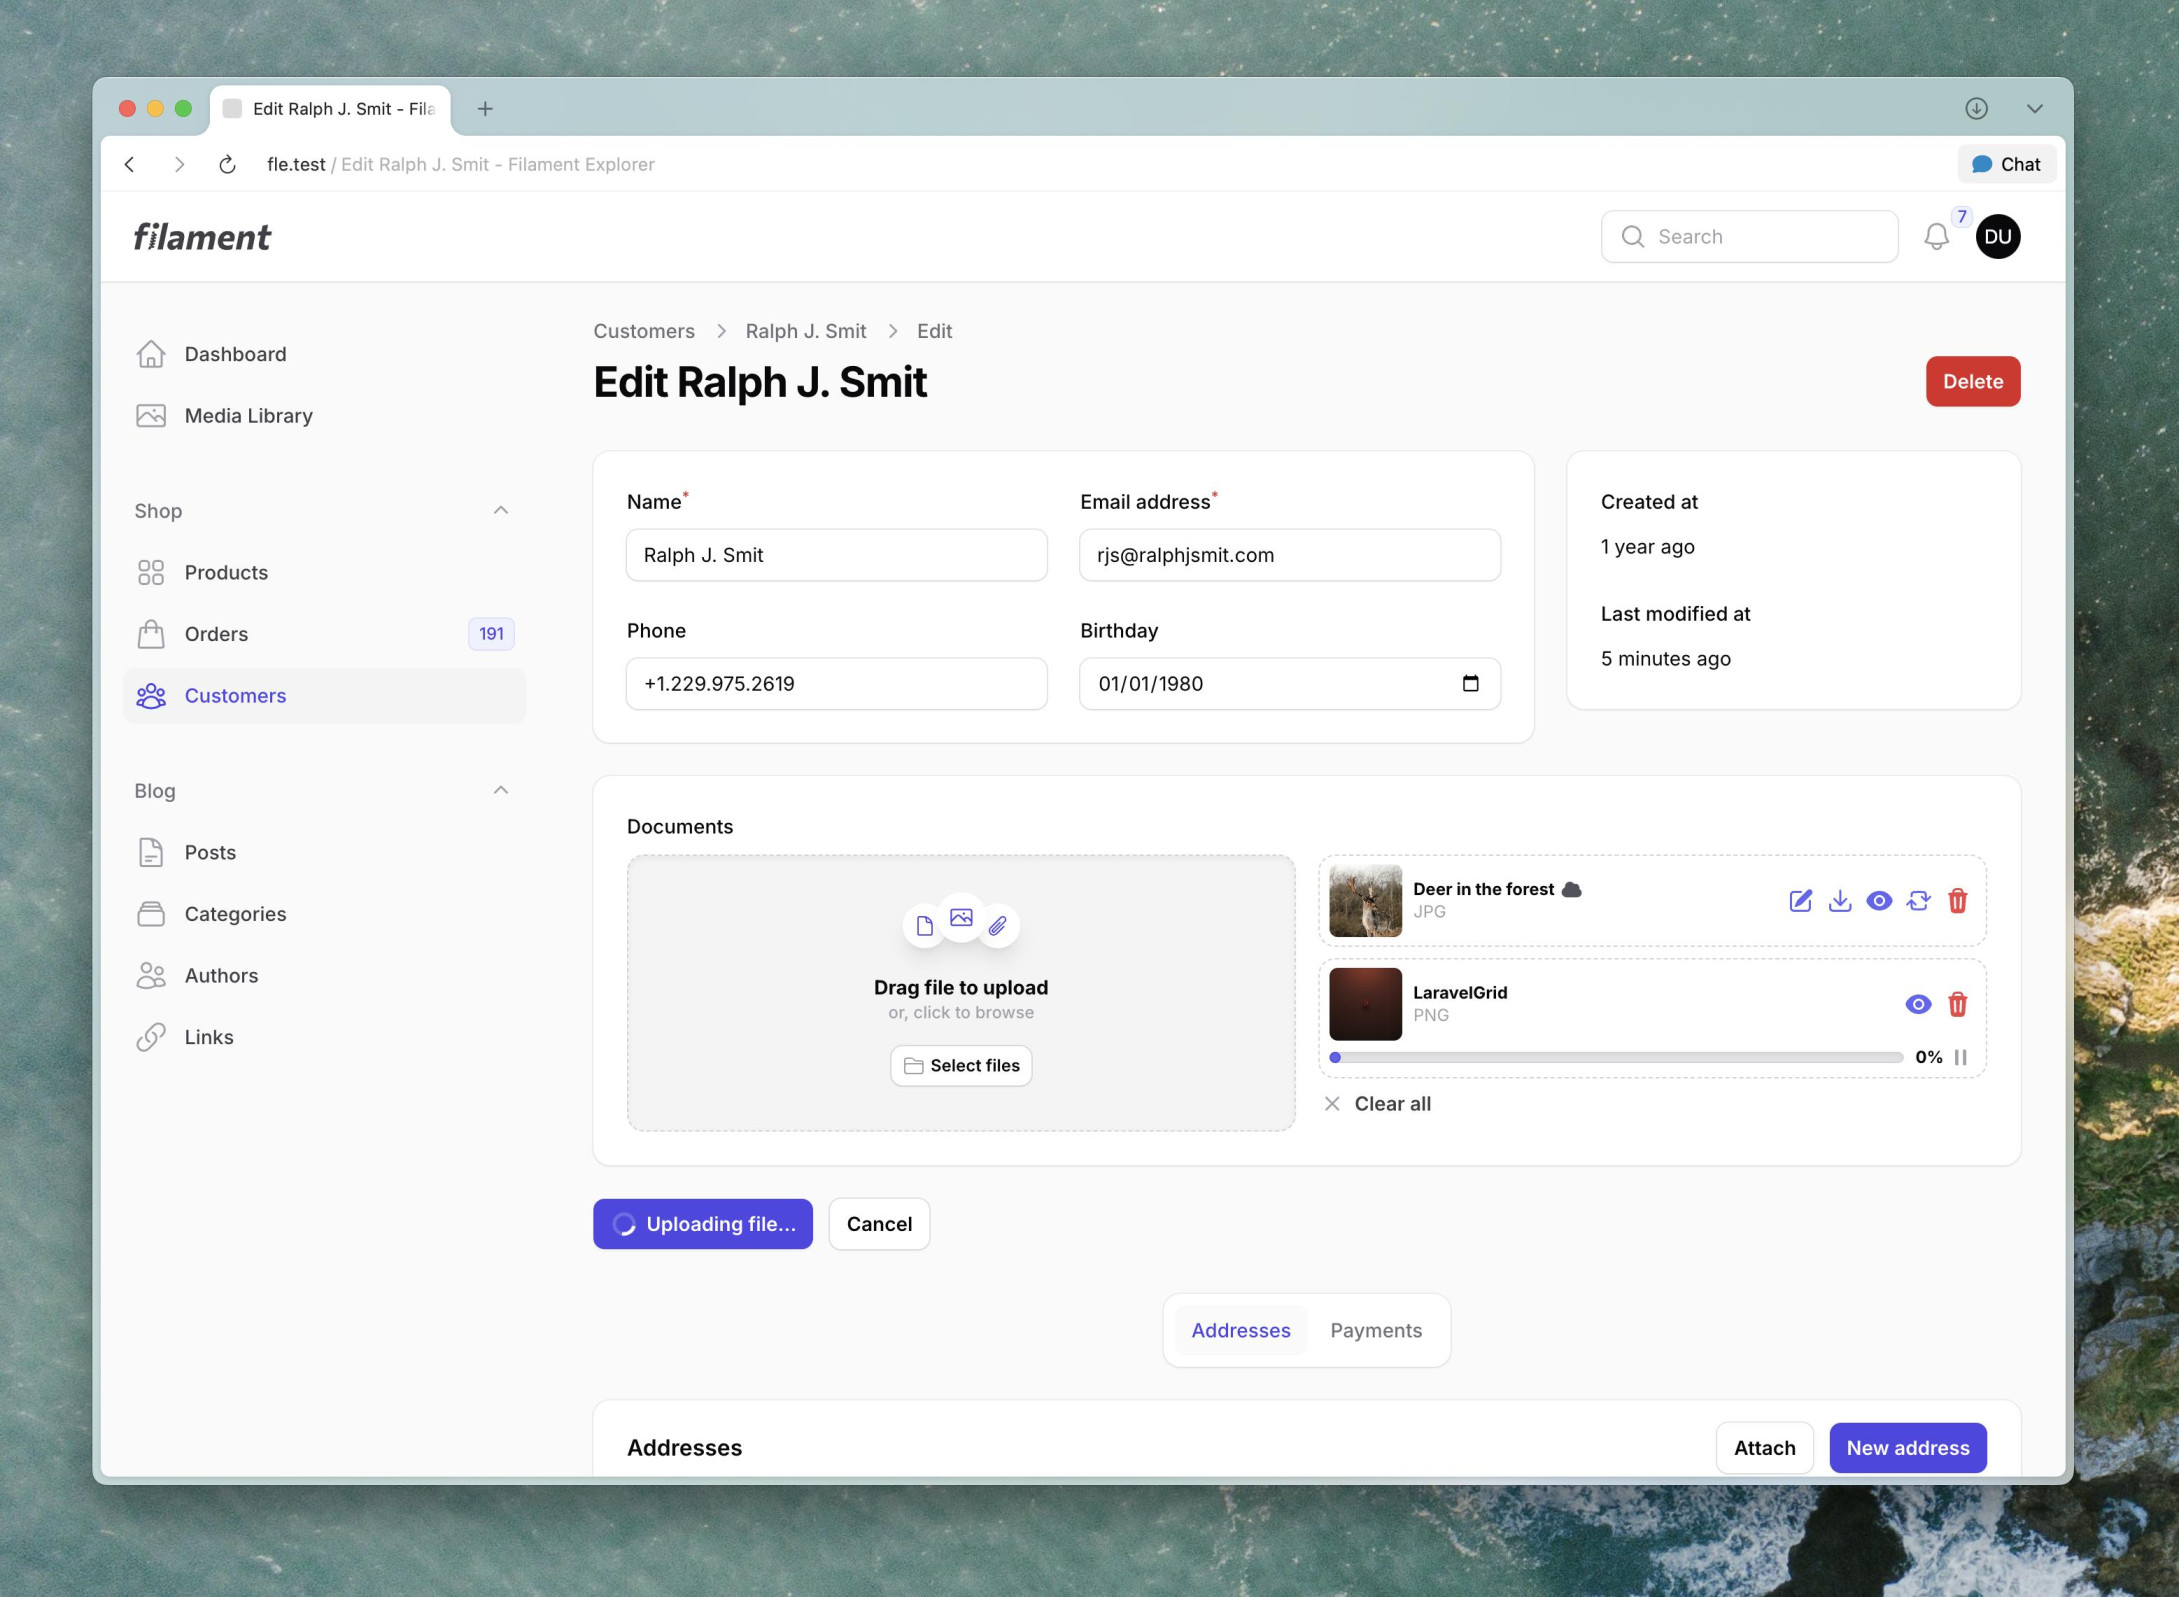

As you can see, placing the upload component inside a Section works really well. Another option would be to place the upload directly on the page. This makes the upload feel more 'supplemental' to the main content of the page.
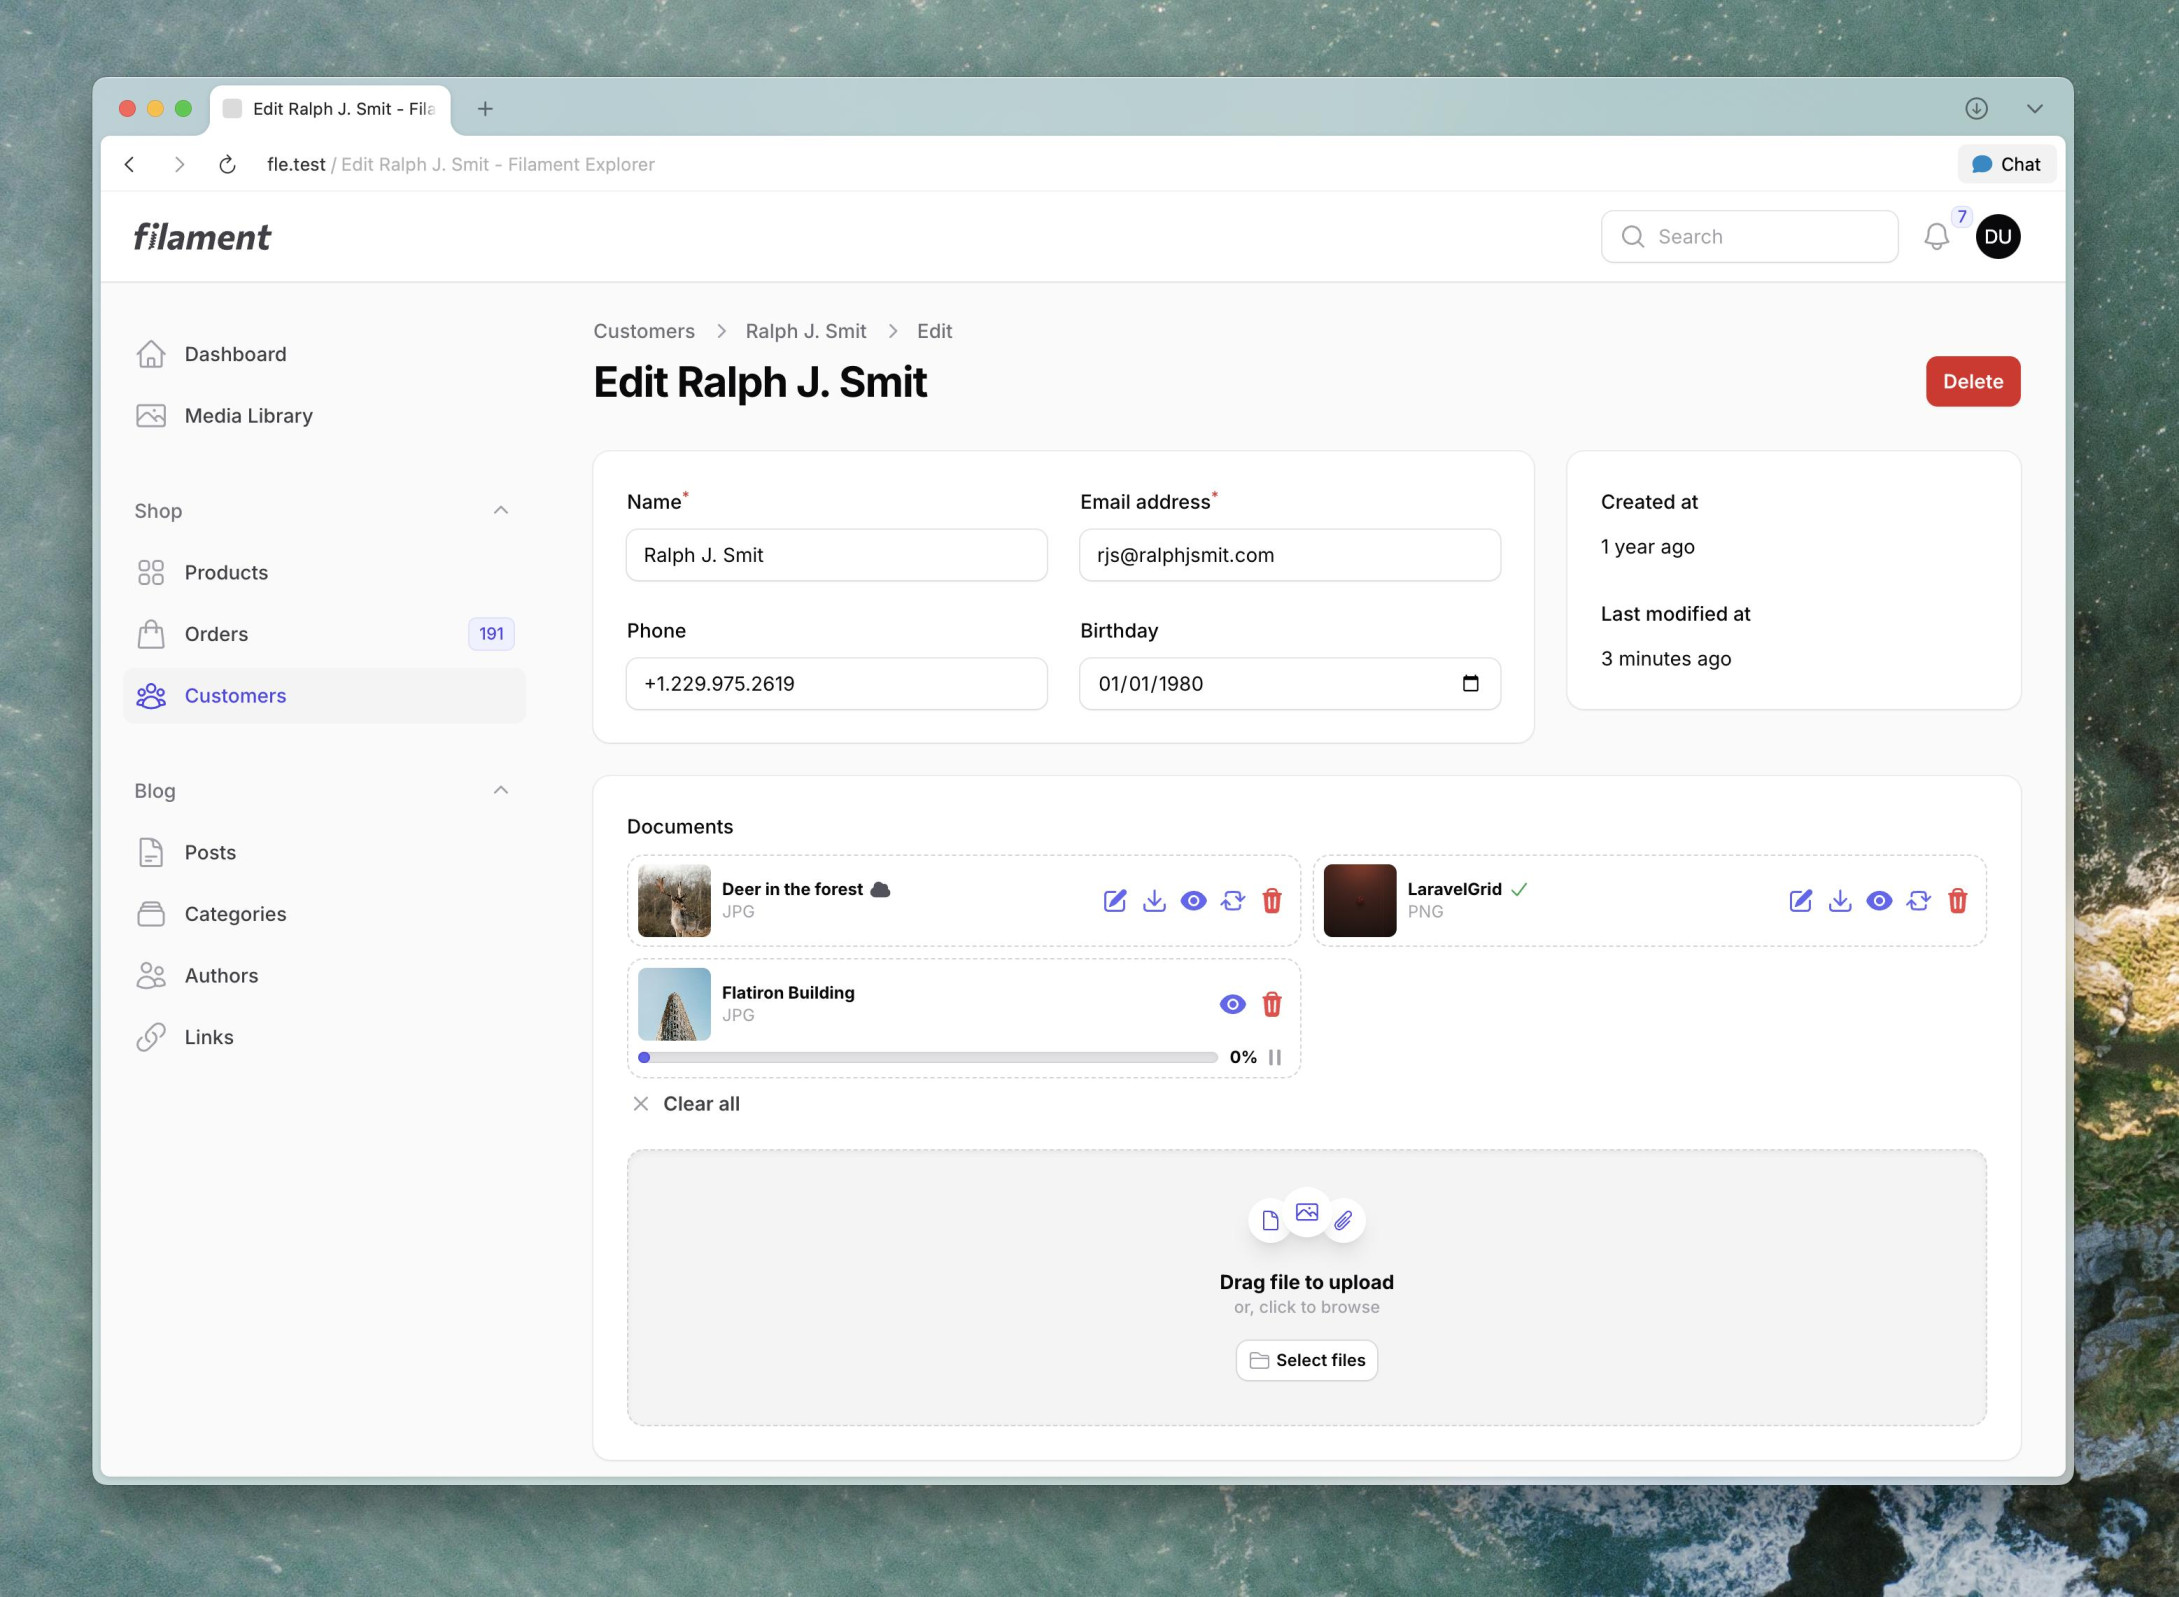
- Image editor
- Download file
- Preview file
- Replace file (opens your file explorer to select a new file)
- Remove file
- Reorder file
You can see an upload, the image editor, previewing and removing:
.gif)
The editor is also provided as an easy ImageEditor component which you can easily use in your own forms as well:
#Installation guide: Filament Upload Pro
Thank you for purchasing the Advanced Upload Pro plugin for Filament!
We tried to make the plugin as easy-to-install and versatile as possible. Nevertheless, if you still have a question or a feature request, please send an e-mail to support@filamentplugins.com.
#Prerequisites
The package is supported on Laravel 10 or higher and Filament V5, V4 and V3.
#Installation via Composer
To install the package you should add the following lines to your composer.json file in the repositories key in order to get access to the private package:
{
    "repositories": [
        {
            "type": "composer",
            "url": "https://satis.ralphjsmit.com"
        }
    ]
}
If you have one of my other premium packages installed already, then you don't need to repeat these lines.
Next, you should require the package via the command line. You will be prompted for your username (which is your e-mail) and your password (which is your license key, e.g. 8c21df8f-6273-4932-b4ba-8bcc723ef500).
composer require ralphjsmit/laravel-filament-upload
# You can also publish the translations if wanted:
php artisan vendor:publish --tag="filament-upload-translations"

# You can also publish the config if wanted:
php artisan vendor:publish --tag="filament-upload-config"
#Add plugin Blade files to custom theme.css (required)
For all panels that you want to use the package in, make sure that you have created a Filament custom theme. Next, for each theme, you need to add the following line to the theme.css file:
@source '../../../../vendor/ralphjsmit/laravel-filament-upload/resources/**/*.blade.php';
If you are using the plugin outside a panel, then make sure to include the above line in the CSS-file that is used to generate the CSS for the Livewire components where you will use the upload component in.
#Configuring the plugin per-panel
The Filament Upload Pro package works in all forms & infolists, irrespective of whether you also have a Filament panel or not. This means that you can nicely include the advanced upload in your app, anywhere you want and wherever you have a form or infolist.
If you do decide to use the Filament Upload package in a panel, then you should register the plugin in the $panel providers that you want to use the plugin in:
use RalphJSmit\Filament\Upload\FilamentUpload;

$panel
    ->plugin(FilamentUpload::make())
There currently are no configuration methods on the plugin itself. However, it is best practice in Filament to register plugins in the panels that a plugin is used in. Also, if it ever becomes necessary in the future to add per-panel configuration methods to the plugin, then I will be able to do so without needing a breaking change.
#S3-bucket CORS configuration
If you are using S3, confirm that your bucket has a CORS configuration with at least the following properties:
[
    {
        "AllowedOrigins": [
            "https://example.com",
            "https://staging.example.com"
        ],
        "AllowedMethods": [
            "GET",
            "PUT",
            "HEAD"
        ],
        "AllowedHeaders": [
            "*"
        ],
        "ExposeHeaders": [
            "ETag"
        ]
    }
]
#Usage
#Advanced File Upload
The most important component in the package is the AdvancedFileUpload component. This component is a form component that you can use to replace any FileUpload, with minimal changes to your code. Every time a file is uploaded, it is first uploaded (in chunks or using S3 Multipart) to the temporary file upload disk. Then, when you save the form, the files are moved to the disk you specify.
use RalphJSmit\Filament\Upload\Filament\Forms\Components\AdvancedFileUpload;

AdvancedFileUpload::make('profile_path')
    ->temporaryFileUploadDisk('s3') // Default to `config('livewire.temporary_file_upload.disk')` or `config('filesystems.default')`...
    ->disk('s3')  // Default to `config('filament.default_filesystem_disk')`
As the files get moved between disks, it is therefore optimal if you use the same disk for temporary file uploads as the permanent disk, but it is not a requirement. You can also use scoped disks, which the package will handle automatically.
Make sure to have an
arrayorcollectioncast on your Eloquent model to contain an array of file paths.
#Setting a directory
To place and read uploaded files from a certain directory on your disk, use the ->directory() method:
AdvancedFileUpload::make('banner_images')
    ->disk('s3')
    ->directory('banners')
    ->multiple()
When you set a directory, the directory is not prefixed to the dehydrated state. So if you upload a file in the above example, the dehydrated state will be an array of purely the filenames without starting with
banners/, as this is done automatically for convenience and flexibility. However, the native FilamentFileUploaddoes prefix the directory to the dehydrated state. If you would like to have the same behavior, you can passshouldDehydrateDirectory: trueas second parameter to the->directory()method.
If you upload an image, it will get places automatically in the banners directory. Only the filename inside the banners directory will be returned, so if you upload a file banners/banner.jpg, only banner.jpg will be returned.
#Accepted file types & preserving filenames (security)
You can specify which file types are allowed to be uploaded using the ->acceptedFileTypes() method. This method accepts an array of mimetypes or file extensions:
AdvancedFileUpload::make('brochure_path')
    ->acceptedFileTypes(['application/pdf'])
To accept images, use ->image(), which is an alias for the image/* mimetype group.
By default, the original filenames of the uploaded files are not preserved, but assigned a random name on the server with the neutral extension .upload. When the file is fully uploaded, the package will first retrieve the mimetype of the file content, and validate it against the accepted file types. Only if the mimetype (based on the actual file-content) is valid and accepted, the file will be renamed to the extension that belongs to this mimetype. This way, the package never trusts the file-extension provided the user (which can be easily manipulated), and is only looked at the contents of the file.
If you want to preserve the original filenames, you can use the ->preserveFilenames(). This method is safe to use for S3-based disks, as there no risk of malicious code execution is present. However, you should never use this for the public disk (or even local).
AdvancedFileUpload::make('brochure_path')
    ->acceptedFileTypes(['application/pdf'])
    ->preserveFilenames()
Another aspect to be aware of is that if the filename can be determined by the user, then this can lead to overwrites of existing files if not properly validated.
#Storing filenames in independent column
As using ->preserveFilenames() is not optimal, you can also choose to let uploads be assigned a random generated name, but store the original filenames in a separate column. This way you can still show users the original filename, whilst ensuring security and file uniqueness on your actual disk. To enable this, use the ->storeFileNamesIn()` method:
AdvancedFileUpload::make('brochure_path')
    ->acceptedFileTypes(['application/pdf'])
    ->storeFileNamesIn('brochure_filename')
It also works for multiple files:
AdvancedFileUpload::make('brochure_paths')
    ->acceptedFileTypes(['application/pdf'])
    ->storeFileNamesIn('brochure_filenames')
    ->multiple()
This method can be enabled safely even if you already have files, as the AdvancedFileUpload will look at the second column to see if any alias is defined, and if not, it will automatically fall back to the actual filename as on disk. Make sure that for single upload the filename column is a string, whereas for multiple uploads the filename column is a JSON column with an array or collection cast.
#Fetching file information
When rendering existing files in the upload component, you have the choice to prevent the package from getting the file type, size and whether it exists by using the ->fetchFileInformation(false) method:
AdvancedFileUpload::make('banner_images')
    ->fetchFileInformation(false)
One downside of this is that the package cannot render an appropriate preview, and neither can it remove non-existing file paths on mount.
The file size and mimetype are getting cached, so for performance you don't necessarily have to disable this.
#Spatie MediaLibrary support
The package supports an automatic integration with Spatie MediaLibrary. To enable the automatic loading of media files, use the ->spatieMediaLibrary() method:
AdvancedFileUpload::make('media')
    ->spatieMediaLibrary()
    ->multiple() // In case of single-support, only the first image will be loaded.
When enabled, this will take the current $record and load the media files from the MediaLibrary into the upload. Users can then view, edit, download, replace and delete these files. When a user saves the form, the media collection is updated.
To use a different collection, provide a collection: $collection parameter:
AdvancedFileUpload::make('media')
    ->spatieMediaLibrary(collection: 'banners')
    ->multiple()
#Providing custom properties
You may pass in custom properties when uploading files using the ->customProperties() method:
AdvancedFileUpload::make('banners')
    ->spatieMediaLibrary(collection: 'banners')
    ->multiple()
    ->customProperties(['zip_filename_prefix' => 'folder/subfolder/'])
#Providing custom headers
You may pass in custom headers when uploading files using the ->customHeaders() method:
AdvancedFileUpload::make('banners')
    ->spatieMediaLibrary(collection: 'banners')
    ->multiple()
    ->customHeaders(['CacheControl' => 'max-age=86400'])
#Filtering media
It's possible to target a file upload component to only handle a certain subset of media in a collection. To do that, you can filter the media collection using the filterMediaUsing() method. This method accepts a function that receives the $media collection and manipulates it. You can use any collection method to filter it.
For example, you could scope the field to only handle media that has certain custom properties:
AdvancedFileUpload::make('banners')
    ->spatieMediaLibrary(collection: 'banners')
    ->customProperties(fn (Get $get): array => [
        'gallery_id' => $get('gallery_id'),
    ])
    ->filterMediaUsing(function (Collection $media, Get $get): Collection {
        return $media->where('custom_properties.gallery_id', $get('gallery_id'));
    })
#Multiple uploads
To allow multiple uploads, use the ->multiple() method:
AdvancedFileUpload::make('banner_images')
    ->disk('s3')
    ->multiple()
#Minimum and maximum file count
You can specify a minimum and maximum number of files that can be uploaded using the ->minFiles() and ->maxFiles() methods:
AdvancedFileUpload::make('banner_images')
    ->multiple()
    ->minFiles(1)
    ->maxFiles(5)
#Minimum and maximum file size
You can specify a minimum and maximum file size that can be uploaded using the ->minFileSize() and ->maxFileSize() methods. The file size is specified in bytes:
AdvancedFileUpload::make('banner_images')
    ->multiple()
    ->minFileSize(1024) // 1 KB
    ->maxFileSize(1024 * 1024) // 10 MB
This rule is only applied to newly uploaded files, as applying this to already existing files on the server would not be a great UX in case you ever must change this validation, and because it would make every form save very slow.
#Reordering files
If you have multiple file-upload, you can allow users to reorder files using the ->reorderable() method. This will modify the order in which the file paths are dehydrated:
AdvancedFileUpload::make('banner_images')
    ->multiple()
    ->reorderable()
Reordering is also supported when using the Spatie MediaLibrary-integration.
#Custom upload logic
By default, when a user uploads a file, the upload is first stored on the ->temporaryFileUploadDisk(), within the ->temporaryFileUploadDirectory() (usually livewire-tmp), and then within a nested directory. When a user submits the form, the file is moved (if the temporary disk is the same as the permanent disk) or copied to its permanent location.
If you want, you can provide a custom logic to replace this process, so that you can modify the file or determine the permanent file location yourself. To do use, use the ->saveUploadedFileUsing() method:
AdvancedFileUpload::make('banner_images')
    ->multiple()
    ->saveUploadedFileUsing(function (AdvancedFileUpload $component, string $temporaryFileUploadPath, string $temporaryFileUploadFilename) {
        // Temporary disk...
        $temporaryFileUploadDisk = $component->getTemporaryFileUploadDisk();
        $temporaryFileUploadDirectory = $component->getTemporaryFileUploadDirectory();

        // Permanent disk...
        $disk = $component->getDisk();
        $directory = $component->getDirectory();
        $diskData = $component->getDiskData();

        // Copy/move the file to permanent location...
        $disk->put(
            path: $diskData->generatePath($directory, $temporaryFileUploadFilename),
            contents: $temporaryFileUploadDisk->readStream($temporaryFileUploadPath),
        );

        // Always return the _filename_ that the file was moved to (excluding the `$directory` prefix).
        return $temporaryFileUploadFilename;
    });
This hook can be called multiple times in the same request for different files if a user uploads multiple new files at once.
#Uploading message
When a file is uploading, the "submit" button of the form will be temporarily disabled with the following text: 'Uploading file...'. To modify this message, use the ->uploadingMessage() method:
AdvancedFileUpload::make('banner_images')
    ->multiple()
    ->uploadingMessage('Uploading banner...')
It is recommended to keep the message short.
#Layout options
The AdvancedFileUpload component is a column-based component, meaning that it exists of two child-groups: the dropzone and the files-section. For each, you can specify how many columns it should take up. For example, for a vertical layout, you can configure it like this:
AdvancedFileUpload::make('profile_path')
    ->columns(5) // 5 columns total
    ->dropzoneColumnSpan(2) // Dropzone section should span 2 columns
    ->filesColumnSpan(3) // Files section should span 3 columns
    ->dropzoneAfterFiles() // Dropzone should come after (or before: default) the files
#Dropzone area
The default dropzone heading and description can be modified using the following methods:
AdvancedFileUpload::make('profile_path')
    ->dropzoneHeading('Drag & drop your profile image here')
    ->dropzoneDescription('or, click to select an image')
Above the heading and description three icons are displayed. You can modify these using the ->dropzonePreview{}Icon() methods, to better match the type of files you are expecting:
use Filament\Support\Icons\Heroicon;

AdvancedFileUpload::make('profile_path')
    ->dropzonePreviewLeftIcon(Heroicon::OutlinedDocument)
    ->dropzonePreviewCenterIcon(Heroicon::OutlinedPhoto)
    ->dropzonePreviewRightIcon(Heroicon::OutlinedPaperClip)
Instead of icons, you can also provide three images as previews. To do so, use the ->dropzonePreviewImages() method:
AdvancedFileUpload::make('profile_path')
    ->dropzonePreviewImages(
        leftImageUrl: asset('preview-a-small.png'),
        centerImageUrl: asset('preview-b-small.png'),
        rightImageUrl: asset('preview-c-small.png')
    )
#Files
The AdvancedFileUpload component provides several actions that can be performed on files. Each action can be customized or disabled using the following methods:
#Add file action
The add file action allows users to select files from their device to upload. You can customize this action using the ->addAction() method:
use Filament\Support\Icons\Heroicon;

AdvancedFileUpload::make('banner_images')
    ->addAction(function (Forms\Components\Actions\Action $action) {
        return $action
            ->label('Upload banners')
            ->icon(Heroicon::OutlinedPhoto);
    })
#Delete file action
The delete file action allows users to remove individual files. You can control whether files can be deleted using the ->deletable() method, and customize the action using the ->deleteAction() method:
use Filament\Support\Icons\Heroicon;

AdvancedFileUpload::make('banner_images')
    ->deleteAction(function (Forms\Components\Actions\Action $action) {
        return $action
            ->label('Remove banner')
            ->icon(Heroicon::OutlinedTrash);
    })
To disable the action, use:
AdvancedFileUpload::make('banner_images')
    ->deletable(false)
#Delete all files action
The delete all files action allows users to remove all files at once. You can control whether all files can be deleted using the ->deleteAll() method, and customize the action using the ->deleteAllAction() method:
use Filament\Support\Icons\Heroicon;

AdvancedFileUpload::make('banner_images')
    ->deleteAllAction(function (Forms\Components\Actions\Action $action) {
        return $action
            ->label('Clear all banners')
            ->icon(Heroicon::OutlinedTrash);
    })
To disable the action, use:
AdvancedFileUpload::make('banner_images')
    ->deleteAll(false)
#Download file action
The download file action allows users to download individual files. You can control whether files can be downloaded using the ->downloadable() method, and customize the action using the ->downloadAction() method:
use Filament\Support\Icons\Heroicon;

AdvancedFileUpload::make('banner_images')
    ->downloadAction(function (Forms\Components\Actions\Action $action) {
        return $action
            ->label('Download banner')
            ->icon(Heroicon::OutlinedArrowDownTray);
    })
To disable the action, use:
AdvancedFileUpload::make('banner_images')
    ->downloadable(false)
#Edit file action
The edit file action allows users to edit image files using the built-in image editor. You can control whether files can be edited using the ->editable() method, and customize the action using the ->editAction() method:
use Filament\Support\Icons\Heroicon;

AdvancedFileUpload::make('banner_images')
    ->editAction(function (Forms\Components\Actions\Action $action) {
        return $action
            ->label('Edit banner')
            ->icon(Heroicon::OutlinedPencilSquare);
    })
To disable the action, use:
AdvancedFileUpload::make('banner_images')
    ->editable(false)
#Preview file action
The preview file action allows users to view files in a modal. You can control whether files can be previewed using the ->previewable() method, and customize the action using the ->previewAction() method:
use Filament\Support\Icons\Heroicon;

AdvancedFileUpload::make('banner_images')
    ->previewAction(function (Forms\Components\Actions\Action $action) {
        return $action
            ->label('View banner')
            ->icon(Heroicon::OutlinedEye);
    })
To disable the action, use:
AdvancedFileUpload::make('banner_images')
    ->previewable(false)
#Replace file action
The replace file action allows users to replace an existing file with a new one. You can control whether files can be replaced using the ->replaceable() method, and customize the action using the ->replaceAction() method:
use Filament\Support\Icons\Heroicon;

AdvancedFileUpload::make('banner_images')
    ->replaceAction(function (Forms\Components\Actions\Action $action) {
        return $action
            ->label('Replace banner')
            ->icon(Heroicon::OutlinedArrowPathRoundedSquare);
    })
To disable the action, use:
AdvancedFileUpload::make('banner_images')
    ->replaceable(false)
#Custom file actions
You can add custom actions to each file by using the ->extraItemActions() method. Actions are inserted just before the "delete"-action, as that is usually the most logical order. Inside the ->action() method, you can retrieve the disk name and the path to the file that the action was triggered on. This allows you to perform any action that has a relation to an individual file.
use Filament\Support\Icons\Heroicon;

AdvancedFileUpload::make('banner_images')
    ->extraItemActions([
        fn (AdvancedFileUpload $component) => Forms\Components\Actions\Action::make('optimize')
            ->icon(Heroicon::Sparkles)
            ->iconButton()
            ->color('primary')
            ->action(function (array $arguments) use ($component) {
                [$diskName, $path] = $component->getDiskNameAndPath($arguments['id']);

                // Retrieve file...
                $contents = Storage::disk($diskName)->get($path);

                // Modify file based on `$diskName` and `$path`. Note: do *not* move
                // the file as that will cause the component to end up invalid.

                // The `$path` is the filename + the provided `->directory()` if specified.
            }),
    ])
Note: when using custom actions, you should always use the
$component->getDiskNameAndPath()method to retrieve the disk name and path of the file that the action was triggered on. This ensures that you are working with the correct file. Furthermore, do not modify the file name or its location, as then the component ends up with an invalid state.
#Image editor
The ImageEditor component is a form component that allows users to edit images directly in the browser. It can be used independently of the AdvancedFileUpload component in any Filament form:
use RalphJSmit\Filament\Upload\Filament\Forms\Components\ImageEditor;

ImageEditor::make('image_path')
    ->disk('s3')
    ->directory('images')
#Uneditable file message
When a file type cannot be edited, a message is displayed to the user. You can customize this message using the following methods:
use Filament\Support\Icons\Heroicon;

ImageEditor::make('image_path')
    ->uneditableFileMessageIcon(Heroicon::OutlinedExclamationTriangle)
    ->uneditableFileMessageTitle('This image cannot be edited')
#Configuring the editor globally
You can configure the image editor globally using the configureUsing() method in a service provider or in the bootUsing() method of a panel. This allows you to set default options for all ImageEditor instances in your application:
use RalphJSmit\Filament\Upload\Filament\Forms\Components\ImageEditor;
use RalphJSmit\Filament\Upload\Filament\Forms\Components\ImageEditor\Tab;
use RalphJSmit\Filament\Upload\Support\ImageEditor\CropPreset;

// In a service provider boot() method or panel bootUsing() callback:
ImageEditor::configureUsing(function (ImageEditor $editor) {
    $editor
        ->tabs([Tab::Adjust, Tab::Watermark])
        ->cropPresets([
            CropPreset::make('square', ratio: 1.0),
        ]);
});
Any configuration set on an individual ImageEditor instance will override the global defaults for that property.
#Tabs
By default, the image editor shows all available tabs. You can restrict which tabs are visible using the ->tabs() method:
use RalphJSmit\Filament\Upload\Filament\Forms\Components\ImageEditor\Tab;

ImageEditor::make('image_path')
    ->tabs([Tab::Adjust, Tab::Annotate, Tab::Watermark])
The available tabs are: Tab::Adjust, Tab::Finetune, Tab::Filters, Tab::Watermark, Tab::Annotate, and Tab::Resize.
You can also set which tab and tool are selected when the editor opens:
use RalphJSmit\Filament\Upload\Filament\Forms\Components\ImageEditor\Tab;
use RalphJSmit\Filament\Upload\Filament\Forms\Components\ImageEditor\Tool;

ImageEditor::make('image_path')
    ->defaultTab(Tab::Annotate)
    ->defaultTool(Tool::Text)
The available tools are: Tool::Crop, Tool::Rotate, Tool::Flip, Tool::Brightness, Tool::Contrast, Tool::HSV, Tool::Warmth, Tool::Blur, Tool::Text, Tool::Image, Tool::Rect, Tool::Ellipse, Tool::Polygon, Tool::Pen, Tool::Line, and Tool::Arrow.
#Crop presets
You can add custom crop presets that appear in the crop tool dropdown:
use RalphJSmit\Filament\Upload\Support\ImageEditor\CropPreset;

ImageEditor::make('image_path')
    ->cropPresets([
        CropPreset::make('classicTv', ratio: 4 / 3)->description('4:3'),
        CropPreset::make('cinemascope', ratio: 21 / 9)->description('21:9'),
        CropPreset::make('square', ratio: 1.0)->description('1:1'),
    ])
You can also organize presets into folders with groups:
use RalphJSmit\Filament\Upload\Support\ImageEditor\CropPreset;
use RalphJSmit\Filament\Upload\Support\ImageEditor\CropPresetFolder;
use RalphJSmit\Filament\Upload\Support\ImageEditor\CropPresetGroup;

ImageEditor::make('image_path')
    ->cropPresetFolders([
        CropPresetFolder::make('socialMedia')->groups([
            CropPresetGroup::make('facebook')->items([
                CropPreset::make('fbProfile', width: 180, height: 180)->description('180x180'),
                CropPreset::make('fbCover', width: 820, height: 312)->description('820x312'),
            ]),
            CropPresetGroup::make('instagram')->items([
                CropPreset::make('igPost', ratio: 1.0)->description('1:1'),
                CropPreset::make('igStory', width: 1080, height: 1920)->description('1080x1920'),
            ]),
        ]),
    ])
When a crop preset specifies width and height instead of a ratio, you can enable auto-resize to automatically resize the image to those dimensions after cropping:
ImageEditor::make('image_path')
    ->cropAutoResize()
To set the default crop ratio when the editor opens, use ->cropDefaultRatio():
ImageEditor::make('image_path')
    ->cropDefaultRatio(16 / 9)
The default ratio can also be set to 'original', 'ellipse', or 'custom'.
To hide the crop presets entirely, use ->cropNoPresets():
ImageEditor::make('image_path')
    ->cropNoPresets()
#Watermark gallery
You can provide a gallery of watermark images that users can choose from in the Watermark tab:
use RalphJSmit\Filament\Upload\Support\ImageEditor\WatermarkImage;

ImageEditor::make('image_path')
    ->watermarkGallery([
        WatermarkImage::make('https://example.com/watermark-logo.png'),
        WatermarkImage::make(
            'https://example.com/watermark-large.png',
            'https://example.com/watermark-thumb.png',
        ),
    ])
The second argument to WatermarkImage::make() is an optional preview URL used as a thumbnail in the gallery list for better performance.
To hide the text watermark option and only allow image watermarks, use ->watermarkHideText():
ImageEditor::make('image_path')
    ->watermarkHideText()
#Annotation defaults
You can customize the default fill color, stroke color, stroke width, and opacity for all annotation tools:
ImageEditor::make('image_path')
    ->annotationDefaults([
        'fill' => '#3b82f6',
        'stroke' => '#1e40af',
        'strokeWidth' => 2,
        'opacity' => 0.9,
    ])
#Text
You can customize which fonts are available in the text annotation tool and the default font size:
ImageEditor::make('image_path')
    ->textFonts(['Arial', 'Georgia', 'Courier New', 'Verdana'])
    ->textFontSize(24)
Make sure the fonts you provide are available in the user's browser. System fonts like Arial and Georgia work out of the box. Custom fonts must be loaded separately in your application.
#Rotate
You can customize the rotation angle step and the rotation component type:
ImageEditor::make('image_path')
    ->rotateAngle(45)
    ->rotateComponentType('slider')
The component type can be 'slider' or 'buttons'.
#Save defaults
You can set the default file type and quality used when saving edited images:
ImageEditor::make('image_path')
    ->defaultSavedImageType('webp')
    ->defaultSavedImageQuality(0.9)
The supported image types are 'png', 'jpeg', 'jpg', and 'webp'. The quality value ranges from 0.1 to 1 and only applies to jpeg, jpg, and webp formats.
#PDF-viewer
The PDFEntry component is an infolist entry that allows you to display PDF files directly in your infolist. It can be used in any Filament infolist:
use RalphJSmit\Filament\Upload\Filament\Infolists\Entries\PdfEntry;

PdfEntry::make('document_path')
    ->disk('s3')
    ->directory('documents')
#Minimum height
You can specify the minimum height of the PDF viewer using the ->minHeight() method. This can be a string with a CSS value or an integer representing pixels:
PdfEntry::make('document_path')
    ->minHeight(600) // 600px
    ->minHeight('50vh')
#Upgrade guide (from V0 to V1)
If you are upgrading from version 0.x to 1.x, then you should remove the following line from your custom theme tailwind.config.js:
content: [
    // Your other files
    './vendor/ralphjsmit/laravel-filament-upload/resources/**/*.blade.php',
],
Instead, add the following line to your theme.css file:
@source '../../../../vendor/ralphjsmit/laravel-filament-upload/resources/**/*.blade.php';
The V1 is available to all customers who purchased a license.
#Roadmap
I hope this package will be useful to you! If you have any ideas or suggestions on how to make it more useful, please let me know (support@filamentplugins.com).
#Support
If you have a question, bug or feature request, please e-mail me at support@filamentplugins.com or create an issue in #ralphjsmit-plugins on the Filament Discord. Love to hear from you!
The author
From the same author

SEO
This package is a convenient helper for using the laravel-seo package with Filament Admin and Forms.
Author:
Ralph J. Smit

Components
A collection of handy components that can be used in almost any project, like sidebars, timestamps & more.
Author:
Ralph J. Smit
Notifications Pro
Seamlessly integrate Laravel database notifications with Filament.
Author:
Ralph J. Smit

Onboarding Manager Pro
Beautiful onboarding experiences for Filament Admin.
Author:
Ralph J. Smit
Featured Plugins
A selection of plugins curated by the Filament team

Blueprint
Filament Blueprint is a premium Laravel Boost extension that helps AI agents produce accurate, detailed implementation plans and security reports for Filament apps.
 Filament
Custom Fields
Eliminate custom field migrations forever. Let your users create and manage form fields directly in Filament admin panels with 20+ built-in field types, validation, and zero database changes.
 Relaticle

Spotlight Pro
Browse your Filament Panel with ease. Filament Spotlight Pro adds a Spotlight/Raycast like Command Palette to your Filament Panel.
 Dennis Koch