- Features
- Configuring the plugin per-panel
- Disabling cards
- Re-ordering cards
- Customizing headings
- Customizing icons
- Customizing the widths/heights (rows/columns)
- Registering custom cards
- Customizing page navigation details
- Customizing the page
- Roadmap
- Support
This package provides a beautiful integration of Laravel Pulse into Filament. It allows you to build custom Laravel Pulse dashboards directly inside your Filament panels. All default Pulse cards are included, a custom card to track the usage of your Filament application and you can add additional custom cards or third-party pacakges as well.
Another very handy use case is if your users need certain advanced metrics about your application. You can then create a custom Pulse recorder/card, and display these additional cards straight inside Filament!
NEW: The package supports Filament V3 & Filament V4 (beta).
#Features
- Add a custom monitoring page/dashboards to your Filament panels.
- Pages completely customisable and can be different per panel.
- Support all default Laravel Pulse recorders in Filament-design.
- Includes custom recorder/metric to track usage of your Filament panel.
- Easily extendable by adding additional cards (create custom recorders yourself or add third-party packages).
- Beautiful design & integration with Filament Admin.
- Support for dark mode. 🌚
- Display individual Pulse cards using widgets (coming soon).
#Screenshots
#Dashboard
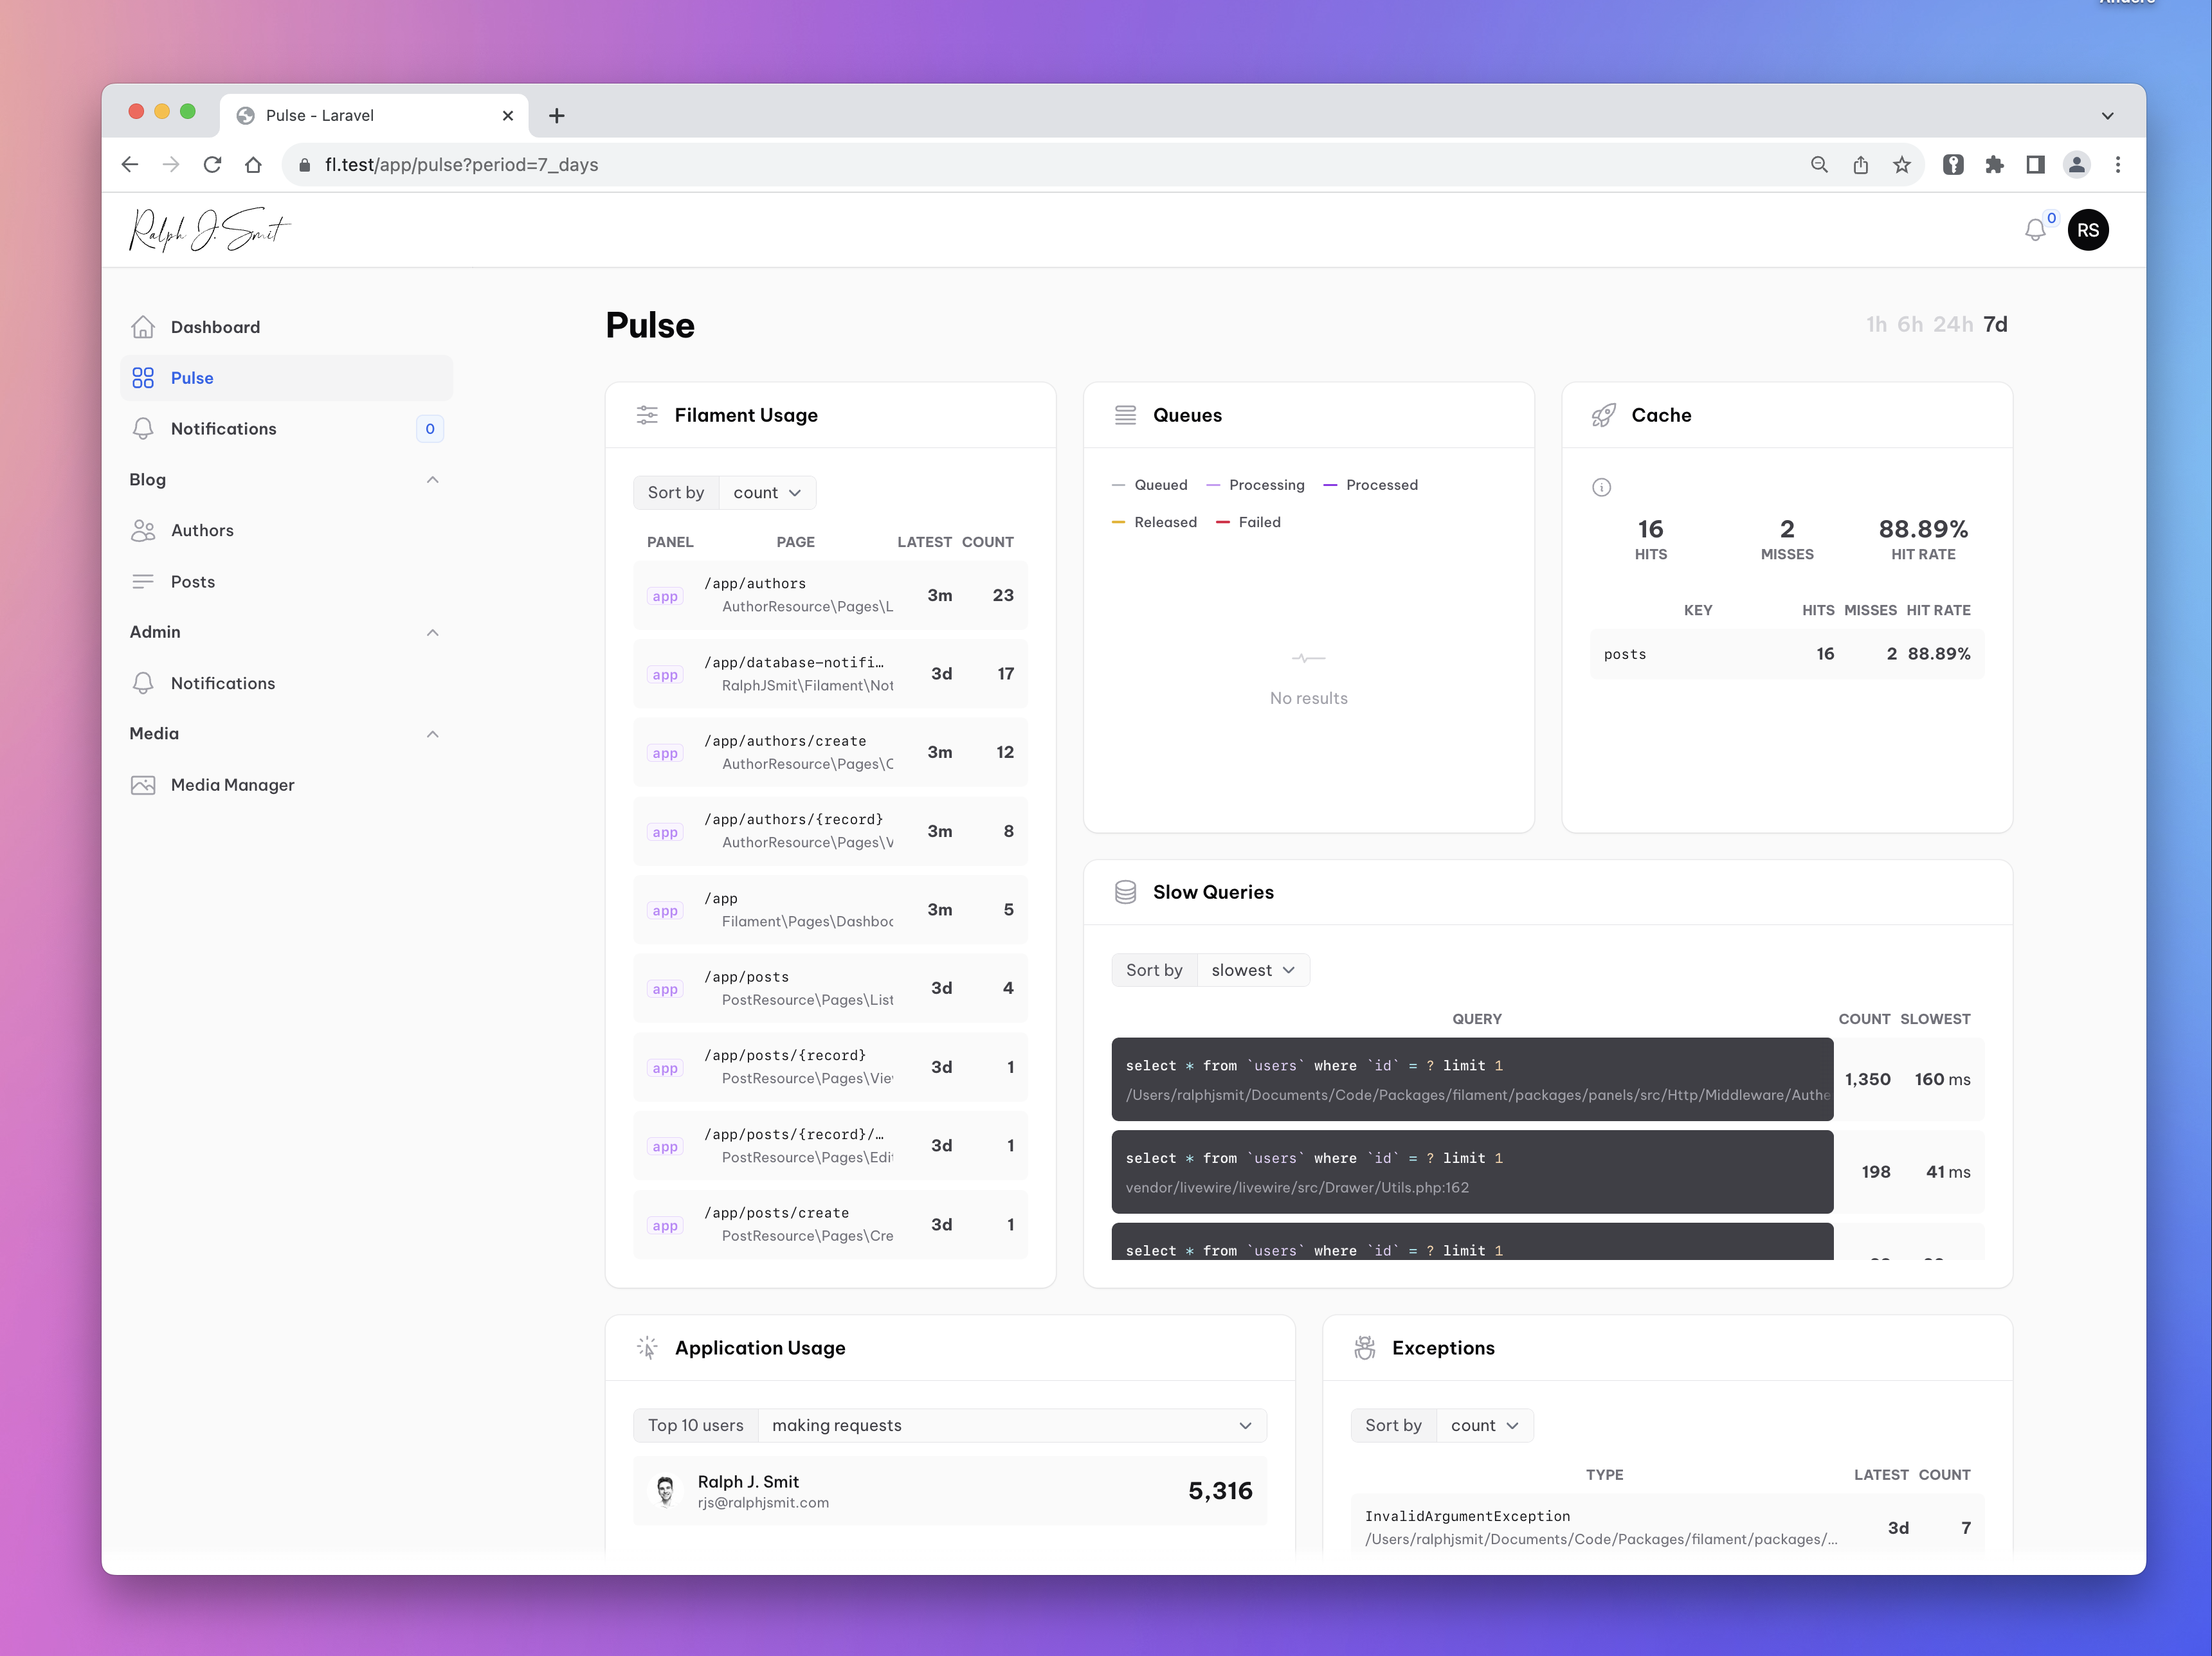
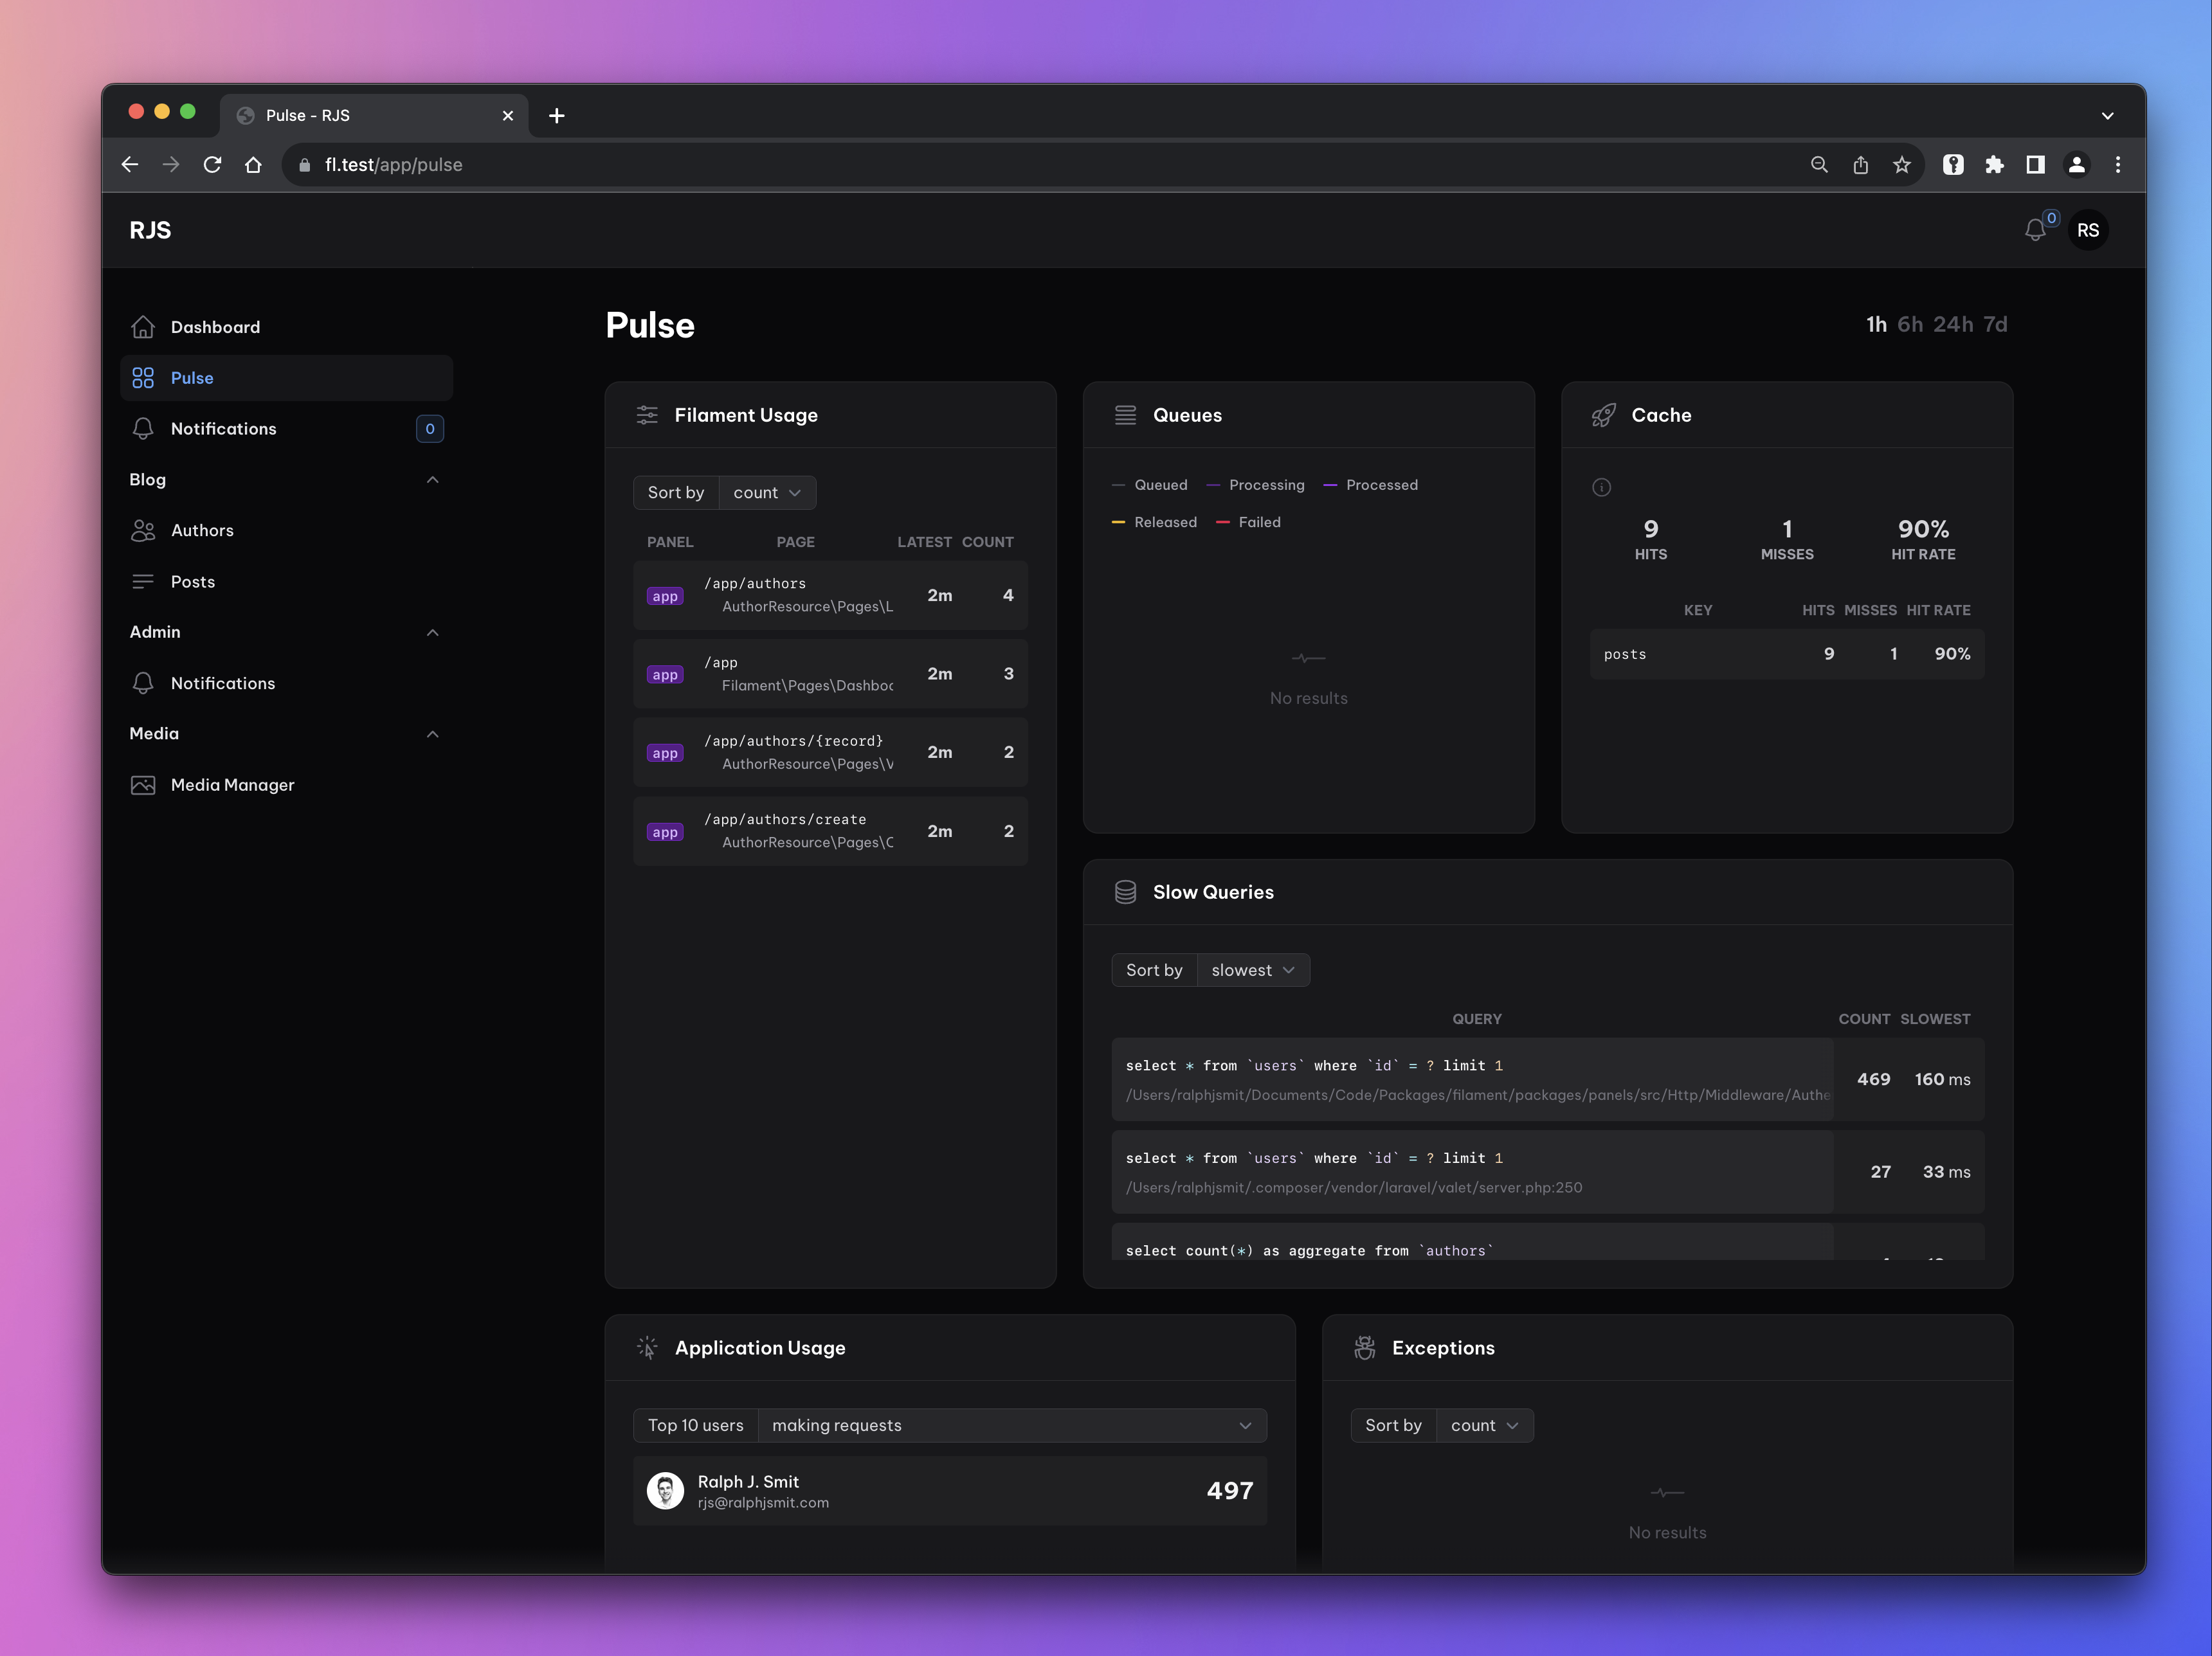
The Pulse page is where your users can view all the cards. By default, the page will show all cards included with Pulse, plus the custom Filament Usage card. You can customize the entire page very easily.

The page fully supports dark mode. You can re-order any widgets, change the title, icon, etc. At the top right is the period selector to select the period that you want to view the data for.

Thank you for purchasing the Pulse plugin for Filament Admin!
We tried to make the plugin as easy-to-install and versatile as possible. Nevertheless, if you still have a question or a feature request, please send an e-mail to support@ralphjsmit.com.
#Prerequisites
For these installation instructions to work, you'll need to have the Filament Panel Builder package installed and configured.
Before starting the further installation, you should already have Laravel Pulse installed according to the Pulse installation guide.
The package is supported on Filament V3 and V4; and Laravel 10 or higher (with earlier versions available since Laravel 8). Please be aware though that support for Laravel 10 security fixes has ended.
#Installation via Composer
To install the package you should add the following lines to your composer.json file in the repositories key in order to allow access to the private package:
{ "repositories": [ { "type": "composer", "url": "https://satis.ralphjsmit.com" } ]}If you have one of my other premium packages installed already, then you don't need to repeat these lines.
Next, you should require the package via the command line. You will be prompted for your username (which is your e-mail) and your password (which is your license key, e.g. 8c21df8f-6273-4932-b4ba-8bcc723ef500).
composer require ralphjsmit/laravel-filament-pulse:^0.5 # You can also publish the translations if wanted:php artisan vendor:publish --tag="filament-pulse-translations"In contrast to my other packages, you don't need to activate the license on specific domains that you use the license for. This is because there is only one license option which includes unlimited installations.
#Add Filament Usage Recorder
If you want to track the usage of your Filament panels, you should add the custom recorder to the config/pulse.php file under the recorders key.
This recorder will track frequently visited pages in your Filament panel. The recorder has been optimized with the optimization techniques provided by Pulse, so it will have no impact on the performance of your application.
\RalphJSmit\Filament\Pulse\Recorders\FilamentPageRecorder::class => [ 'enabled' => env('PULSE_FILAMENT_PAGES_ENABLED', true), 'sample_rate' => env('PULSE_FILAMENT_PAGES_SAMPLE_RATE', 1), 'ignore' => [ // Panel IDs that you want to ignore. Should be a valid regex... '#^admin#', ],],Make sure to register the plugin for each panel that you want to record the usage of. See the Configuring the plugin per-panel section for more information.
#Add plugin Blade files to custom theme.css (required)
For all panels that you want to use the package in, make sure that you have created a Filament custom theme. Next, for each theme you need to add the following two lines to the theme.css file:
@source '../../../../vendor/ralphjsmit/laravel-filament-pulse/resources/**/*.blade.php';@source '../../../../vendor/laravel/pulse/resources/**/*.blade.php';#Configuring the plugin per-panel
Next, you should register the plugin in each of the Filament panels that you are using and want to display the Pulse page in:
use RalphJSmit\Filament\Pulse\FilamentPulse; $panel ->plugin(FilamentPulse::make())In the rest of the docs, if we refer to the $plugin variable, then we mean the $plugin = FilamentPulse::make(). This is not necessarily a variable, but it helps to keep the code examples shorter and simpler.
Therefore, the following code examples mean the same:
$plugin ->serverCard(false) ->someOtherMethod();use RalphJSmit\Filament\Pulse\FilamentPulse; $panel ->plugin( FilamentPulse::make() ->serverCard(enabled: false) ->someOtherMethod() )#Filament Usage Recorder
If you registered the custom Filament Usage Recorder, you will need to add the ->plugin(FilamentPulse::make()) for every panel that you want to record the use of. However, by default, that will also register and display a Pulse page in every panel. If you want to monitor certain panels (like a user-facing panel), but only have the Pulse page in your admin panel, then you can disable the Pulse page on a per-panel basis.
If you want to disable the Pulse page in a panel, pass false to the ->pulsePage() method:
$plugin ->pulsePage(false);After you added the plugin to your panel, you can visit the Pulse page in your panel. This page will have the same layout as the default Pulse, but only inside your Filament panel and styled to match with Filament's styling. The styling has been updated to fit in better with Filament's UI.
There are many configuration options available to customize the Pulse dashboard. I'll go through them below.
By default, Pulse offers the following cards:
- Servers
- Usage (application usage showing users)
- Queues
- Cache
- Slow Queries
- Filament Usage card (using custom recorder)
- Exceptions
- Slow Requests
- Slow Jobs
- Slow Outgoing Requests
#Disabling cards
You can disable a Pulse card by calling its respective method and passing false to the enabled parameter:
$plugin ->serversCard(enabled: false) ->usageCard(enabled: false) ->queuesCard(enabled: false) ->cacheCard(enabled: false) ->slowQueriesCard(enabled: false) ->filamentPagesCard(enabled: false) ->exceptionsCard(enabled: false) ->slowRequestsCard(enabled: false) ->slowJobsCard(enabled: false) ->slowOutgoingRequestsCard(enabled: false)You can also pass a closure if you need to determine during run-time whether the card should be enabled or not:
$plugin ->filamentPagesCard(enabled: fn () auth()->user()->isDeveloper())#Re-ordering cards
You can re-order cards by passing an integer to the following methods. This works similar to other Filament methods like $navigationSort.
$plugin ->serversCardSort(1) ->usageCardSort(2) ->queuesCardSort(3) ->cacheCardSort(4) ->slowQueriesCardSort(5) ->filamentPagesCardSort(6) ->exceptionsCardSort(7) ->slowRequestsCardSort(8) ->slowJobsCardSort(9) ->slowOutgoingRequestsCardSort(10)Setting the column span is also available as the sort parameter on the generic method:
$plugin ->serversCard(sort: 1) ->usageCard(sort: 2) // ...#Customizing headings
You can add custom headings to the cards by passing a new heading to its respective method. You can pass a both closure (if you need to use the translator) and a string.
$plugin ->serversCardHeading('Servers') ->usageCardHeading('Application Usage') ->queuesCardHeading('Queues') ->cacheCardHeading('Cache') ->slowQueriesCardHeading('Slow Queries') ->filamentPagesCardHeading('Filament Usage') ->exceptionsCardHeading('Exceptions') ->slowRequestsCardHeading('Slow Requests') ->slowJobsCardHeading('Slow Jobs') ->slowOutgoingRequestsCardHeading('Slow Outgoing Requests')Setting the title is also available as the title parameter on the generic method:
$plugin ->serversCard(heading: 'Servers') ->usageCard(heading: 'Application Usage') // ...#Customizing icons
You can add custom icons to the cards by passing a new icon to its respective method:
use Filament\Support\Icons\Heroicon; $plugin ->serversCardIcon(Heroicon::OutlinedServerStack) ->usageCardIcon(Heroicon::OutlinedCursorArrowRays) ->queuesCardIcon(Heroicon::OutlinedQueueList) ->cacheCardIcon(Heroicon::OutlinedRocketLaunch) ->slowQueriesCardIcon(Heroicon::OutlinedCircleStack) ->filamentPagesCardIcon(Heroicon::OutlinedAdjustmentsHorizontal) ->exceptionsCardIcon(Heroicon::OutlinedBugAnt) ->slowRequestsCardIcon(Heroicon::OutlinedArrowsRightLeft) ->slowJobsCardIcon(Heroicon::OutlinedCommandLine) ->slowOutgoingRequestsCardIcon(Heroicon::OutlinedCloudArrowUp)Setting the icon is also available as the icon parameter on the generic method:
use Filament\Support\Icons\Heroicon; $plugin ->serversCard(icon: Heroicon::OutlinedServerStack) ->usageCard(icon: Heroicon::OutlinedCursorArrowRays) // ...#Customizing the widths/heights (rows/columns)
Laravel Pulse allows you to customize the width and height of each card. By default, a page will have 12 columns. For each card you can define how many columns it should take horizontally:
$plugin ->serversCardColumnSpanFull() ->usageCardColumnSpan(4) ->queuesCardColumnSpan(4) ->cacheCardColumnSpan(4) ->slowQueriesCardColumnSpan(8) ->filamentPagesCardColumnSpan(6) ->exceptionsCardColumnSpan(6) ->slowRequestsCardColumnSpan(6) ->slowJobsCardColumnSpan(6) ->slowOutgoingRequestsCardColumnSpan(6)Setting the column span is also available as the third parameter on the generic method:
$plugin ->serversCard(columnSpan: 1) ->usageCard(columnSpan: 2) // ...For cards, you can also define how many rows it should take vertically. By default, all cards will take up one row. Two exceptions are the application usage card and the filament usage card, which both are tall cards and take up 2 rows:
$plugin ->serversCardRowSpan(1) ->usageCardRowSpan(2) ->queuesCardRowSpan(1) ->cacheCardRowSpan(1) ->slowQueriesCardRowSpan(1) ->filamentPagesCardRowSpan(2) ->exceptionsCardRowSpan(1) ->slowRequestsCardRowSpan(1) ->slowJobsCardRowSpan(1) ->slowOutgoingRequestsCardRowSpan(1)Setting the vertical row span is also available as the fourth parameter on the generic method:
$plugin ->serversCard(rowSpan: 1) ->usageCard(rowSpan: 2) // ...#Registering custom cards
If you want to build your own custom Pulse cars and recorders, or display custom cards from external packages, you can use the registerCard() method.
For example, let's say that we want to register 404 monitoring using geowrgetudor/404-monitor:
$plugin ->registerCard(livewire: \Geow\NotFoundMonitor\Livewire::class, sort: 10, columnSpan: 4, rowSpan: 1)#Customizing page navigation details
If you want to customize the navigation details of the Pulse page, you can configure it using the dedicated methods on the $plugin when configuring it:
use Filament\Support\Icons\Heroicon; $plugin ->navigationGroup('Monitoring') ->navigationSort(1) ->navigationLabel('Monitoring') ->navigationIcon(Heroicon::OutlinedSquaresPlus) ->navigationIcon(Heroicon::SquaresPlus) ->pageTitle('Monitoring') ->slug('monitoring')#Customizing the page
If you want to customise or override other aspects of the page, you can create a new class in your project that extends the \RalphJSmit\Filament\Pulse\Pages\PulsePage page. In this class you can override everything you want to customize, like the title, navigation label or navigatin group.
Finally, you should register the new page in Filament by using the ->registerPages() method:
$plugin->registerPages([ YourExtendedPulsePage::class,])#Upgrade guide (from V1 to V2)
If you are upgrading from version 1.x to 2.x, then you should remove the following lines from your custom theme tailwind.config.js:
content: [ './vendor/ralphjsmit/laravel-filament-pulse/resources/**/*.blade.php', './vendor/laravel/pulse/resources/**/*.blade.php'],Instead, add the following lines to your theme.css file:
@source '../../../../vendor/ralphjsmit/laravel-filament-pulse/resources/**/*.blade.php';@source '../../../../vendor/laravel/pulse/resources/**/*.blade.php';The V2 is available to all customers who previously purchased a license for V1.
#Roadmap
I hope this package will be useful to you! If you have any ideas or suggestions on how to make it more useful (including suggestions for new custom (Filament-related) recorders/cards), please let me know at (support@ralphjsmit.com).
#Support
If you have a question, bug or feature request, please e-mail me at support@ralphjsmit.com or tag @ralphjsmit on #pulse on the Filament Discord. Love to hear from you!
🙋♂️ Ralph J. Smit