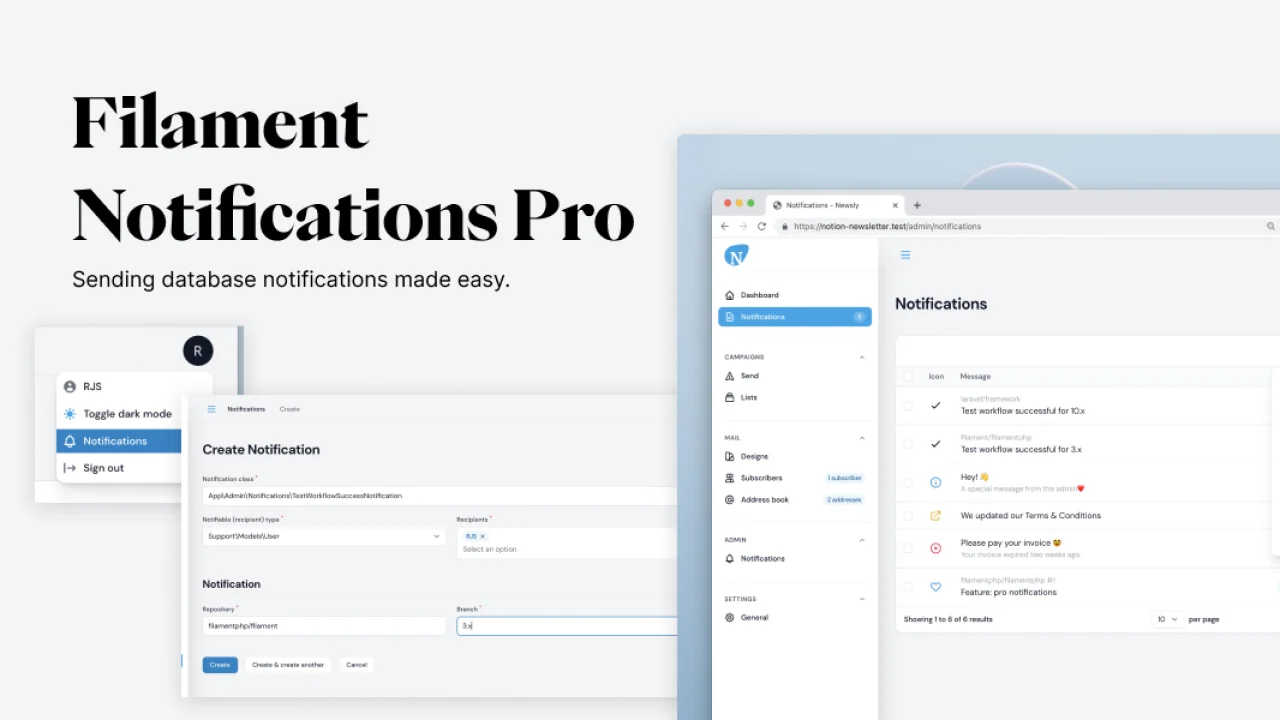
Notifications Pro
CommunitySeamlessly integrate Laravel database notifications with Filament.
filament/
namespace. Review the source and install at your own risk. Found
malware or an unresolved security issue the author won't
address?
Report it
.
 Author:
Ralph J. Smit
Author:
Ralph J. Smit
Documentation
- Features
- Installation
- Usage
- Upgrading from V1 to V2
- Support
This package allows you to integrate Laravel-notifications in your Filament Admin application. The primary goal is to support the regular Notification system with classes, as how it is described in the Laravel-docs. The advantage of this approach is that it allows you to create notification classes that can be sent via multiple channel. For example, send the notification to a user via email ánd show it in the admin panel.
NEW: The package supports Filament V3, V4 & V5.
#Features
- Integrates with the Notification-classes from Laravel.
- Send notifications using multiple channels, including the database.
- Custom resource for admin users to send, view and delete notifications.
- Send on demand notifications to one or multiple recipients with a custom message.
- GitHub-inspired page in the admin panel for your users to view notifications.
- Mark notifications as read.
- Mark notifications as done.
- Bookmark notifications.
- Easily extensible.
- Fully translatable.
- Beautiful in dark mode 🌚
- Magically store database notifications in the database, never have to use the
toArray()method anymore! - Support for notification actions, icons, descriptions
- Sending simple on demand notifications from code
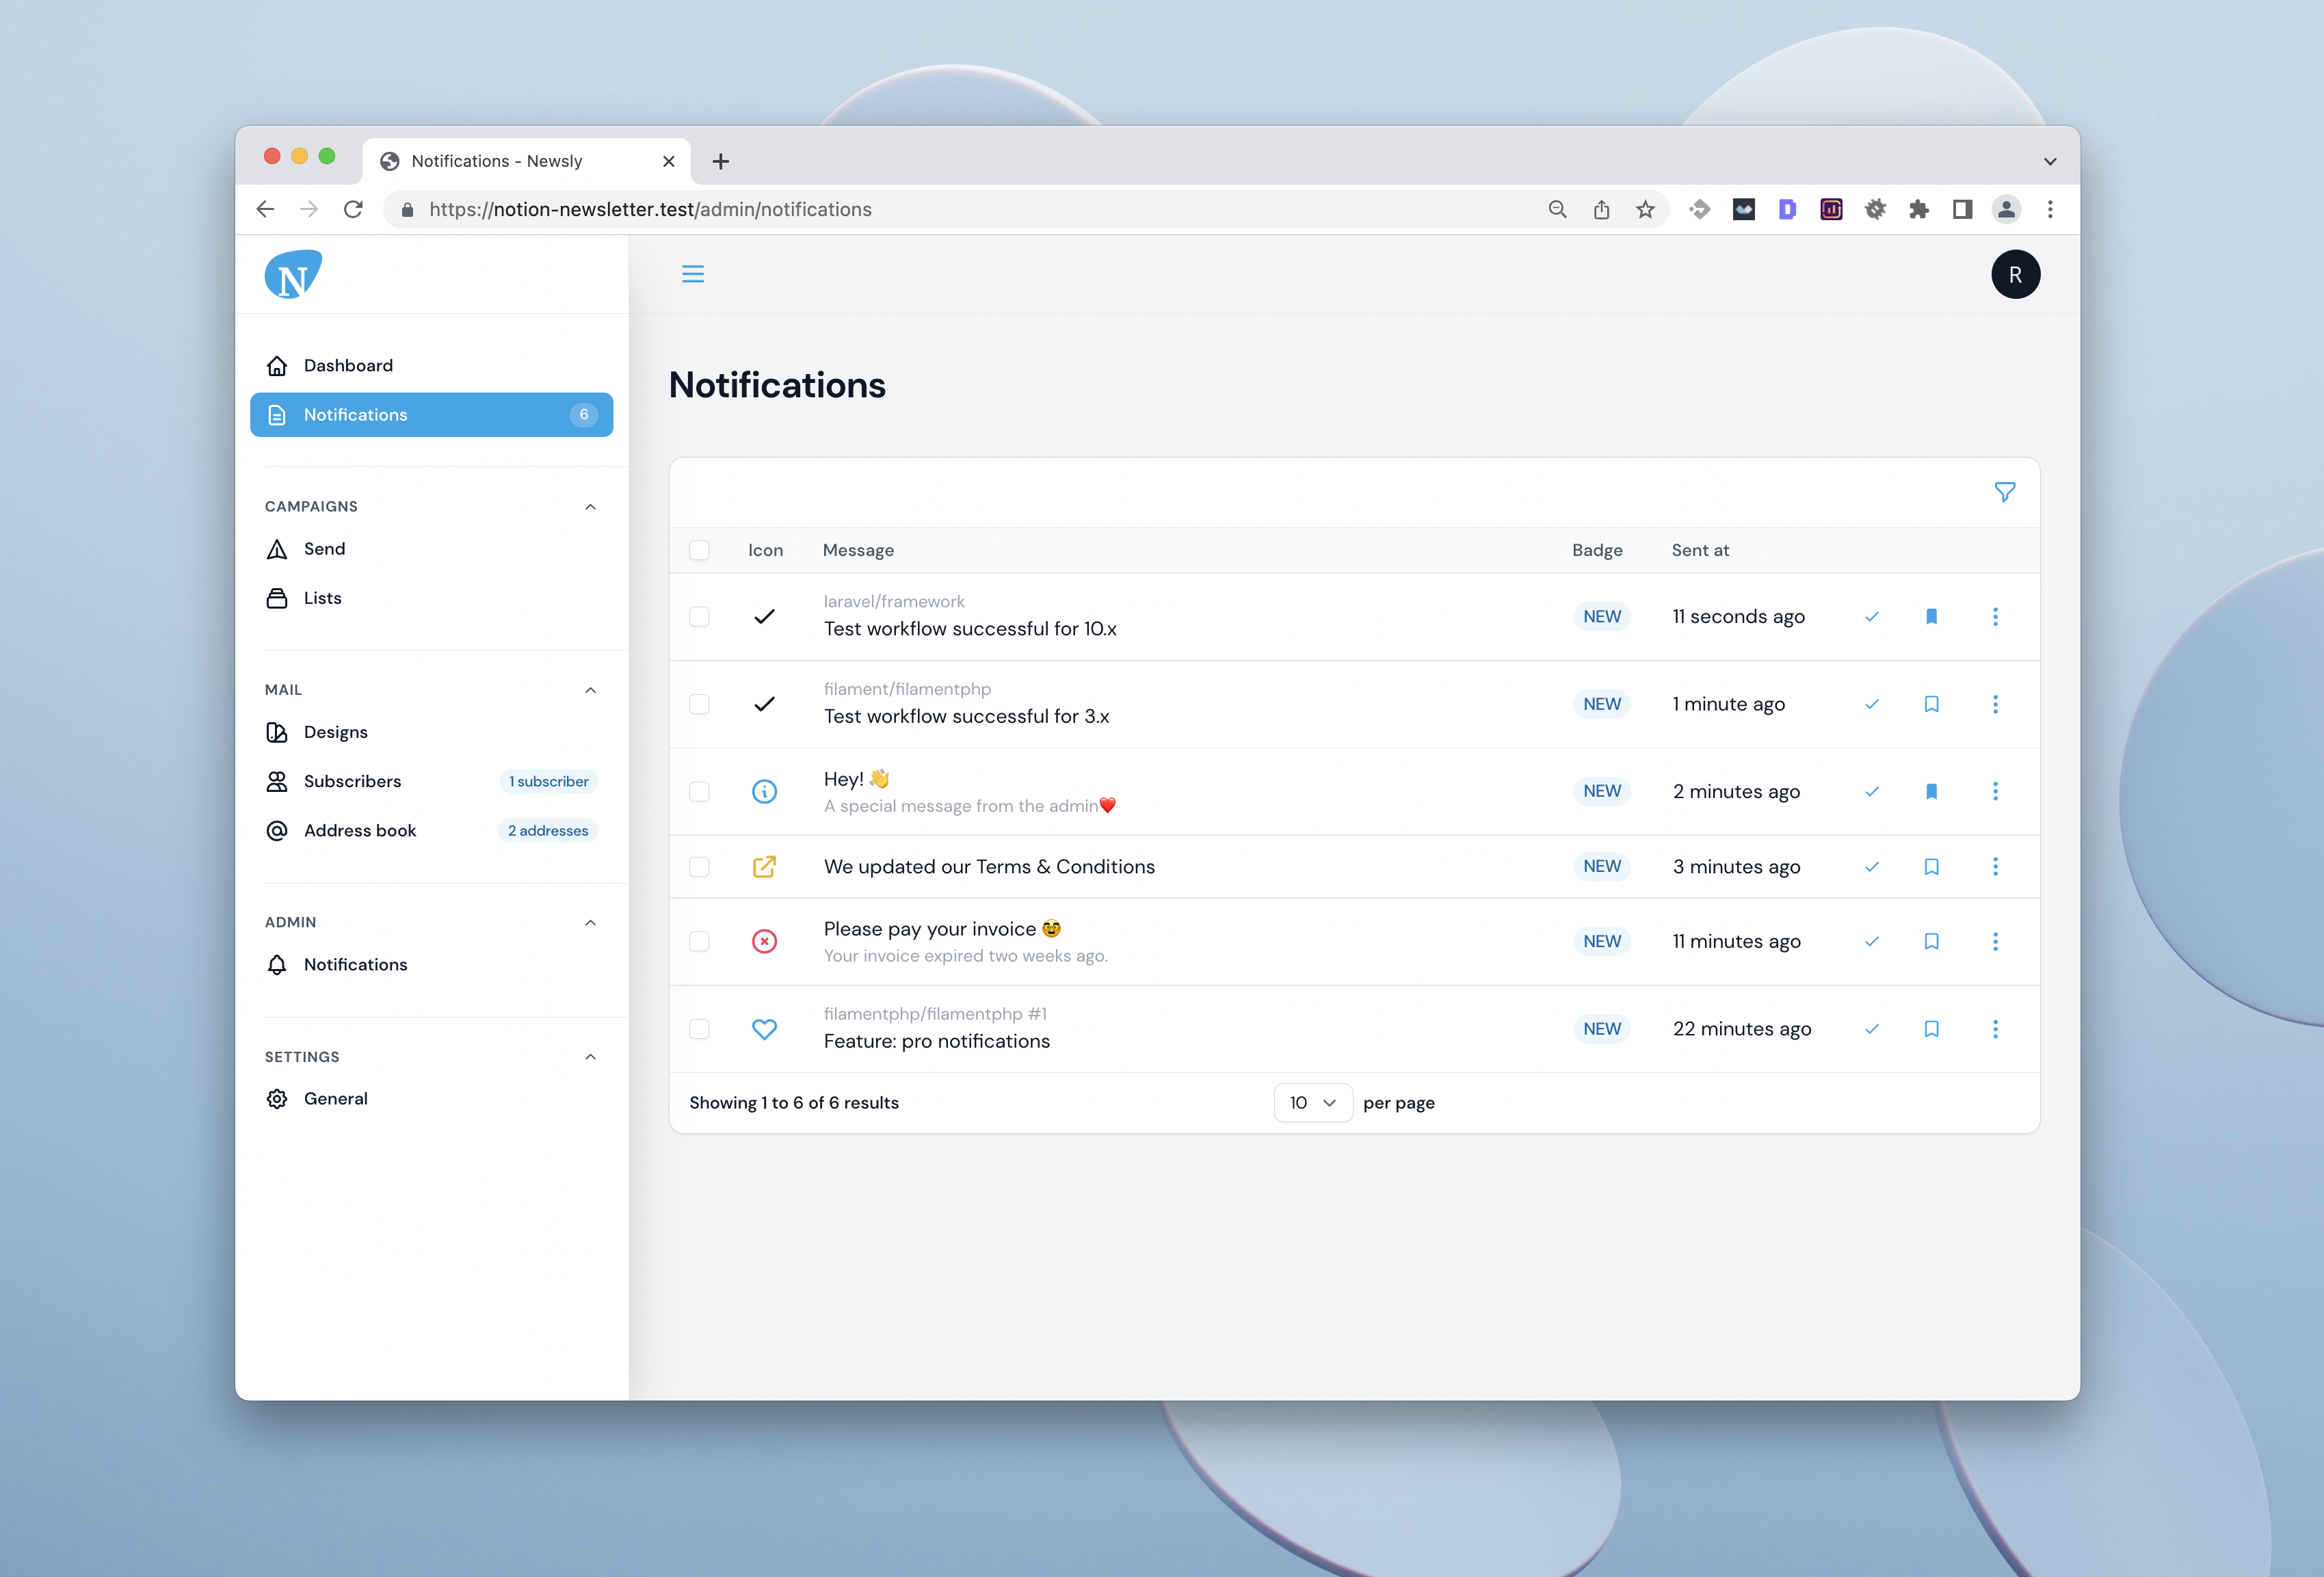
#Screenshots
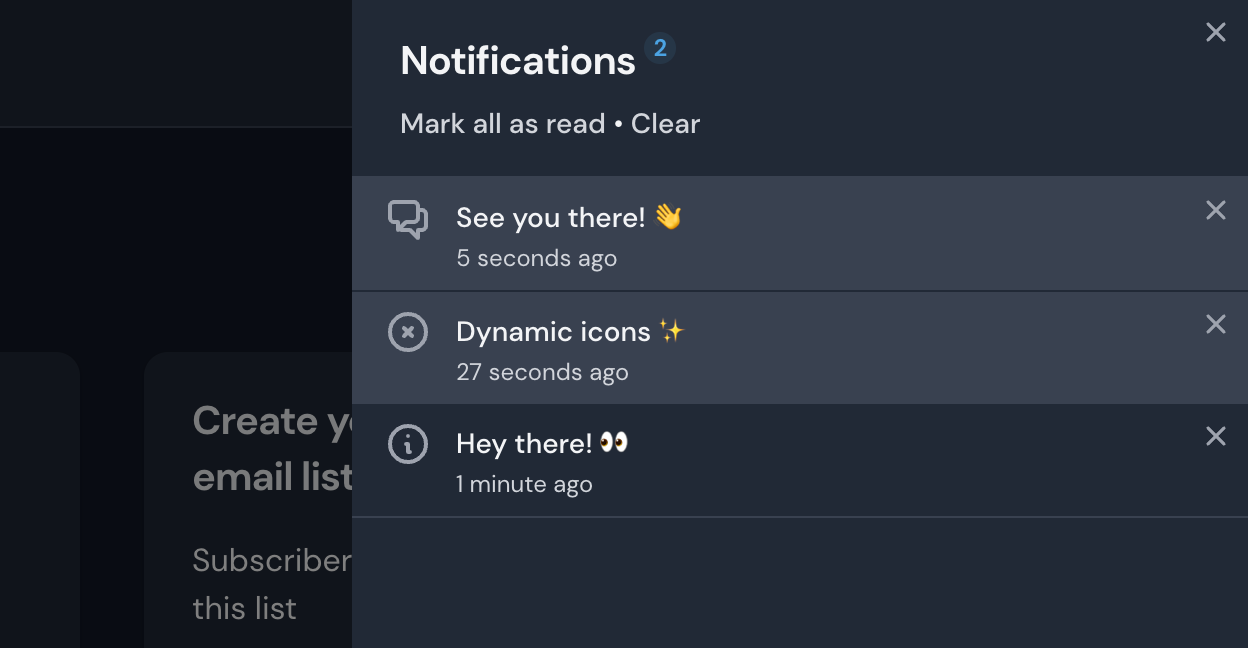
#User-facing notification pages
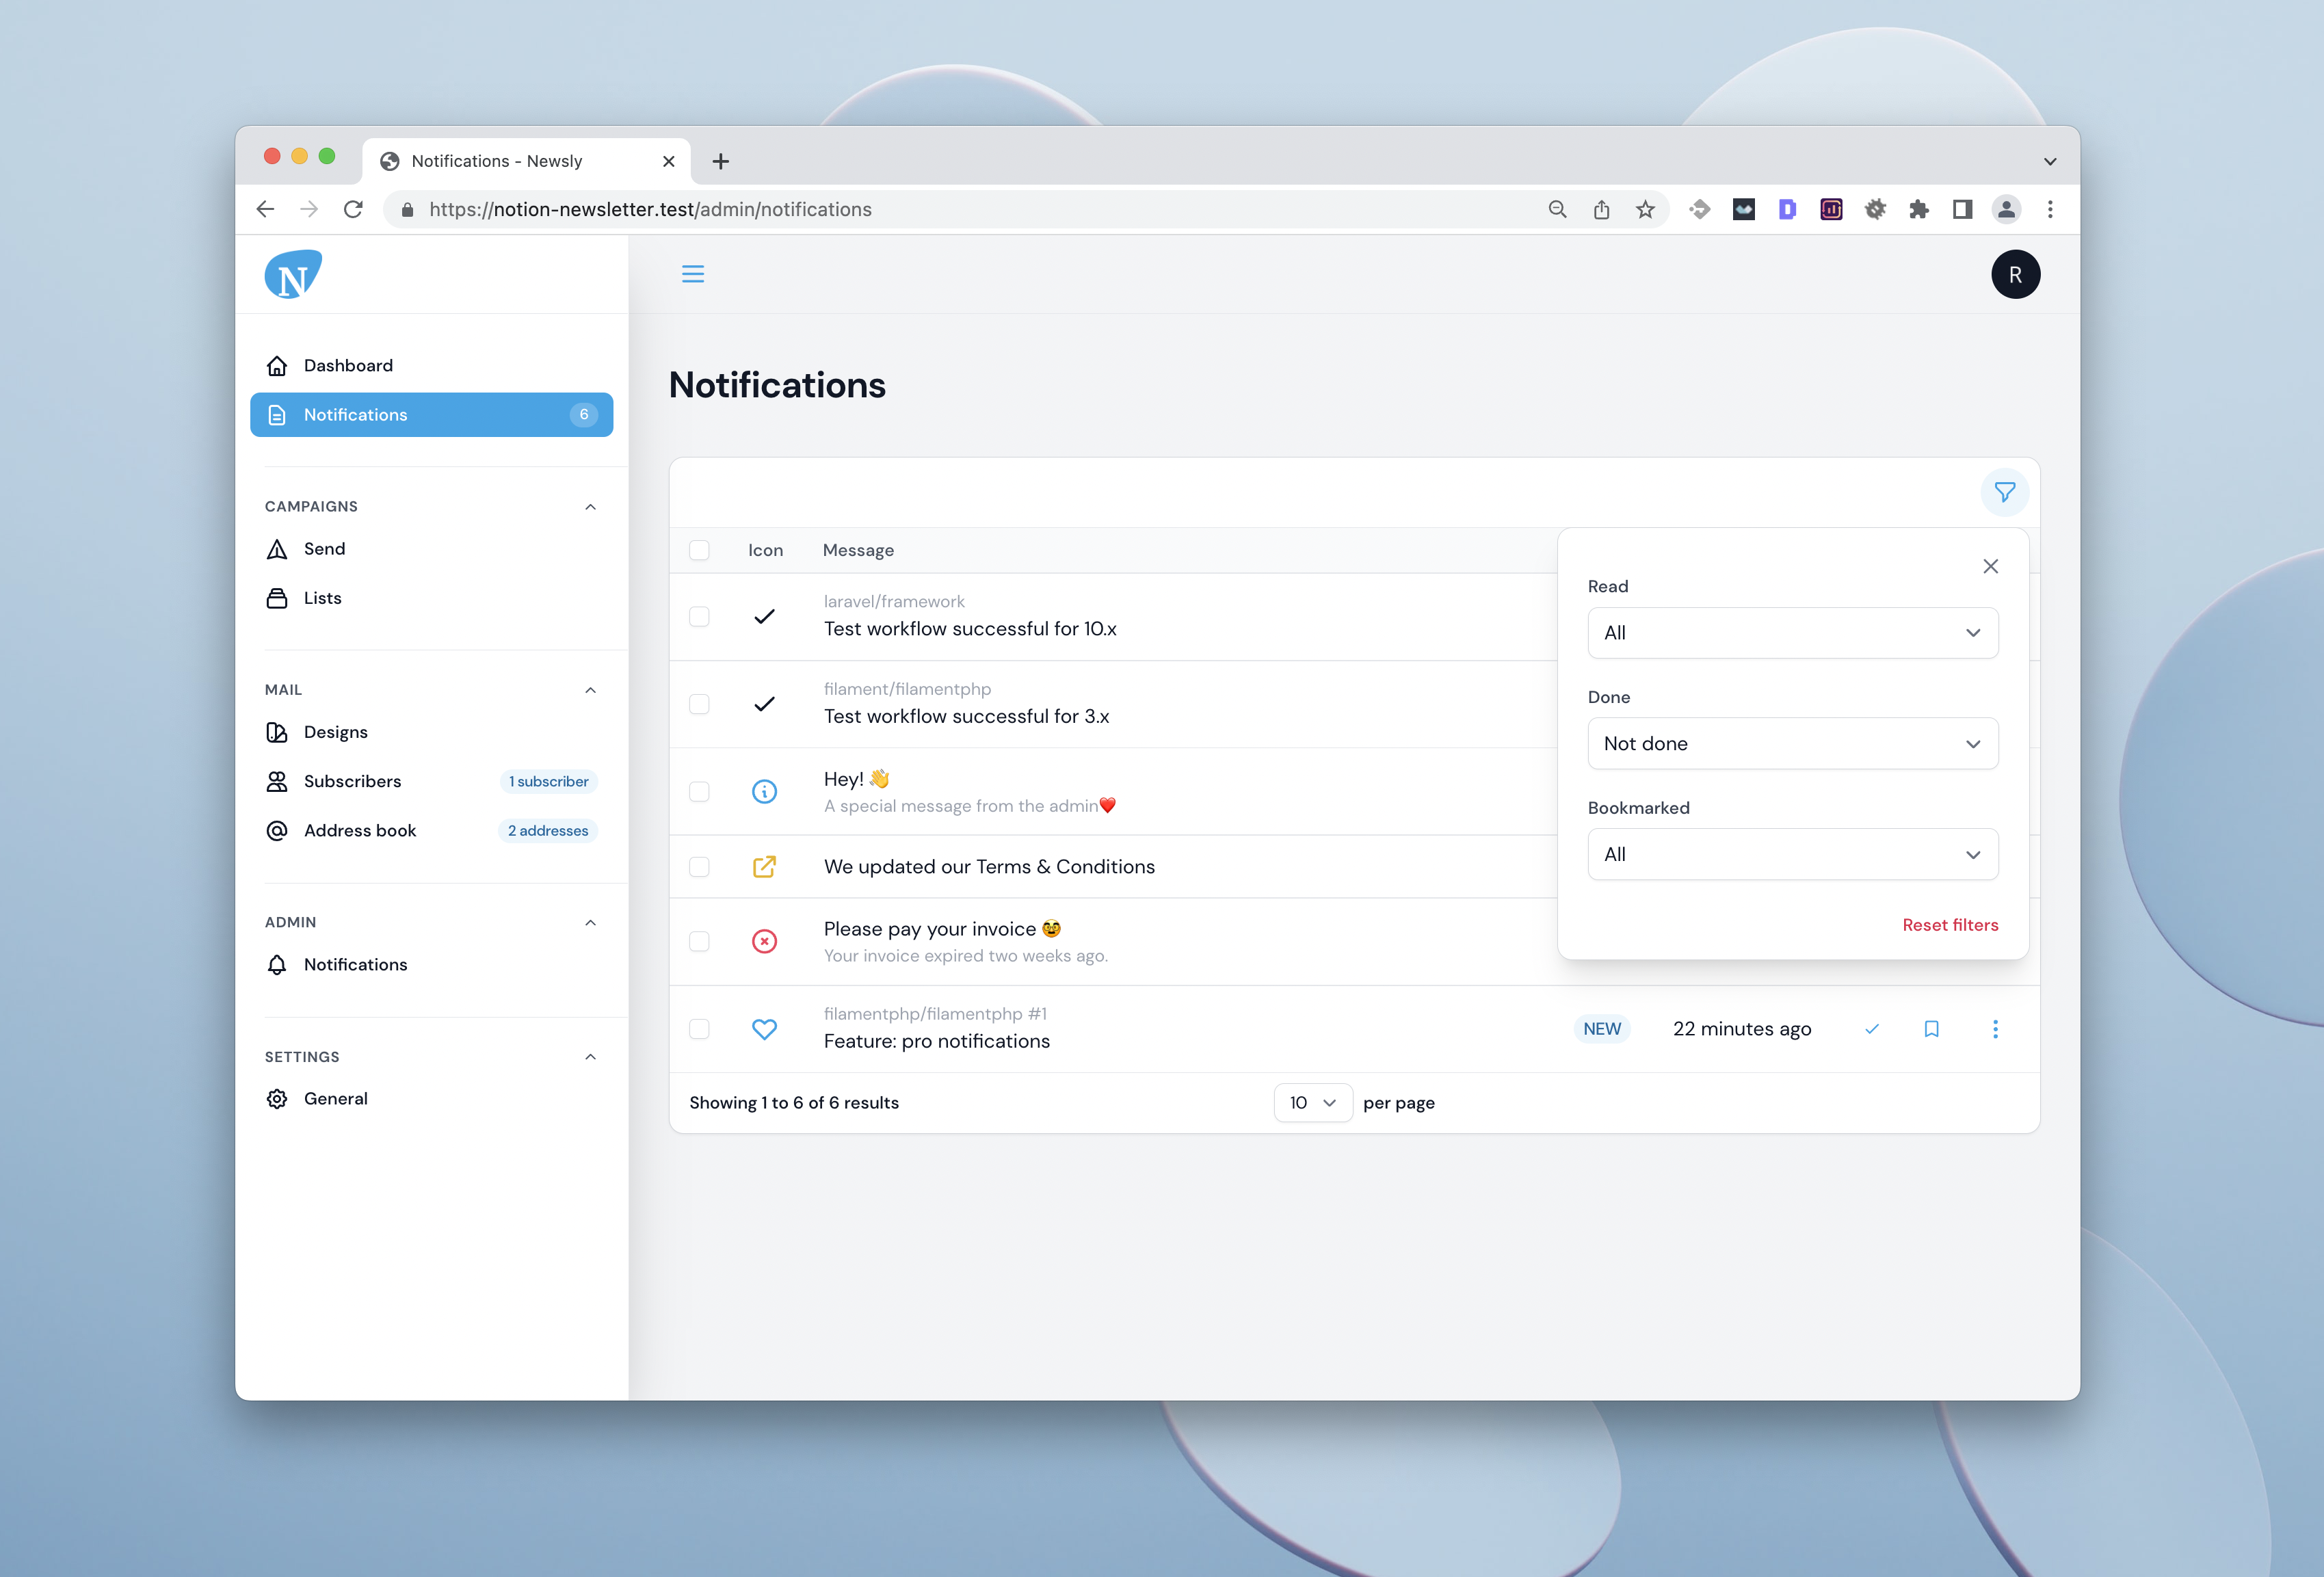
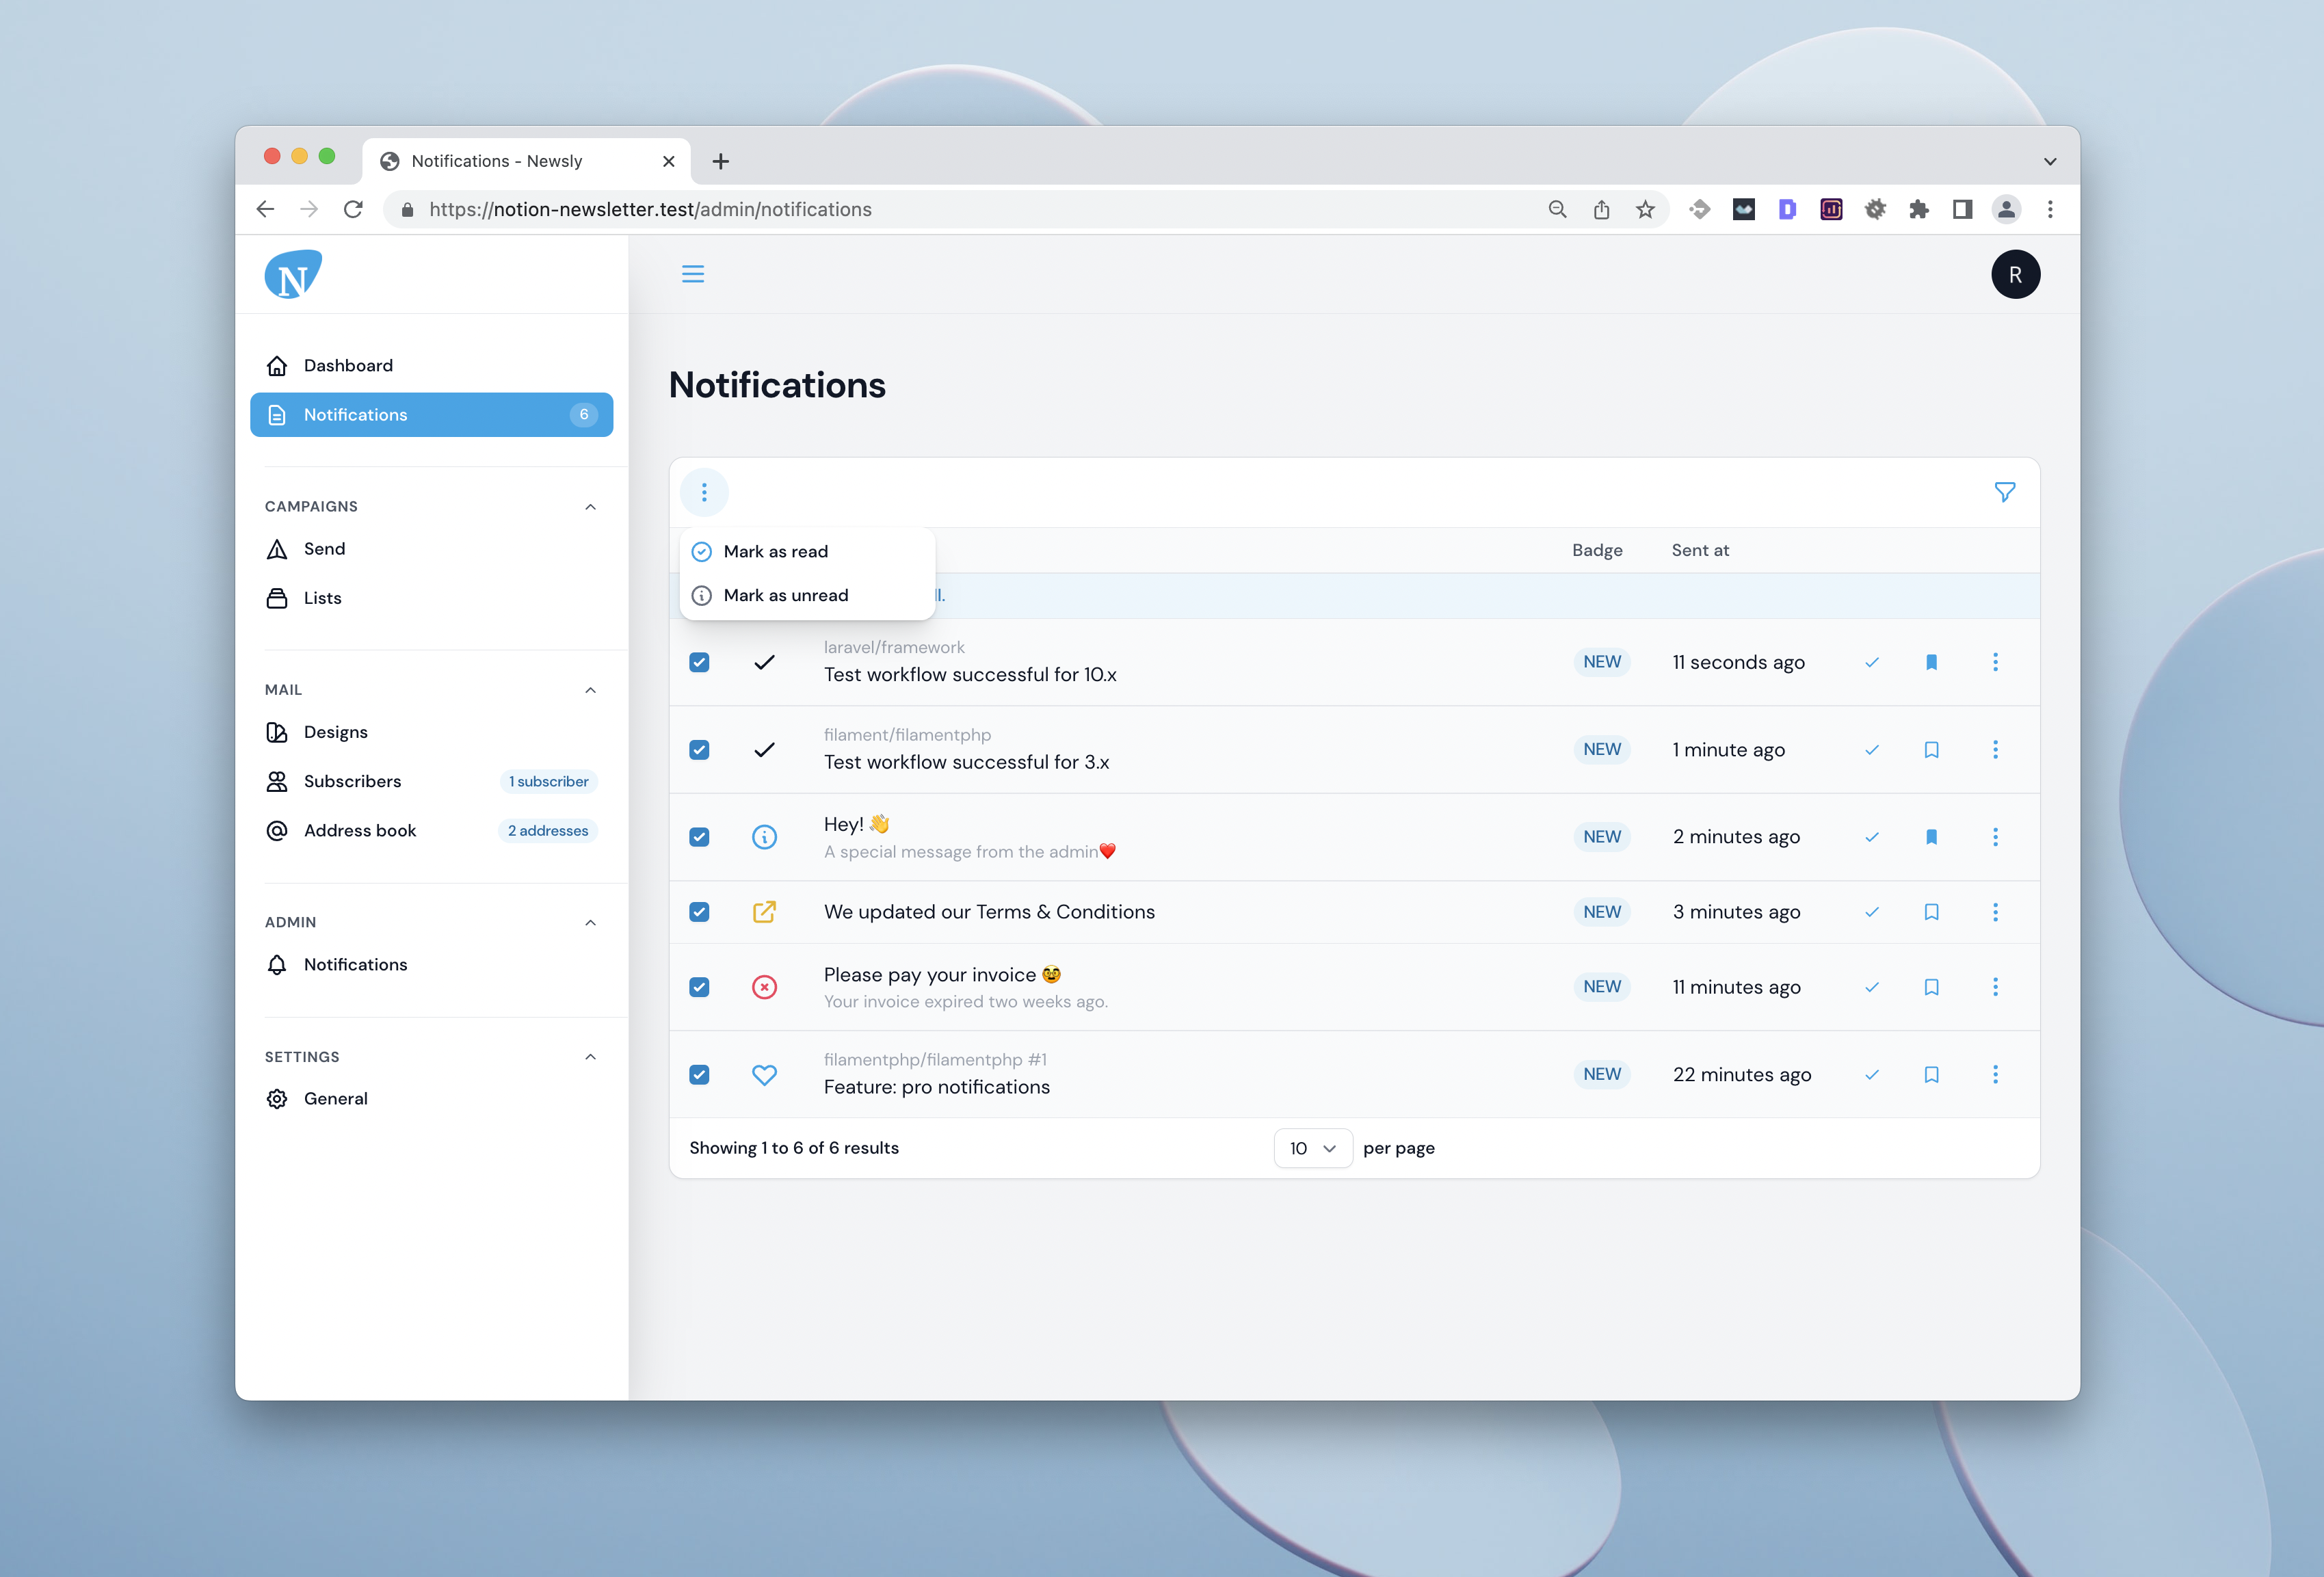
You can give your users a beautiful page to view their notifications:
With filters:
With bulk actions:
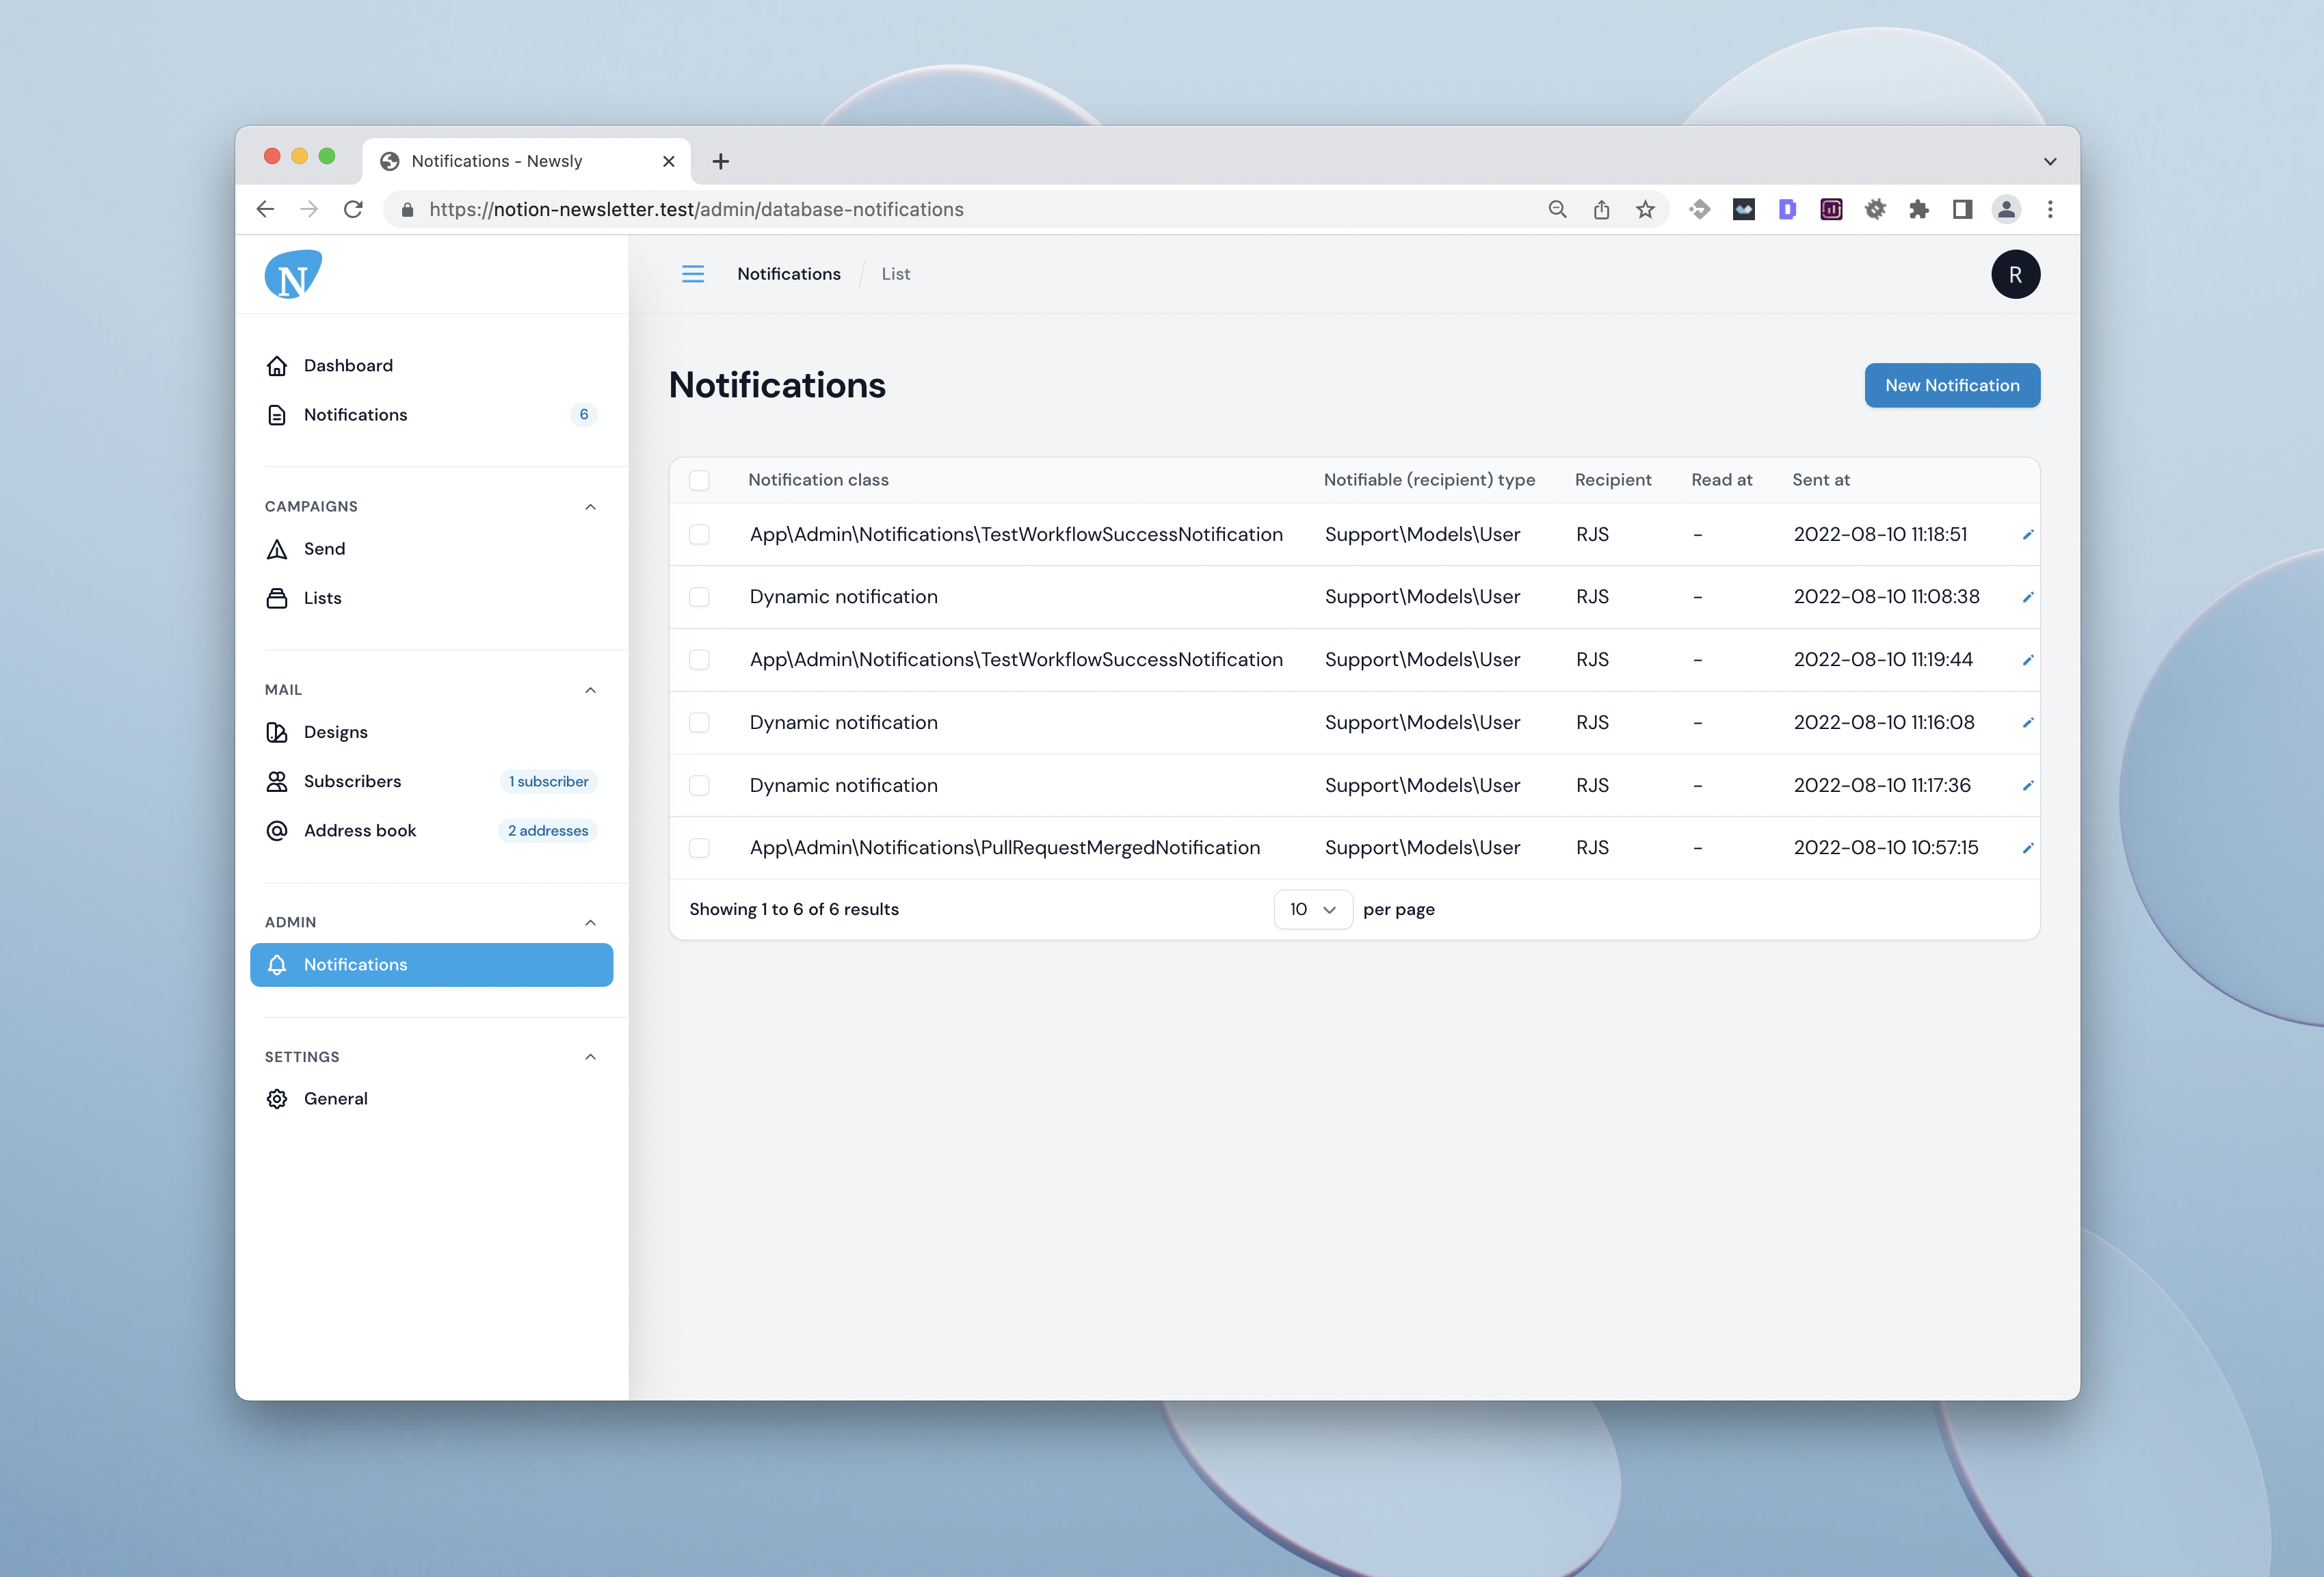
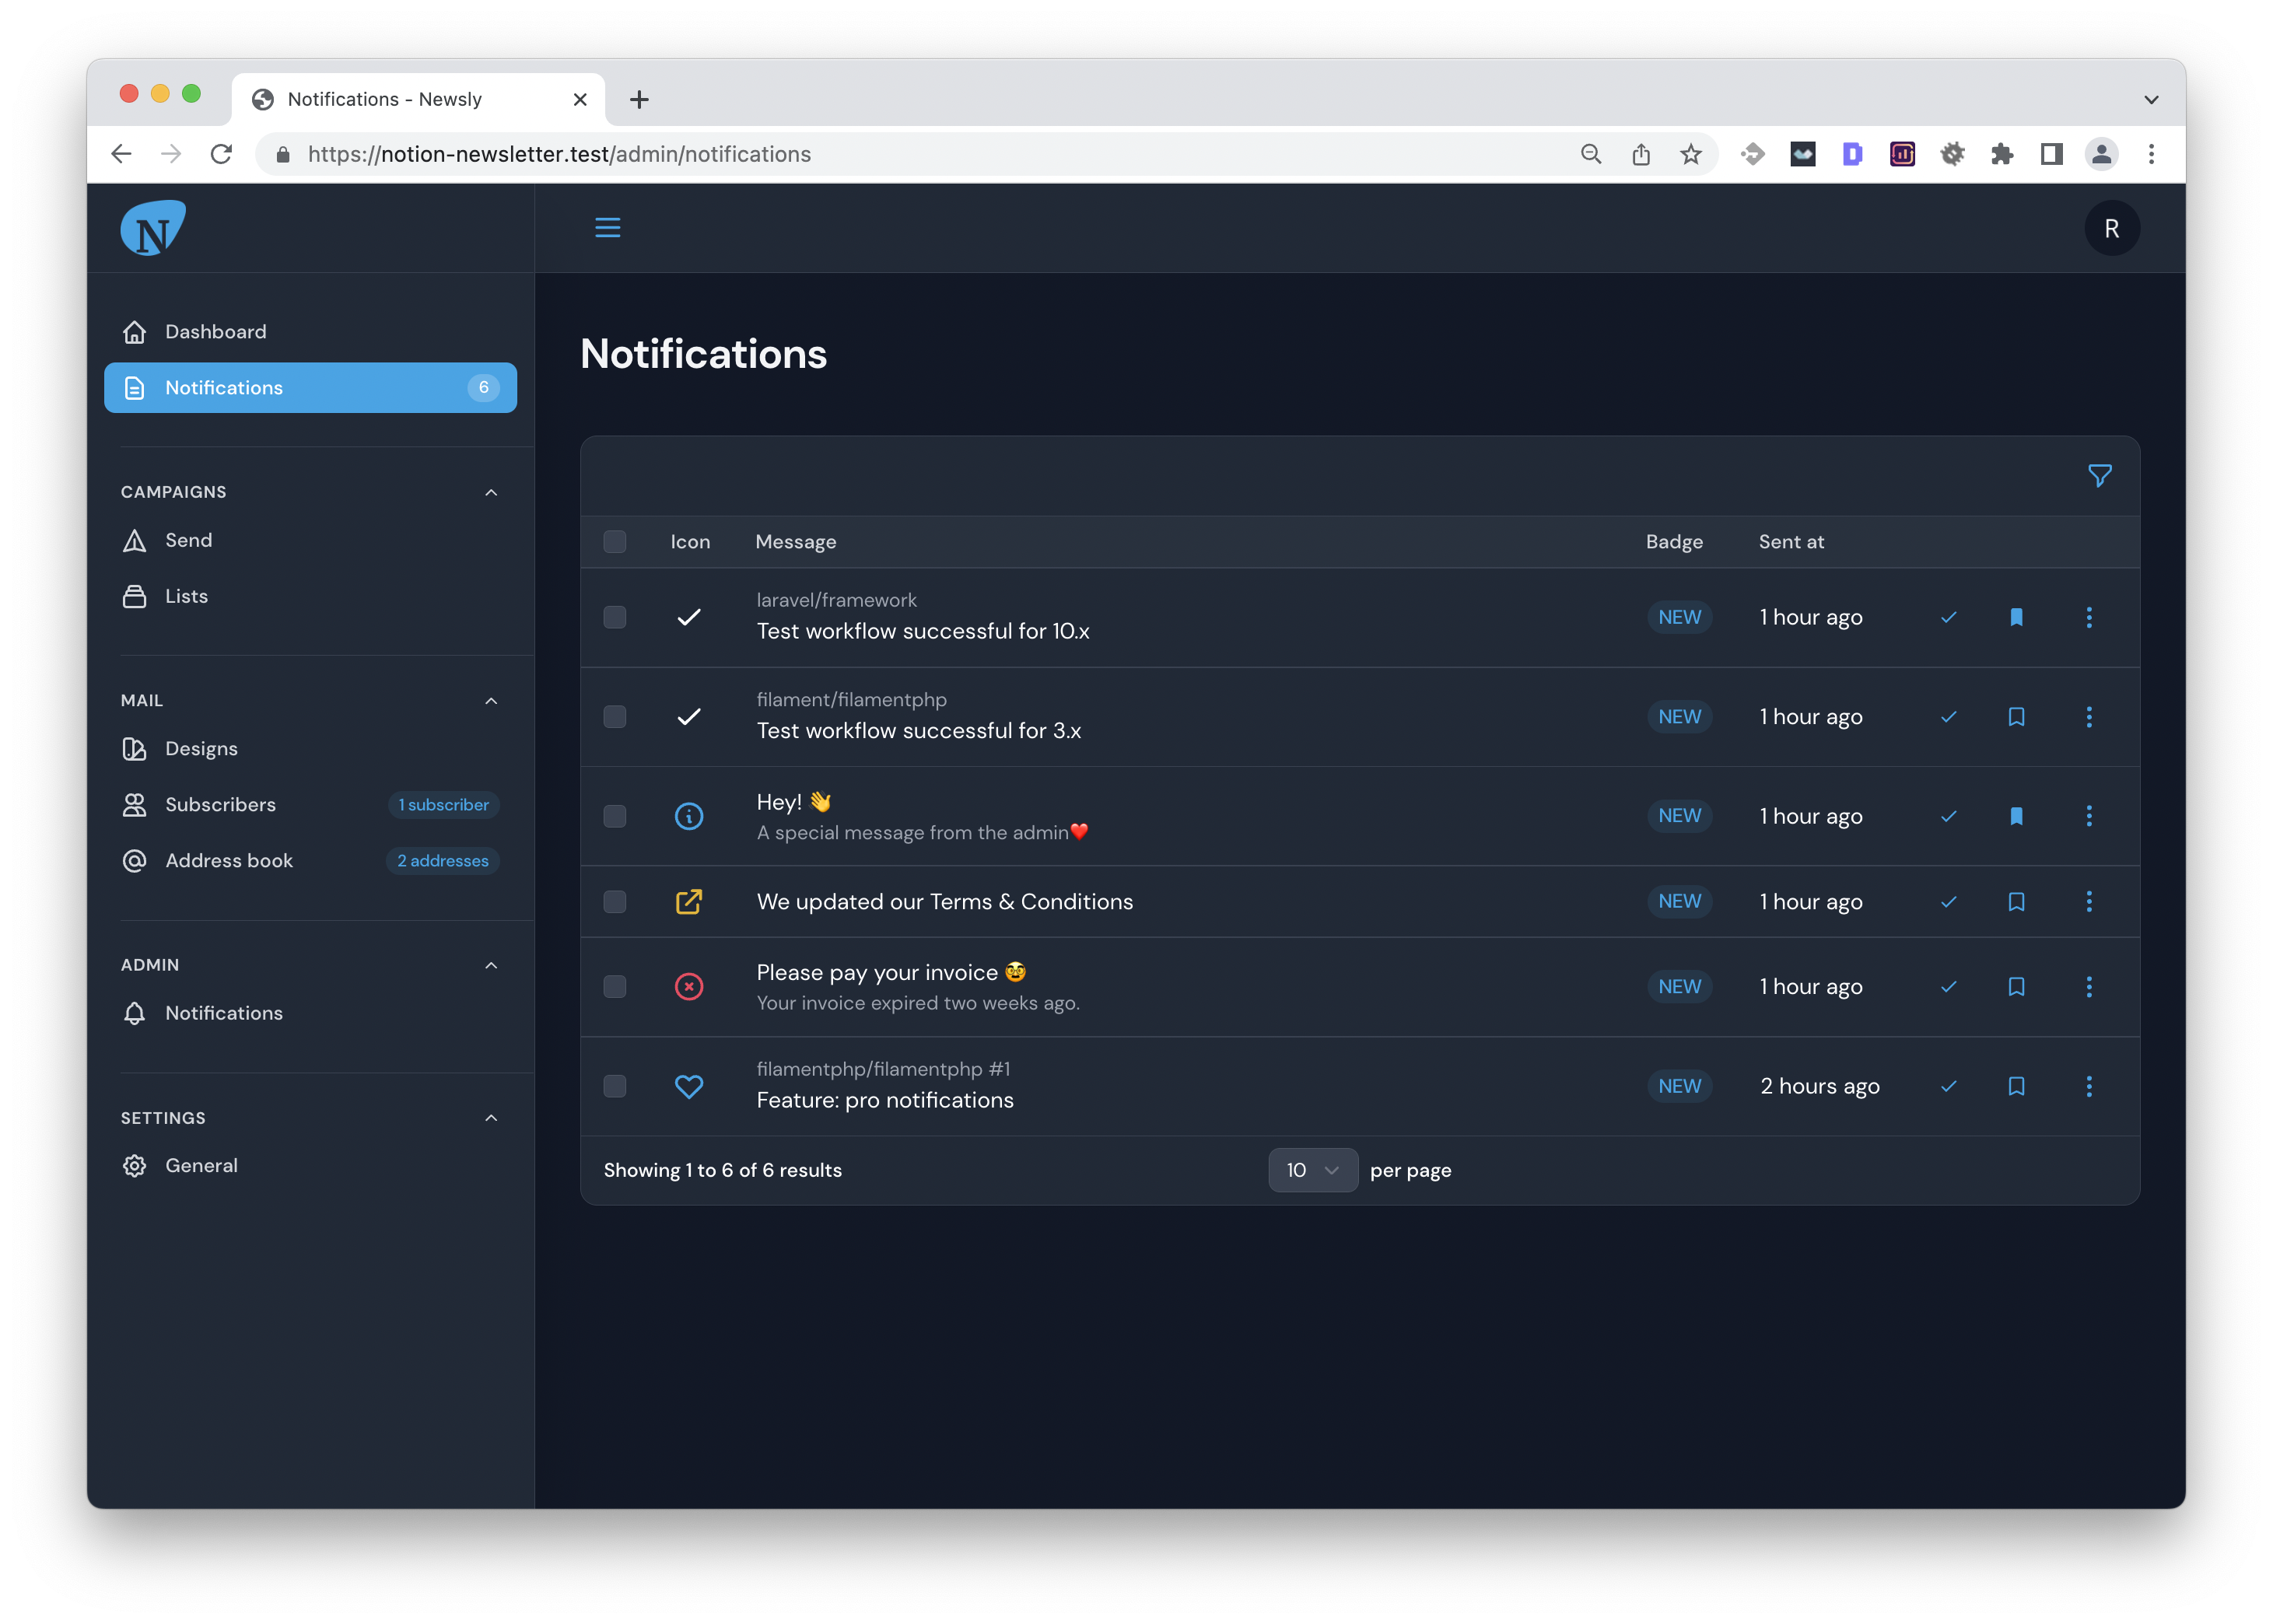
#Admin resource to manage notifications
There is a handy admin resource to manage and send notifications:
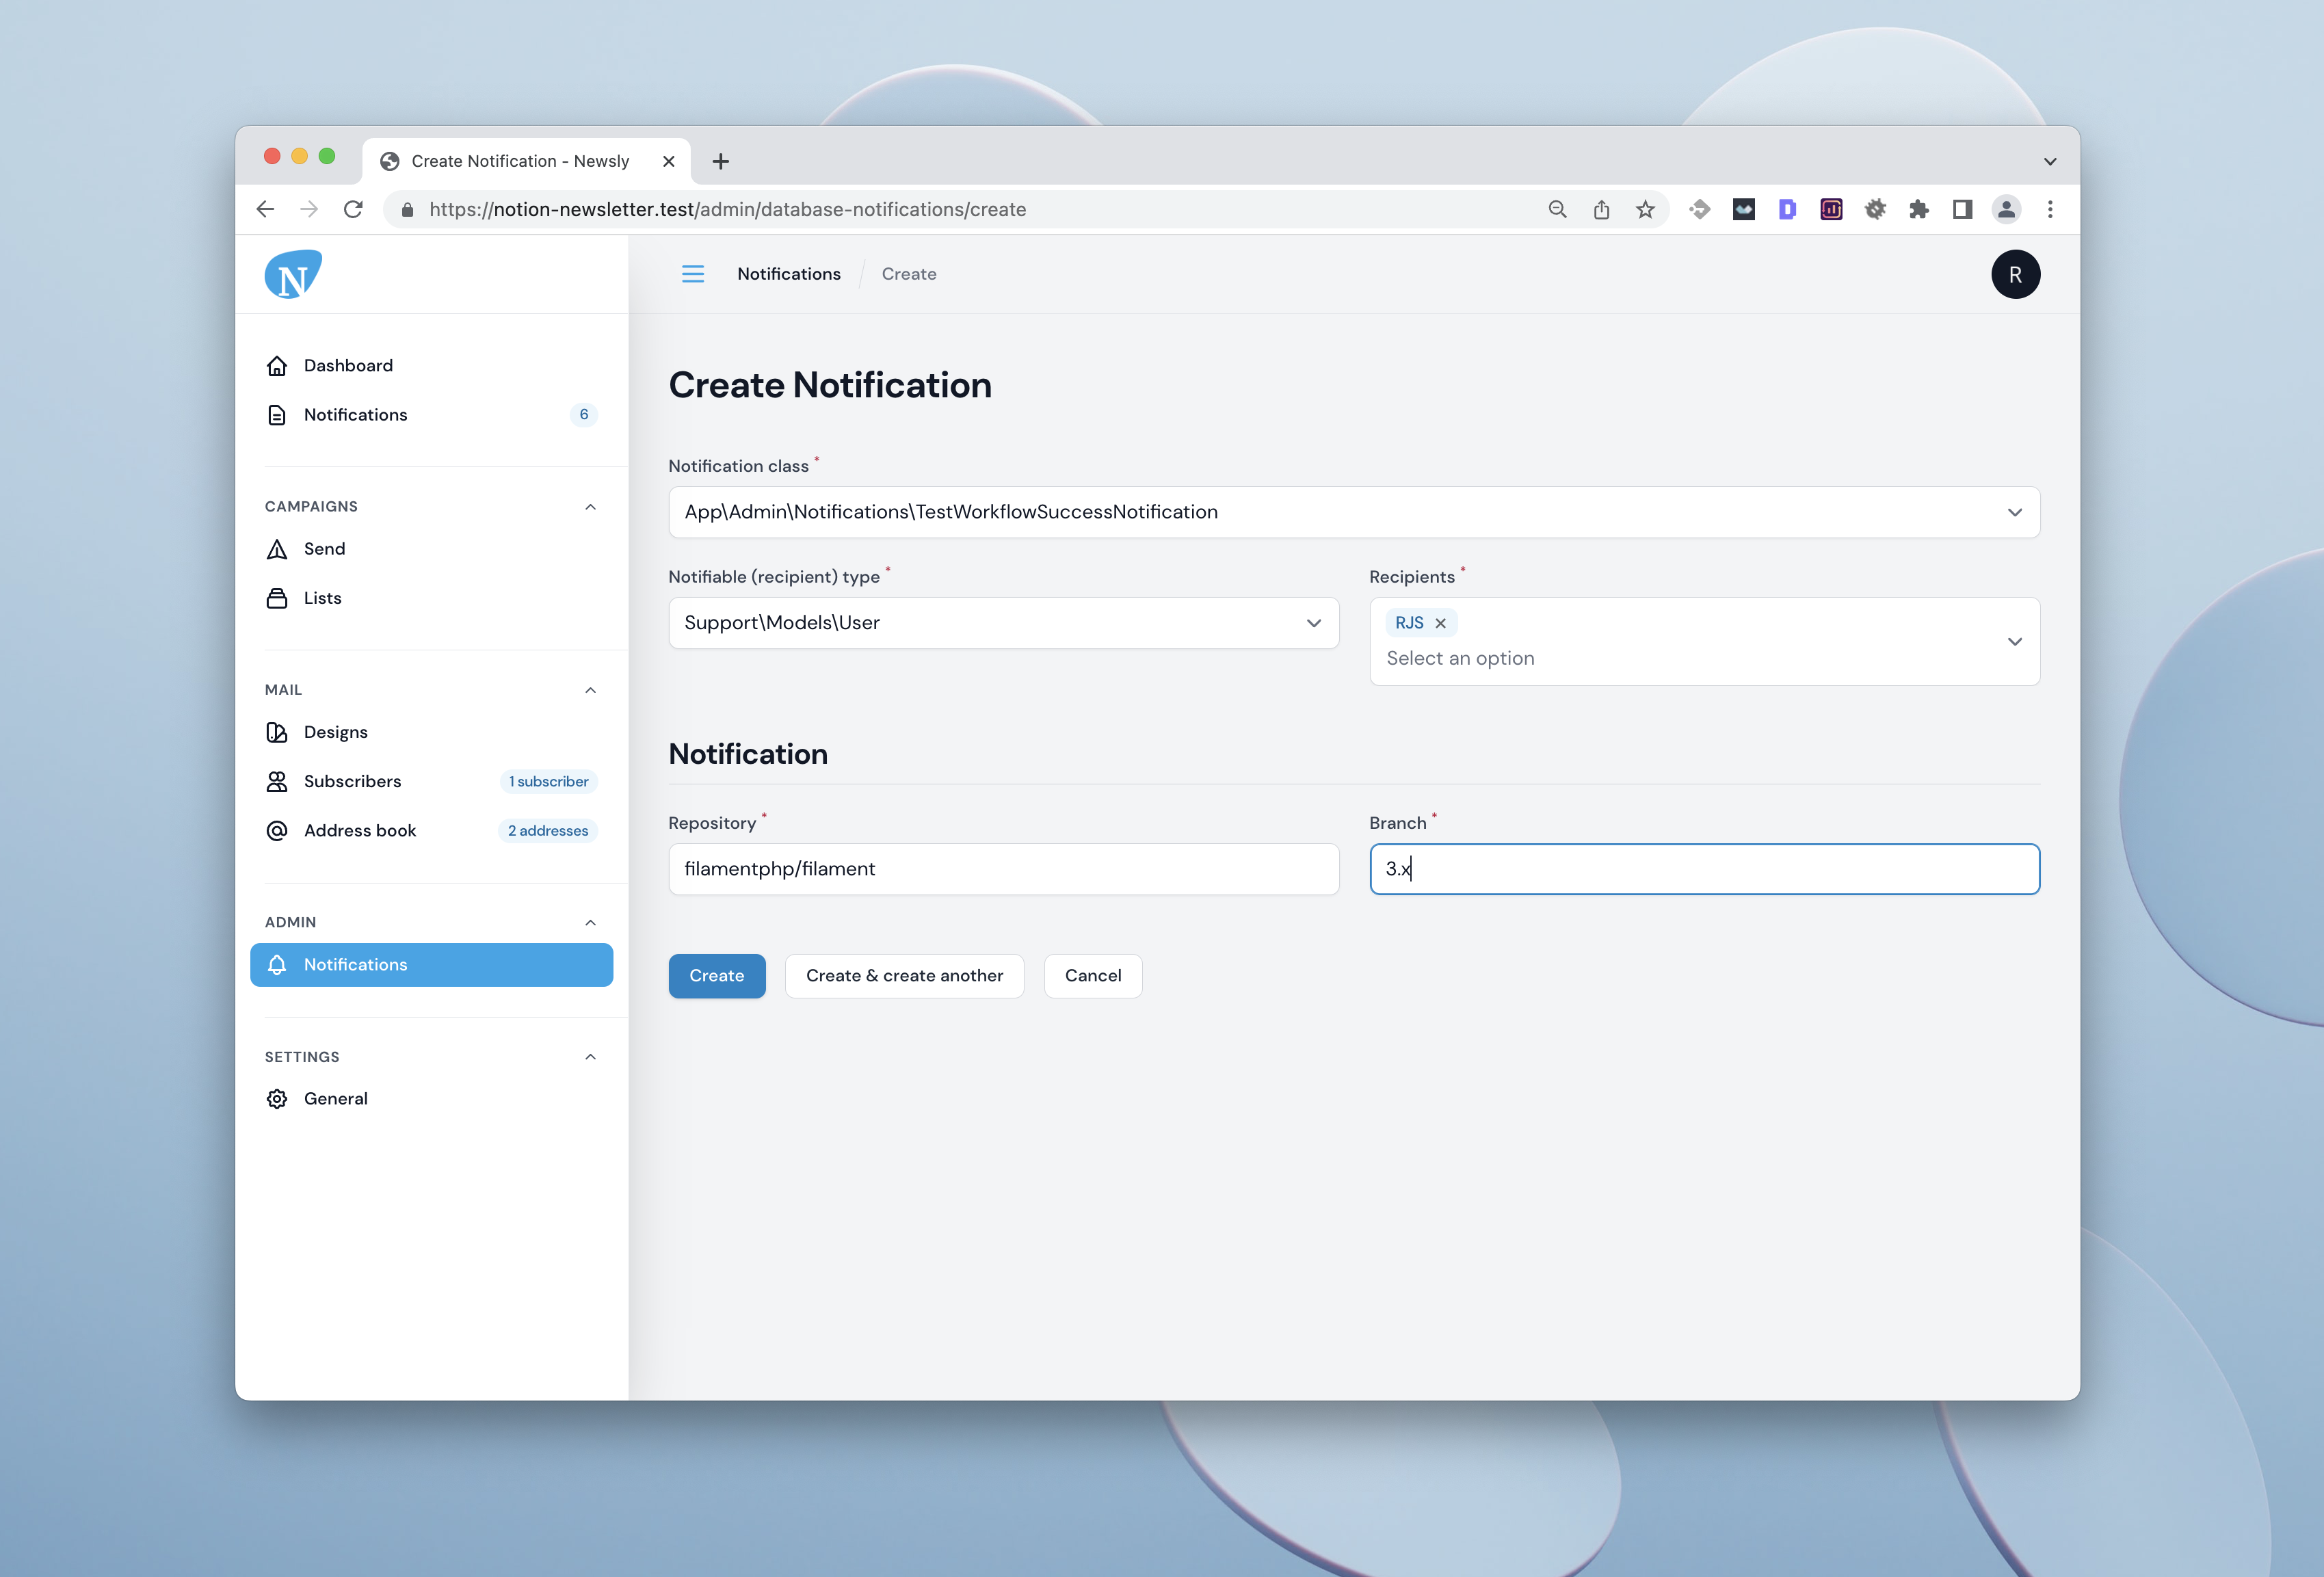
#Send a custom notification from a class
You can send notifications from a notification class. Collect parameters using a Filament form.
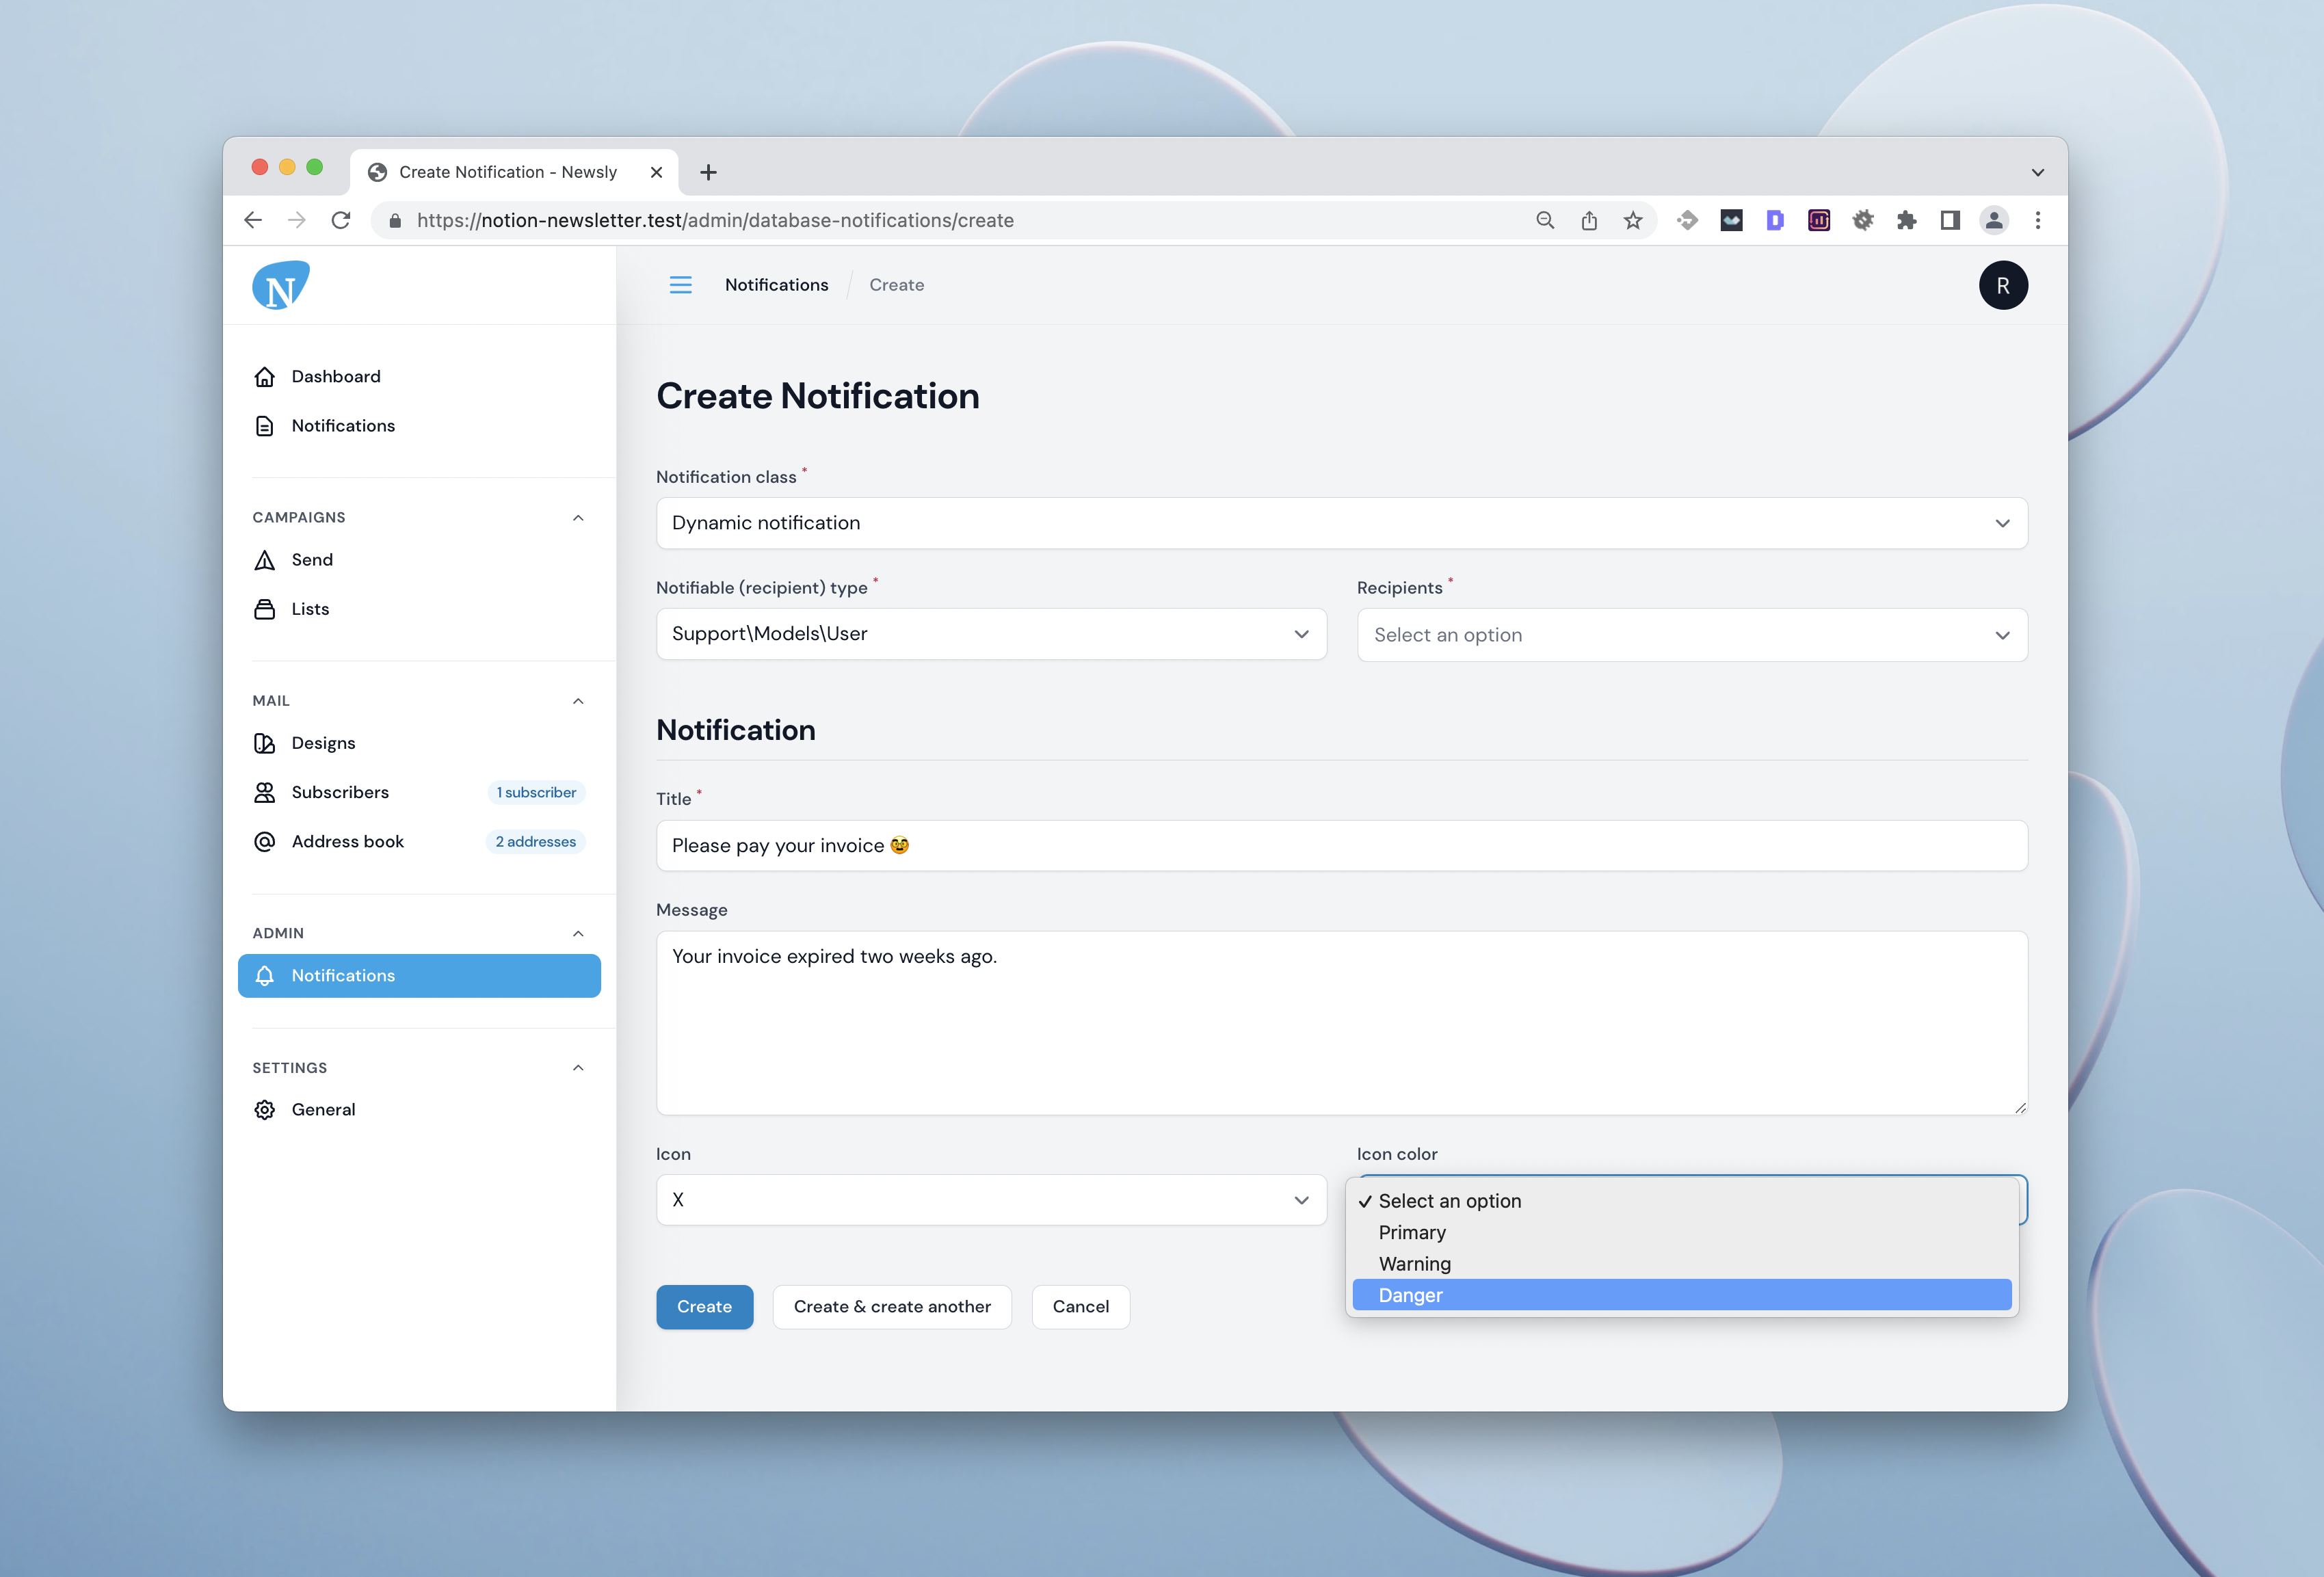
#Send a dynamic notification
There is also a way to send dynamic one-time notifications to one or multiple recipients:
#Native Filament Notifications integration
All notifications will show up in the native Filament Notifications slide-over:
#Dark Mode example
Looks beautiful in dark mode as well:
Thank you for purchasing the Notifications Pro plugin for Filament Admin!
We tried to make the library as easy-to-install and versatile as possible. Nevertheless, if you still have a question or a feature request, please send an e-mail to support@filamentplugins.com.
In this guide I'll show you how to install the library, so you can start using it right away.
#Installation
#Prerequisites
For these installation instructions to work, you'll need to have the Filament Panels package installed and configured.
The package is supported on Filament V3, V4 and V5; and Laravel 10 or higher (with earlier versions available since Laravel 8). Please be aware though that support for security fixes for Laravel 10 ends within a few months.
#Installation via Composer
To install the package you should add the following lines to your composer.json file in the repositories key in order to allow access to the private package:
{
    "repositories": [
        {
            "type": "composer",
            "url": "https://satis.ralphjsmit.com"
        }
    ]
}
If you have one of my other premium packages installed already, then you don't need to repeat these lines.
Next, you should require the package via the command line. You will be prompted for your username (which is your e-mail) and your password (which is your license key, e.g. 8c21df8f-6273-4932-b4ba-8bcc723ef500).
composer require ralphjsmit/laravel-filament-notifications
After purchasing the plugin, you'll also be shown installation instructions with the appropriate credentials pre-filled.
Finally, you'll need to publish the migration and migrate the database:
php artisan vendor:publish --tag="filament-notifications-migrations"
php artisan vendor:publish --tag="filament-notifications-config"

# You can also publish the translations if wanted:
php artisan vendor:publish --tag="filament-notifications-translations"

php artisan migrate
#Custom themes
If you are using a custom theme, the package will work out-of-the-box without any necessary changes.
#Replace use Notifiable with use FilamentNotifiable
Next, you need to replace the default Notifiable trait with the FilamentNotifiable trait. You should do this on your User model and on every other model that you want to send notifications to.
<?php

namespace App\Models;

use Illuminate\Database\Eloquent\Model;
use RalphJSmit\Filament\Notifications\Concerns\FilamentNotifiable;

class User extends Model
{
    use FilamentNotifiable;

    // ..
}
#Configuring the plugin per-panel (Filament V3)
If you are using the plugin in Filament V3, you should register the plugin in each of the panels that you have in your project and would like to use the package in:
use RalphJSmit\Filament\Notifications\FilamentNotifications;

$panel
    ->plugin(FilamentNotifications::make())
#Usage
#Notifications resource
The Filament Notifications plugin comes with a pre-defined resource that allows you to give your admin users a way to send and manage notifications. By default, this NotificationResource is registered automatically. You can disable the automatic registering by removing the resource from the filament-notifications.register.resources array in the config.
#Only giving admin users access
It is recommended to create a new class in your project that extends the default NotificationResource. This allows you to customize the label, the navigation group and restrict access for certain users (among other things). By default the resource will have the label Notifications and be registered under a navigation group with the name admin.
There are two options for restricting access:
- Block everyone except admins.
- Use a policy for more fine-grained access.
#Block everyone except admins
To block access for everyone except admins, you can use the following code:
class NotificationResource extends \RalphJSmit\Filament\Notifications\Filament\Resources\NotificationResource
{
    public static function can(string $action, ?Model $record = null): bool
    {
        return auth()->user()->isAdmin();
    }

    public static function shouldRegisterNavigation(): bool
    {
        return static::can('view');
    }
}
#Block access via a policy
To block access via a policy, you should register a dedicated policy for the RalphJSmit\Filament\Notifications\Models\DatabaseNotification-model. A policy for this model is automatically observed by Filament.
#Sending new notifications
If you haven't already done so, you should set up database notifications in Laravel. In order to get up and running with database notifications, you should follow the next steps:
- Add the
databasedelivery channel to thevia()method of your notification. - Implement the
AsFilamentNotificationinterface and thetoFilamentNotification()method. You'll learn more about the configuration options in the next section. - Add the
StoresNotificationInDatabasetrait to your notification class if you are only using this for database notifications. This trait will take care of converting the object properties to an array for storage in the database, so you don't have to do so. - Register the notification in the
filament-notifications.notificationsconfig array.
namespace App\Notifications;

use Illuminate\Bus\Queueable;
use Illuminate\Notifications\Messages\MailMessage;
use Illuminate\Notifications\Notification;
use RalphJSmit\Filament\Notifications\Contracts\AsFilamentNotification;
use RalphJSmit\Filament\Notifications\FilamentNotification;

class TestNotification extends Notification implements AsFilamentNotification
{
    use StoresNotificationInDatabase;

    public function __construct()
    {
        //
    }

    public static function toFilamentNotification(): FilamentNotification
    {
        return FilamentNotification::make();
    }

    public function via($notifiable): array
    {
        return ['database'];
    }
}
This is how the configuration file looks:
    'notifications' => [
        // Add the notification classes that your users are allowed to send.
        TestNotification::class
    ],
If you want to use a custom label instead of the classname, you can specify the classes as class => label pairs:
    'notifications' => [
        // Add the notification classes that your users are allowed to send.
        TestNotification::class => 'My custom label'
    ],
If you want to have a translated label, you can provide an array instead of a string label, with the locales as keys and the values as label:
    'notifications' => [
        // Add the notification classes that your users are allowed to send.
        TestNotification::class => [
            'en' => 'My custom label in English...',
            'nl' => 'My custom label in Dutch...',
            // ...
        ]
    ],
#Specifying notifiables
Next, you should register the classes that have the Laravel Notifiable trait. Those are the classes that can receive notifications. By default, we included the \App\Models\User::class, but you can add more. You can read more about notifiables in the Laravel docs.
Again, you can specify an array of class names or use the class => label convention:
    'notifiables' => [
        'classes' => [
            // The models that can receive notifications.
            User::class,
        ],

        'search-attributes' => [
            // The column(s) that will be used when searching for a recipient...
            // Leave empty to use the respective `title-attribute`.
            // User::class => ['first_name', 'last_name'],
        ],

        'title-attributes' => [
            // A display-friendly attribute that should be used in the NotificationResource to display each record.
            User::class => 'name',
        ],

        'groups' => [
            // If you're using a multi-tenant application, you can specify whether you want to group
            // recipients by a relationship. You can use this feature to select notifications to
            // just a subset of recipients (for example, the recipients belonging to a tenant).
            //            User::class => [
            //                'relationship' => 'tenant',
            //                'inverse-relationship' => 'users',
            //                'title-attribute' => 'name',
            //            ],
        ],
    ],
After registering a notifiable model, your users will be able to send notifications to that notifiable model. In this example, to one or multiple users.
Because your admin users will need to select notifiable records, you should specify the title record attribute that we will use to display each record:
#Magically storing notifications in the database
It can very well be that your notification needs some parameters and has certain properties that need to be stored in the database. Laravel gives you a handy toArray() method that you can use to convert the data on your notification class to an array, which Laravel stores in the database.
However, this process can be a little bit cumbersome, for example because you have to convert Eloquent models to id's and back.
Luckily, this package provides a handy trait called StoresNotificationInDatabase that will take care of converting all the data to an array and back, so you don't have to do this cumbersome process yourself.
Below is a (rather far-fetched) example that shows you all the different kinds of properties that are supported.
class TestNotification extends Notification implements AsFilamentNotification
{
    use Queueable, StoresNotificationInDatabase;

    protected array $options;

    protected string $identifier;

    private $private;

    /** Will be stored in the database as null, because untyped & uninitialized properties will never throw a "property not initialized"-exception. */
    public $undefined;

    /** Will not be stored in the database, since it is typed and undefined. */
    public string $undefinedTyped;

    public function __construct(
        protected User $user,
        public string $message,
        array $options,
    ) {
        $this->options = $options;
        $this->identifier = Str::random();
        $this->private = false;
    }

    public static function toFilamentNotification(): FilamentNotification
    {
        //
    }

    public function via($notifiable): array
    {
        return ['database'];
    }
}
#Overriding the storing of notifications in the database
However, if the StoresNotificationInDatabase doesn't work for you, you can always omit the trait and implement the toArray() method yourself. However, doing so also requires that you pass a closure to the constructUsing() method on the FilamentNotification class, that will take the inputs from the toArray() method and return an instantiated notification class using your custom logic:
class TestNotification extends Notification implements AsFilamentNotification
{
    use StoresNotificationInDatabase;

    public function __construct(
        public User $user,
        public string $customMessage,
    ) {}

    public static function toFilamentNotification(): FilamentNotification
    {
        return FilamentNotification::make()
            ->message(fn (self $notification) => $notification->customMessage)
            ->form([
                \Filament\Forms\Components\TextInput::make('message')
                    ->label('Message')
                    ->required(),
                \Filament\Forms\Components\Select::make('user_id_or_something')
                    ->options(User::get()->mapWithKeys(fn(User $user) => [$user->id => $user->name]))
                    ->required()
                    ->label('User'),
            ])
            ->constructUsing(function(array $data) {
                ['custom_message' => $message, 'user_id_or_something' => $userId] = $data;

                return new static(
                    user: User::find($userId),
                    customMessage: $message
                );
            });
    }

    public function toArray(): array
    {
        return [
            'user_id_or_something' => $this->user->id,
            'custom_message' => $this->customMessage,
            // Some internal properties are required to store in the database. They will be provided by this method.
            ...$this->getInternalToArray(),
        ];
    }

    public function via($notifiable): array
    {
        return ['database', 'mail'];
    }

    // Implement a `toMail()` method to match the methods in `via()`...
}
#Displaying notifications to the end-user
By default, the plugin will register a page called "Notifications" as a user menu item.
You can disable this by removing the Notification page class from the filament-notifications.register.pages config.
#Adding a message
Each database notification should be able to be displayed as a string to the end user. In order to achieve this, you should pass a closure or string to the message() method in the toFilamentNotification() method.
This closure accepts a single argument, with the type and signatureself $notification.
public static function toFilamentNotification(): FilamentNotification
{
    return FilamentNotification::make()
        ->form(/** */)
        ->message(function (self $notification) {
            return "{$notification->user->name} said: {$notification->message}.";
        });
}
#Adding a notification description
You can also add a description to the notification. This is displayed below or above the notification message and can be used to display more information.
public static function toFilamentNotification(): FilamentNotification
{
    return FilamentNotification::make()
        ->form(/** */)
        ->message("Account has changed")
        ->description(fn(self $notification) => "The user {$notification->user->name} has changed their account.", descriptionPosition: 'below'); // descriptionPosition is "below" or "above".
}
#Adding an icon
It is nice to add a custom icon for every notification. By default, we are using the heroicon-o-bell-icon, but you can specify your own icon and icon color using the ->icon() method.
Both parameters ($icon and $color) can be both a string and a closure:
return FilamentNotification::make()
    ->form(/** */)
    ->message(/** */)
    ->icon('heroicons-o-check-circle', 'success');
You can disable the icon by passing null to the first parameter, but that will not look very nice.
#Adding actions
You can also specify one or more actions that a user can take for a notification. Each action will be shown in the dropdown at the end of each notification:
return FilamentNotification::make()
    ->form(/** */)
    ->message(/** */)
    ->actions([
        Action::make('View')
            ->url("https://github.com", true)
            ->icon('heroicon-o-arrows-pointing-out'),
    ]);
#Sending on-demand notifications to users
In the UI, it is possible to send on-demand notifications to one or multiple users. This is very useful for situations where you want to notify a user about something manually, so you don't have to create and maintain a notification class for it.
You can also send these on-demand notifications from code. Here is an example:
use RalphJSmit\Filament\Notifications\Notifications\OnDemandNotification;

OnDemandNotification::make('Test')
  ->body('Some nice body')
  ->icon('heroicon-o-information-circle') // You pass any Blade icon-component here.
  ->iconColor('warning')                  // Primary, warning, danger
  ->url('example.com', 'View website')    // Add a url here for a "view" action, optionally with a label.
  ->sendToDatabase($notifiable);          // Can be an Eloquent model or a collection of models.
#Complete example
Below is a complete example of a notification that is stored in the database. This example is also visible in the screenshots above.
<?php

namespace App\Admin\Notifications;

use Filament\Forms\Components\TextInput;
use Filament\Tables\Actions\Action;
use Illuminate\Bus\Queueable;
use Illuminate\Notifications\Messages\MailMessage;
use Illuminate\Notifications\Notification;
use RalphJSmit\Filament\Notifications\Concerns\InteractsWithFilamentNotification;
use RalphJSmit\Filament\Notifications\Concerns\StoresNotificationInDatabase;
use RalphJSmit\Filament\Notifications\Contracts\AsFilamentNotification;
use RalphJSmit\Filament\Notifications\FilamentNotification;

class TestWorkflowFailedNotification extends Notification implements AsFilamentNotification
{
    use Queueable;
    use StoresNotificationInDatabase;

    public function __construct(
        public string $repository,
        public string $branch,
    ) {}

    public static function toFilamentNotification(): FilamentNotification
    {
        return FilamentNotification::make()
            ->form([
                TextInput::make('repository')
                    ->label('Repository')
                    ->required(),
                TextInput::make('branch')
                    ->label('Branch')
                    ->required(),
            ])
            ->message(fn (self $notification) => "Test workflow failed for {$notification->branch}")
            ->description(fn (self $notification) => $notification->repository, 'above')
            ->icon('heroicon-o-x-circle', 'danger')
            ->actions([
                Action::make('View')
                    ->url("https://github.com", true)
                    ->icon('heroicon-o-arrows-pointing-out'),
            ]);
    }

    public function toMail($notifiable): MailMessage
    {
        return ( new MailMessage )
            ->line("Test workflow failed for {$this->branch}")
            ->line('Thank you for using our application!');
    }

    public function via($notifiable): array
    {
        return ['database', 'mail'];
    }
}
#Upgrading from V1 to V2
The Filament Notifications Pro plugin has a V2 version that already has support for Filament V3.
If you want to upgrade to Notifications Pro V2, and therefore Filament V3 support, take the following steps:
- Require
ralphjsmit/laravel-filament-notifications'^2.0'instead of a 1.x version. - For each of the panels that you want to use the Notifications Pro plugin in, please register the plugin like follows:
use RalphJSmit\Filament\Notifications\FilamentNotifications;

$panel
    ->plugin(FilamentNotifications::make())
- If you have extended pages like the
Notificationspage, please check your custom overrides with the new code. TheNotificationshas dropped several methods likegetTableFilters(), which has been replaced by a static functiontable(Table $table): Tableand$table->filters(). - Re-compile your assets using
npm run buildornpm run prodif you are using a custom theme.
#Support
If you have a question, bug or feature request, please e-mail me at support@filamentplugins.com or tag @ralphjsmit on #notifications-pro on the Filament Discord. Love to hear from you!
🙋♂️ Ralph J. Smit
The author
From the same author
SEO
This package is a convenient helper for using the laravel-seo package with Filament Admin and Forms.
Author:
Ralph J. Smit

Components
A collection of handy components that can be used in almost any project, like sidebars, timestamps & more.
Author:
Ralph J. Smit
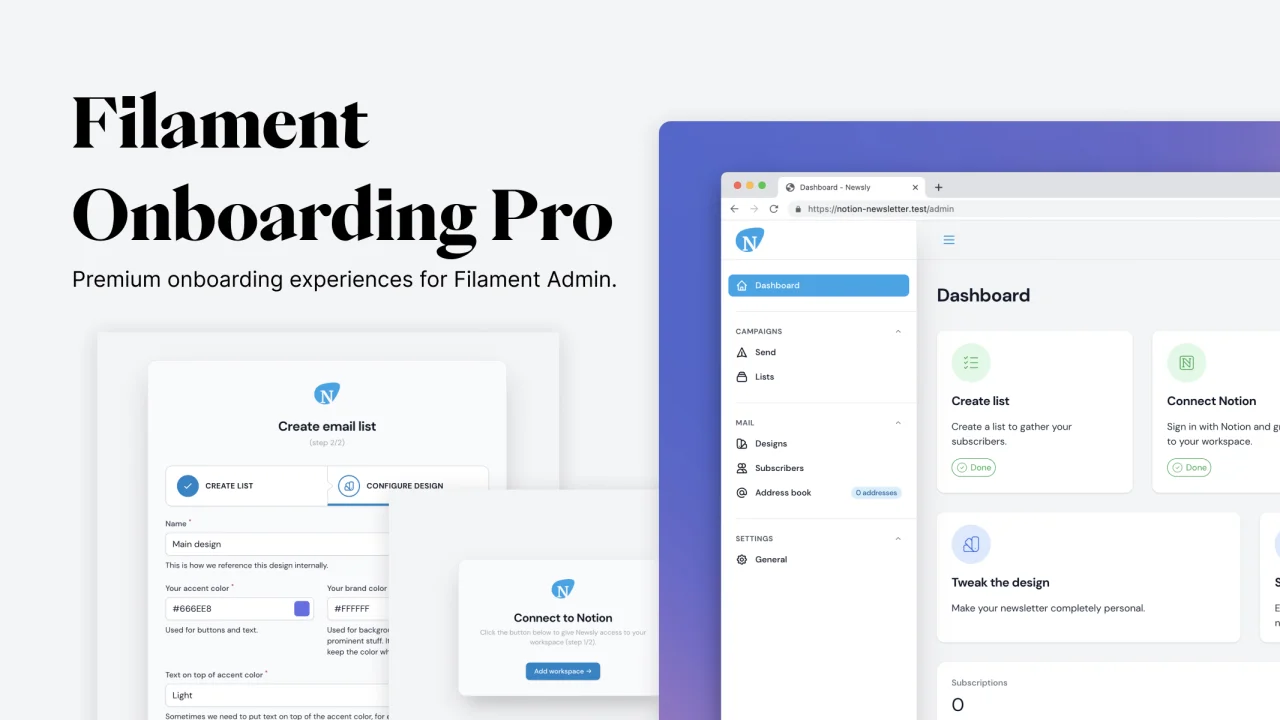
Onboarding Manager Pro
Beautiful onboarding experiences for Filament Admin.
Author:
Ralph J. Smit
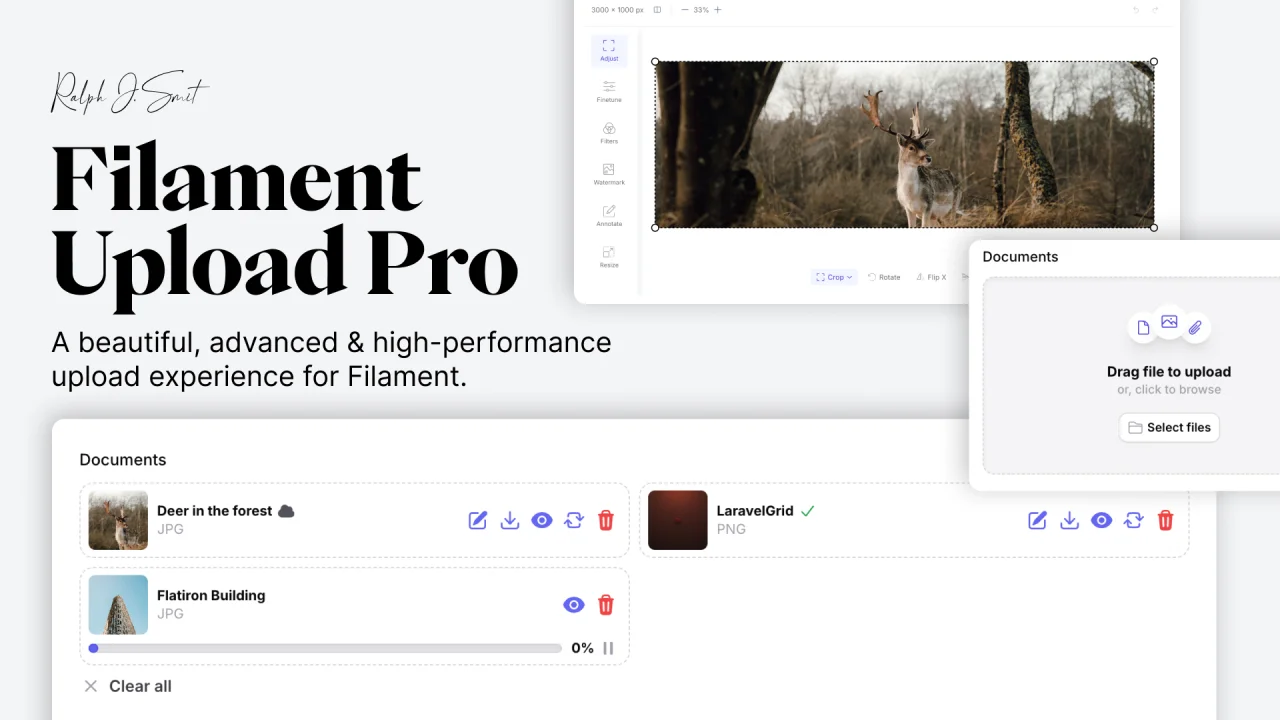
Upload Pro
A beautiful, advanced & high-performance upload experience for Filament.
Author:
Ralph J. Smit
Featured Plugins
A selection of plugins curated by the Filament team
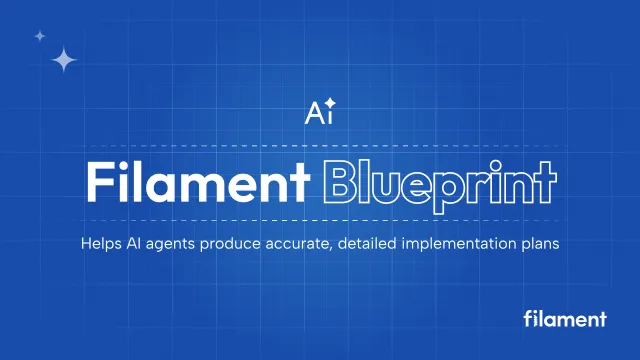
Blueprint
Filament Blueprint is a premium Laravel Boost extension that helps AI agents produce accurate, detailed implementation plans and security reports for Filament apps.
 Filament
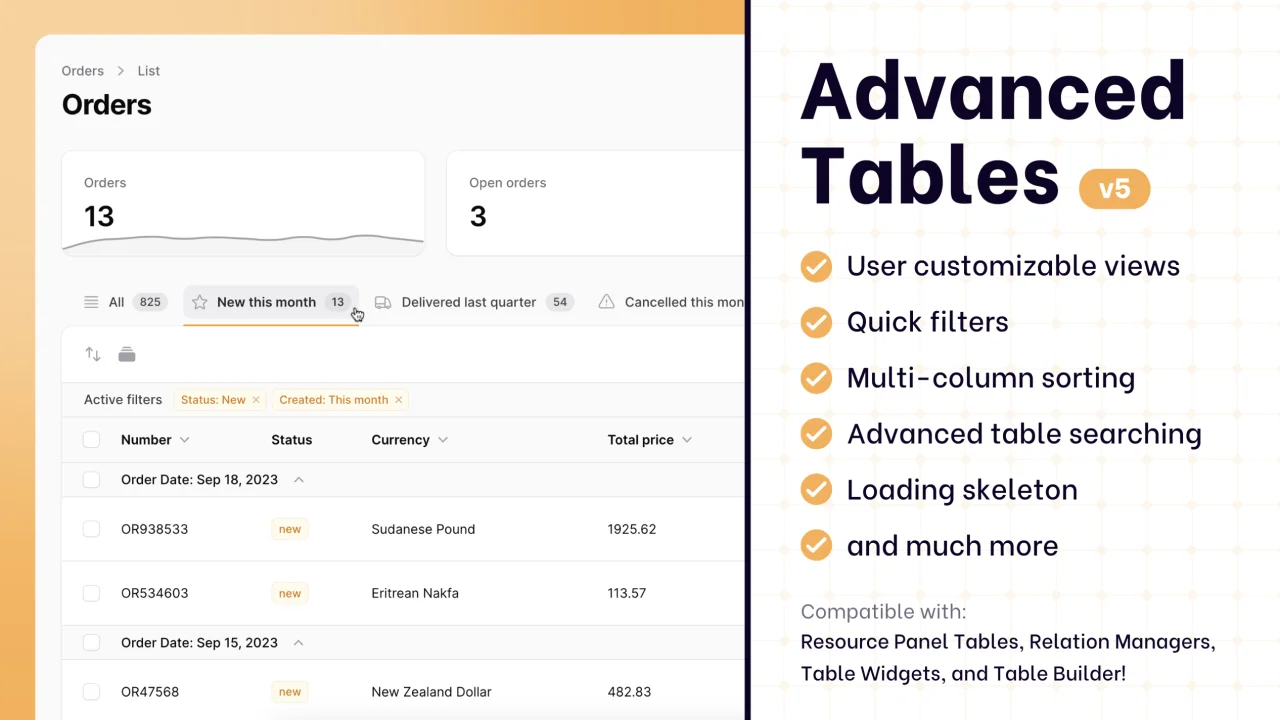
Advanced Tables (formerly Filter Sets)
Supercharge your tables with powerful features like user-customizable views, quick filters, multi-column sorting, advanced table searching, convenient view management, and more. Compatible with Resource Panel Tables, Relation Managers, Table Widgets, and Table Builder!
 Kenneth Sese
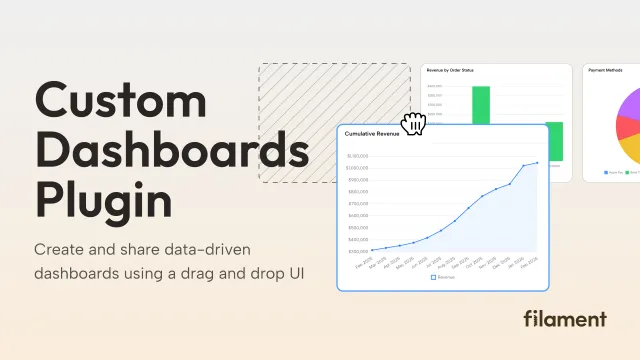
Custom Dashboards
Let your users build and share their own dashboards with a drag-and-drop interface. Define your data sources in PHP and let them do the rest.
Filament