Tutorials
CommunityTool for creating tutorials, walkthroughs and onboarding experiences for your users.
 Author:
Guava
Author:
Guava
Package health
BetaAutomated checks of this plugin's Composer package
13 checks
-
Passed:
Current Laravel version supported
—
Package dependencies resolve together with current Laravel
13.0. - Passed: Current PHP version supported — No PHP constraint declared; package imposes no version restriction.
- Skipped: Current Symfony version supported
- Passed: Abandoned or archived — No consulted source marks the package abandoned (packagist, github).
- Failed: Commit and release recency — Inactive: last commit 674 days ago; last release 674 days ago. View details on Plumb
-
Failed:
composer.lock not committed by library
—
composer.lockis present in the released dist archive. View details on Plumb - Warning: Dist archive is lean
- Failed: GitHub Actions pinned to SHA — View details on Plumb
- Passed: Open security advisories
- Passed: Dependabot PR responsiveness — No open Dependabot PRs.
- Failed: Dependabot or Renovate configured — No dependency updater configuration found. View details on Plumb
- Skipped: Dependency update cooldown configured
- Passed: Provides a security policy
filament/
namespace. Review the source and install at your own risk. Found
malware or an unresolved security issue the author won't
address?
Report it
.
Documentation
- Tutorials
- Not ready for production!
- Showcase
- Support us
- Installation
- Steps
- Actions
- Using multiple tutorials
- Credits

#Tutorials
Tutorials is a complete tool for creating tutorials, walkthroughs and onboarding experiences for your users. It is a simple and easy to use library, which can be integrated into your project with just a few lines of code.
#Not ready for production!
The tutorials plugin is currently in alpha version and thus not production-ready. Use at your own risk.
#Showcase


Video Showcase 1 Video Showcase 2
#Support us
Your support is key to the continual advancement of our plugin. We appreciate every user who has contributed to our journey so far.
While our plugin is available for all to use, if you are utilizing it for commercial purposes and believe it adds significant value to your business, we kindly ask you to consider supporting us through GitHub Sponsors. This sponsorship will assist us in continuous development and maintenance to keep our plugin robust and up-to-date. Any amount you contribute will greatly help towards reaching our goals. Join us in making this plugin even better and driving further innovation.
#Prerequisites
- Laravel 10+
- PHP 8.0+
- Filament 3
- Livewire 3
Filament is currently a prerequisite, but it can be also used outside of the Filament Panels anywhere in your frontend in any livewire component.
Below is all the information you need to get started. We try to follow the Filament conventions as much as possible, so a lot of these steps should be familiar to you already.
#Installation
composer require guava/tutorials
#Add assets to your theme
You will require a custom theme to use this plugin.
In your theme's tailwind.config.js file, add the following to your content array:
export default {
    presets: [preset],
    content: [
        // ...
        './vendor/guava/tutorials/resources/**/*.php',
    ],
}
#Add plugin to your filament dashboard
use Guava\Tutorials\TutorialsPlugin;

$panel->plugins([
    TutorialsPlugin::make(),
    //
])
#Add tutorials to your livewire component (or filament page)
To get started, you need to do the following:
- Implement the
HasTutorialsinterface and use theInteractsWithTutorialstrait. - Implement the
tutorial()function. - Configure your tutorial inside the
tutorial()function. - Mount the tutorial in the
mount()function usingmountTutorial().
Let's say we have a Project Resource that allows us to edit the name and description of the project. And when
creating a project, we want to guide the user through the process using a tutorial. This is how our final create page
class would look like:
use Guava\Tutorials\Concerns\InteractsWithTutorials;
use Guava\Tutorials\Contracts\HasTutorials;
use Guava\Tutorials\Steps\Step;

class CreateProject extends CreateRecord implements HasTutorials
{
    use InteractsWithTutorials;

    public function mount(): void
    {
        parent::mount();

        $this->mountTutorial();
    }

    public function tutorial(Tutorial $tutorial) : Tutorial
    {
        return $tutorial->steps([
            Step::make('name'),
            Step::make('description'),
        ]);
    }
}
That's it! You just created your first tutorial.
Keep in mind that this tutorial will be mounted on each page load. It is up to you to define the logic of when to mount the tutorial.
#Tutorials
A tutorial is a set of Steps that should guide the user through your livewire components (or filament pages).
#Tutorial Lifecycle
You can hook into different parts of a Tutorial`s lifecycle.
#After mount
After a tutorial is mounted, you can call your own code:
$tutorial->steps([
    //
])
->afterMount(
    fn() => // Your code here
)
#After unmount
After a tutorial is unmounted, you can call your own code:
$tutorial->steps([
    //
])
->afterUnmount(
    fn() => // Your code here
)
#After Skipped
If you have skippable tutorials, you can call your own code after a tutorial was skipped:
$tutorial->steps([
    //
])
->afterSkipped(
    fn() => // Your code here
)
#Steps
Each tutorial consists of Steps, where each step represents an action the user can make or a part they should draw their attention to. Such as fill out a form field, click a button or just view a widget.
A step is basically an overlay around your target (form field, action button, ...) with:
- A label positioned in the top-left corner of the step overlay.
- A hint positioned in the top-right corner of the step overlay. By default, hint shows the tutorial progress: current step and the total number of steps.
- A description positioned in the bottom-left corner of the step.
- And actions positioned in the bottom-right corner of the step.
Steps offer plenty of customization options, which we will try to describe below.
#Selector
Every step needs a selector which is used to target an element to render an overlay around.
When a Step is created, it accepts either an instance of Selector or a string selector as a parameter.
When a string selector is passed, by default a FormSelector/FieldSelector (both are the same) is used.
But you are not limited to only targeting form fields, you can also target other elements on the page, such as a Widget or a Action button.
#Form Field Selector
This is the default selector used by a step.
use Guava\Tutorials\Selectors\FormSelector;
use Guava\Tutorials\Selectors\FieldSelector;
use Guava\Tutorials\Selectors\ComponentSelector;

// All variants are the same
Step::make('username');
Step::make(FormSelector::make('username'));
Step::make(FieldSelector::make('username'));
Step::make(ComponentSelector::make('username'));
All variants are the same, use whichever you prefer.
#Widget Selector
Use this selector to target Widgets.
use Guava\Tutorials\Selectors\WidgetSelector;

// Currently only the "index" of the widget is supported
// So first widget = '1', second widget = '2', etc.
Step::make(WidgetSelector::make('1'));
#(Generic) Selector
A generic selector can be used to target elements using a CSS selector, such as:
use \Guava\Tutorials\Selectors\Selector;

Step::make(Selector::make('div'));
Step::make(Selector::make('#my-id'));
Step::make(Selector::make('.my-class'));
Step::make(Selector::make('[data-attribute]'));
#Customizing label
By default the label is hidden. Here's how to set a label:
Step::make('username')
    ->label('Enter a username');
You can also conditionally hide the label using:
Step::make('username')
    ->hiddenLabel(true); // or a closure
#Customizing description
By default the description is hidden. Here's how to set a description:
Step::make('username')
    ->description('Pick an easy-to-remember, unique username');
You can also conditionally hide the description using:
Step::make('username')
    ->hiddenDescription(true); // or a closure
#Customizing hint
By default the hint shows the tutorial's current progress in form of the current step number out of the total number of steps. You can override the step using:
Step::make('username')
    ->hint('Min. 6 characters');
You can also conditionally hide the hint using:
Step::make('username')
    ->hiddenHint(true); // or a closure
#Customizing color
By default, every step uses the primary color from your filament admin panel. You can however customize the color using:
Step::make('username')
    ->color('danger'); // or any other acceptable filament color parameter
#Pass through
By default, a step has an overlay around it, but the user can still interact with the targeted element (form field, action button, ...).
If you want to prevent this, for example in a case where you only want to showcase something to the user without allowing them to interact with the element itself, you can disable event pass through using:
Step::make('username')
    ->passThrough(false);
This way they won't be able to interact with the targetted element.
#Intercepting clicks
Similarly, you might have created a Step for an Action button that you want the user to click on to show what happens.
For example, you might have a button that when clicked, will generate a random username. And as part of the tutorial, you want the user to click the button, trigger it's function (generate the username) but also proceed to the next step.
This is where this feature comes in handy, as the click will also cause the tutorial to proceed to the next step.
You can add it to your step using:
Step::make('username')
    ->interceptClick();
#Customizing actions
By default, the step makes use of all built-in actions.
To override these actions, you can use the following functions:
Step::make('username')
    ->nextStepAction(
        fn(NextStepAction $action) =>  // customize $action here
    )
    ->previousStepAction(
        fn(PreviousStepAction $action) =>  // customize $action here
    )
    ->skipTutorialAction(
        fn(SkipTutorialAction $action) =>  // customize $action here
    )
    ->completeTutorialAction(
        fn(CompleteTutorialAction $action) =>  // customize $action here
    );
You can also pass your own TutorialAction to these methods or pass null to disable the action.
For complete control over the actions rendered for the Step, you can use the actions function and pass an array of actions you want to render:
Step::make('username')
    ->actions([
        PreviousStepAction::make(),
        NextStepAction::make(),
        MyCustomAction::make(),
    ])
#Utility Injection
Almost every function also accepts a Closure as parameter. These closures inject a variety of utilities for you to use, described below.
#Injecting the current record
If you want to access the record from a given Step:
use Illuminate\Database\Eloquent\Model;

function (?Model $record) {
    // ...
}
#Injecting the current step
If you want to access the instance of the Step itself:
use Guava\Tutorials\Steps\Step;

function (Step $step) {
    // ...
}
#Injecting the tutorial
If you want to access the Tutorial instance that the Step belongs to:
use Guava\Tutorials\Tutorial;

function (Tutorial $tutorial) { // or $container
    // ...
}
#Injecting the form component
If your Step targets a Form field, you can inject the form component instance:
use Filament\Forms\Components\Component;

function (Component $component) {
    // ...
}
#Injecting the state of another form field
If your livewire component also contains a Form, you can access any form field's state using the get callback:
use Filament\Forms\Get;

function (Get $get) {
    // ...
}
#Injecting the current Livewire component instance
You can inject the current Livewire component instance using:
use Livewire\Component;

function (Component $livewire) {
    // ...
}
#Actions
You can add multiple actions to a step to perform various tasks.
The plugin comes with a few built-in actions, such as:
- NextStepAction: handles changing to the next step.
- PreviousStepAction: handles changing to the previous step.
- SkipTutorialAction: handles skipping the whole tutorial.
- CompleteTutorialAction: handles completing the tutorial (last step).
Each of these actions are derived from TutorialAction, which you extend to create your own Actions if you'd like.
Actions have all the customization options like regular Filament actions. You can define the color, label, icon or conditionally hide them.
#Using multiple tutorials
By default, the InteractsWithTutorials trait only handles one tutorial per Livewire component - tutorial(). To add
more tutorials to the Livewire component, you can define them in the getTutorials() method, and return an array
containing the name of each tutorial:
protected function getTutorials() : array
{
    return [
        'simpleTutorial',
        'advancedTutorial',
];
}
Each of these tutorials can now be defined within the Livewire component, using a method with the same name:
public function simpleTutorial(Tutorial $tutorial) : Tutorial
{
    $tutorial->steps([
        //
    ]);
}

public function advancedTutorial(Tutorial $tutorial) : Tutorial
{
    $tutorial->steps([
        //
    ]);
}
To mount a specific tutorial, simply pass the name of the tutorial in the mountTutorial(string $name) function, such as:
public function mount(): void
{
    parent::mount();

    $this->mountTutorial('simpleTutorial');
}
Again, it's completely up to you when you mount which tutorial.
#Credits
- Guava
- All Contributors
Our documentation is highly inspired by the awesome Filament Documentation. Partly also because we tried to keep as close to the familiar Filament API as possible and a lot of things work the same.
The author
From the same author

Modal Relation Managers
Allows you to embed relation managers inside filament modals.
Author:
Guava
Icon Picker
Adds an icon picker field and column for your filament panel and form builder.
Author:
Guava
Icons
Install and use any blade icon pack and generate enum classes for any icon sets.
Author:
Guava
Nested Resources
Adds support for nested resources
Author:
Guava
Featured Plugins
A selection of plugins curated by the Filament team
Blueprint
Filament Blueprint is a premium Laravel Boost extension that helps AI agents produce accurate, detailed implementation plans and security reports for Filament apps.
 Filament
Custom Fields
Eliminate custom field migrations forever. Let your users create and manage form fields directly in Filament admin panels with 20+ built-in field types, validation, and zero database changes.
 Relaticle
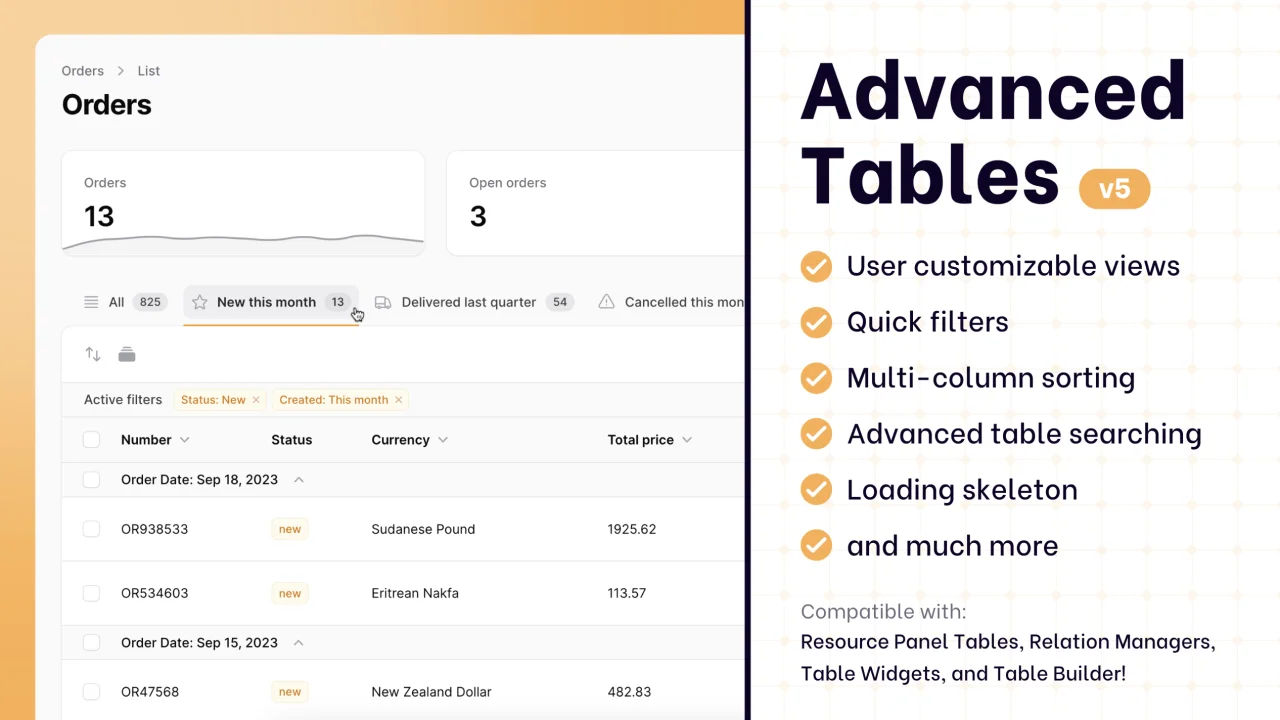
Advanced Tables (formerly Filter Sets)
Supercharge your tables with powerful features like user-customizable views, quick filters, multi-column sorting, advanced table searching, convenient view management, and more. Compatible with Resource Panel Tables, Relation Managers, Table Widgets, and Table Builder!
 Kenneth Sese